Kitchen Remodel, Removing Upper Cabinets for Shelving
Kitchen Remodel, Removing Upper Cabinets for Shelving by Rachel


Hi everyone! We’re Rachel and Dave from Low Country Living. We have spent the last three years renovating a cottage in Alabama and have recently moved to South Carolina only to take on a new (less strenuous) renovation project.
Cassity was sweet enough to invite us to share about our current kitchen remodel.
Before

After

When we moved into the new house we weren’t wild about the kitchen. The cabinet doors had trim on them which caused the hardware to be mounted in an odd location. In addition, we prefer the look of shaker style doors. In our last house, Dave built new cabinets with a friend and we completely overhauled the kitchen. Since I now stay home with our daughter, we don’t have the budget we had with the last house. This forced us to be a little more creative with what we already had. Dave took the trim off and belt-sanded the doors.

He used 3/4″ finishing nails to add 2-1/2″ wide poplar strips (off the shelf at Lowes/HD) to the door faces. Then he put wood filler where the new poplar pieces met the existing door.

He also added poplar pieces of the same thickness to our drawer fronts so they would be the same thickness as the doors. The bin pulls are discontinued Pottery Barn ones that we found for $5 each on Ebay. We will be putting the labels in soon.

We decided to get rid of the upper kitchen cabinets and try something new. As always, we were super slow with the process, so our kitchen ended up looking like this for a while until we saved up the money for the supplies we needed.

To draw the eye upward with vertical lines (and because it’s pretty) we decided to use bead board behind our open shelving area. We (Dave) put wood strips on the walls and screwed them into the studs. That way we could place our brackets where we wanted and screw them into the wood. Otherwise we would be limited to mounting them at the odd stud locations.

We looked around at shelf brackets but didn’t find anything we really liked. It was also hard to find anything under around $6.00 each. I showed Dave a photo of the look I liked and he thought he could re-create it. He made a jig and ended up making our brackets for under $1.50 each. I love this man.
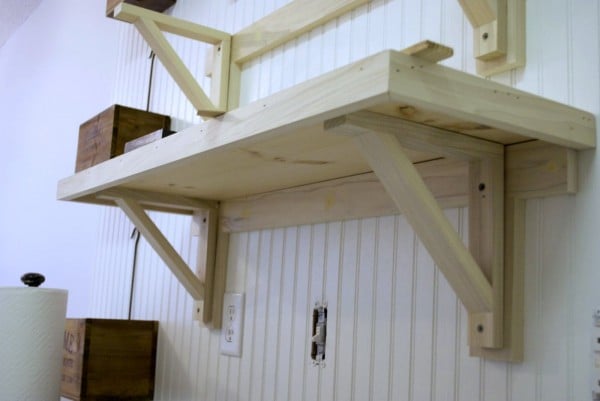
The shelves are 3/4″ thick pine boards. The choices are pretty slim when looking for boards 9+ feet long and 12″ wide, but this worked out well. We bought the select pine, as it has fewer knots. We then applied poplar 1″ x 2″ trim (same material as the brackets) around the perimeter of the shelves to provide the shelves with more presence and help remove some of the cupping of the 12″ wide boards. The wood for all the brackets and shelves ended up being costlier than we thought, but when you consider all the money saved by having no hardware (hinges, knobs/pulls) it’s still more cost effective, not to mention quicker, than building traditional cabinetry.

We added a painted Re-Store Chandelier, some drop cloth curtains, and an old bathroom mirror that Dave framed to the other end of the kitchen.
Before

After


How do you like living without the upper cabinets? I like the look but an unsure if I have the organizational skills to keep it looking neat. We are going to build a house and the plan we are leaning toward has a smaller kitchen than I’d like and if you had no cabinets dictating where you place things, it actually will be more space. Just need to get my ducks in a row to present the case to my husband. He’s much less likely to want to try something different.
Glad you included this in the link party this week so I could discover it! We are in the process of removing our kitchen cabinets and install shelves right now. Long story short we realized there are windows behind our cabinets that the previous owners covered up with the cabinets inside and siding on the outside! A lot of work but it should be a great “Before and After” when er’re done. Thanks for sharing!
Thanks, Ashley!
What did you do about the range hood / vent? I would like to do something similar with my tiny kitchen, but I am not sure what to do about the required venting hardware that used to be fulfilled by the microwave/fan above the stove.
Hi Elise – This was a guest post, so click over to the original blog (linked at the top of the post) and she can help answer your questions! Thanks!
Can you explain how you removed the trim from the cabinet doors without damaging the wood?
Hi Ed,
This post is from a guest a few years back, so if you’ll click over to her site (linked at the top of the post) she can hopefully give you more info there. Thanks!