
DIY Plank Backsplash Using Peel and Stick Vinyl Flooring

Hey, hey Remodelaholic peeps! It’s Jessica from Mom 4 Real, back to share a fun and budget friendly idea for your kitchen! I have seen plank walls everywhere, and absolutely love them! When I started making over my kitchen, I was looking for an inexpensive way to change my backsplash in a hurry. I didn’t want to spend a ton of money, and since eventually we are going to have new countertops put in, I didn’t really want to invest in tile. So, I decided to try a plank wall backsplash. I headed to my favorite home improvement store to buy wood. While taking a shortcut through the flooring section, I noticed that they had vinyl peel an stick faux wood flooring planks for sale for around $1 each. (You can also find similar tiles online at Amazon or Home Depot, you will just have to watch for sales!) My brain immediately went into overdrive! I thought it would be so much easier to use the peel and stick vinyl flooring to create my backsplash instead of regular wood, so I bought a bunch and headed home to give it a try!
This post contains some affiliate links for your convenience. Click here to read our full disclosure policy.

I laid them out on my table to show my husband, and he basically told me I was nuts. That’s pretty normal around here, but he is usually pleased with the end result.

I tested the tackiness on the back and was very pleased! You seriously just peel the wax paper backing off and stick them on the wall…well, erm…that’s where I stuck mine. I guess they really belong on the floor. I’m all about bending the rules when it comes to DIY.

I placed mine in a staggered pattern, and made sure each end was as tight as possible. The great thing is that you have a bit of time to reposition the planks. Just be sure to press them onto the wall really well.

You will have to cut the vinyl to fit around electrical outlets. You will also likely have to cut different lengths once you get to the edge of your wall to be sure they fit well. These things are easily cut with scissors…no tools required!

Once I got all of my planks pressed tightly to the wall, I decided to paint them. I wanted a really cohesive look in my kitchen since it is so tiny.

I grabbed my favorite grey chalky finish paint and gave the wall two thin coats, then finished off with a clear wax.

I love the way it turned out…just a little rustic!
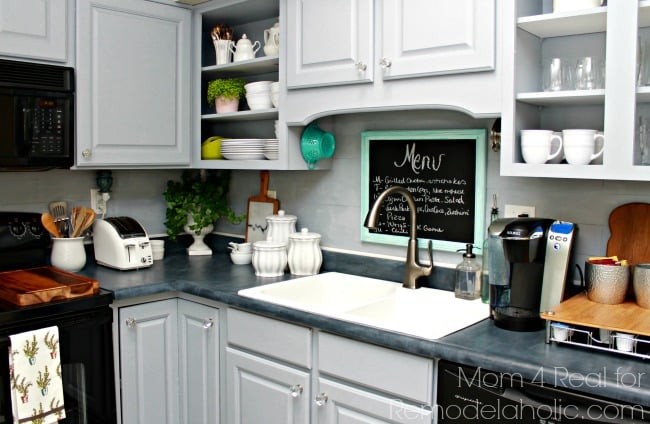
I can’t wait to use these vinyl peel and stick planks other places in my home! They are so easy to use, and ridiculously inexpensive! It cost less than $20 to do the entire backsplash area!
Today over at my blog, Mom 4 Real, I’m sharing a fabulous garden trick…How To Start Seeds In 3 Days…hop on over and check it out!


I just did this to my backsplash and I absolutely love it. I bought the wider planks and had some trouble getting them to stay up so I just nailed them up with a brad nailer… problem solved.
I’m doing the same thing on a wall in the bathroom but my planks are falling off the wall. Did you have this problem? I put up 3 rows this morning and 2 rows have fallen off. I went to the hardware store and they suggested that I rough the wall with sandpaper first. I also bought a strong glue to help. Didn’t expect this project to be so involved. Geez!
I just put up the planks around the back of my tub…I started with just two (for the record, I did mine vertically, but I don’t know if that makes any difference). Although I sanded the wall (freshly painted wall, no grease, no texture), after two days, they were barely adhered. I did some more reading and found a site that recommended using spray adhesive on the wall. So today, I got everything ready. All my boards were the same exact size since I was going vertically; I sprayed my adhesive (3M) and did three planks at a time…spray adhesive, cut boards, place. The spray adhesive is super, super sticky if you wait for it to get tacky as per the instructions, so I was pretty sure I was set. Two and a half hours later, I was done…went downstairs for to have dinner, came back to the bathroom and found — ALL OF THESE STUPID PLANKS BOWING IN THE CENTER!!! I was so aggravated. I finally just used finish nails and nailed them down. Four coats of paint later, I am feeling pretty ambivalent about the whole thing. I know it will look way better once it is trimmed out, but the nails protrude just enough to show; or if you really pound them in, then you wind up with a depression. They didn’t show at all before painting. I was planning on using this idea for backsplash in my kitchen; now I am really glad I did the bathroom first! I am not planning on painting what I put in the kitchen, so hopefully, if I again have to resort the the finish nails, they won’t really show (I am using a gray wood, and the nails are gray…). Anyway, I feel your pain and just keep wondering over and over why it is always soooooooo easy for everyone else, but never for me!! And apparently, you… 🙂
Why did you use the chalky paint?
Can we have some more close up pictures please. Sounds ridiculously easy!
Hi Jessica, I love your peel and stick plank back splash idea! Actually my husband and I were just talking about redoing our back splash and countertops as well. And like you, didn’t want to spend too much on redoing them. I just have one question. How did you finish off the corners? Did you just caulk them?
We put this up in our bathroom, love it! Word of warning, make sure if you have to order like we did that peel and stick is actually that. The product we ordered said peel and stick in the name but it actually wasn’t. We had planned to use additional adhesive however, we ended up using liquid nails as our adhesive. Love it but was more work than we planned on.
Thanks for the tip, Lori!
I love love love the plank back splash. I wonder-my bathroom walls are wallboard. Would I be able to apply the planking OVER the wallboard? It’s outdated and the painted planking would look awesome w/painted cabinets and new fawcet.
I hope this doesn’t sound like a dumb question, but I wonder why you didn’t simply paint the wall rather than adhere flooring to it and then paint that. In the end you have a painted wall rather than a backsplash.
Could you please leave the brand info! All I can find is real wood peel and stick which will cost me hundreds
Styleselections is the brand name, sold at Lowe’s
love your counter top and back splash. We bought a older Mobile home and I was wondering about the same thing just why would this not work as a back slash since there was not one there. I have that green old counter tops so this would be great. So thanks for the idea.
hello! how is this project holding up? thinking of doing it this week in my kitchen!
We were thinking about doing this to our boys’ playroom, it’s 9′ x 10′. But just wondering if we need to put anything on the wall, like a thin board, before we put the planks up to protect the drywall that’s there, if/when we decide to take it down. The drywall is painted. How would you finish the corners that come out and at the door ways that have no trim? Would we need to take the baseboards off?
Sorry, we are so full of questions! We just don’t want to mess it all up either!
We tried this but after a day or two they started to come off. Any idea what type of adhesive I can use now to stick back up?
Liquid nails – a couple dots to each corner will hold them up on a wall. It’s less messy than heavy duty spray adhesive.
Where did you buy your vinyl planks so cheap? No where around here has them that cheap. I have not found them on line that cheap either, even on sale. I keep looking.
Lowe’s sells planks as low as 98 cents a square foot, which works out to about $1.30 per plank. If they don’t have them in the store, you can get them on line…You can also pay a bit more for a name brand. I purchased some Shaw planks — mostly because I liked the color better — from Amazon for about $30/box (10 planks).
Update on my job…It has been three months since I put the peel and stick vinyl “wood” on the wall around my bathtub…this is a tub that is seldom used, so there has been no issue with water or dampness… with that said, I am ready to pull all of them off and just go with real wood that can be nailed to the wall. I am so glad I didn’t spend very much money on this project; however, there is no getting away from the intensive amount of time I put into it! I am so disappointed. I think that every plank has pulled away from the wall…everything appeared to stick in the beginning, and my husband even reinforced them with finish nails. Nevertheless, all of the planks are now bowing and pulling away from the wall. This was definitely a Pinterest fail!
Home depot or Lowes. I did a storage room floor and paid .99 cents a plank.
Tried this and some peeled off the wall within an hour!
Jessica – can we please have a follow-up? How is the projec holding up? Thanks in advance.
Curious as to if I could stick these on top of wallpaper? Wanting to plank my wallpapered bathroom with something like this! Think it would work well?
I used Stick-N-Stay (Lowes #346879) to glue tile look sheet vinyl flooring (Lowes #644870) above my shower enclosure. Looks just like tile and much more waterproof. Glue seems to hold anything to the wall and would likely hold vinyl flooring tiles. (Helps to make sure your walls are square on the inside corners if you use material with a pattern, as I did.)
Would this be something that can be done in a rental home and removed at move out?
Theoretically these tiles are probably removable but I wouldn’t chance it on a rental :/
How have these held up?