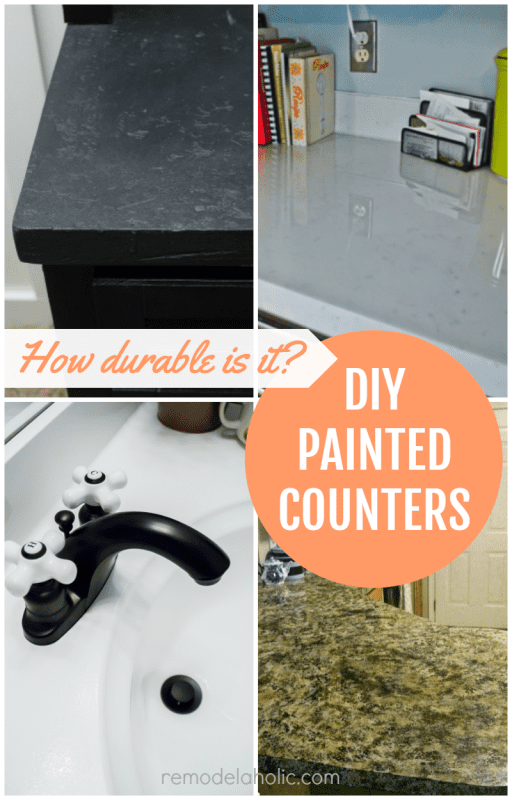
Read this post if you’re curious about DIY kitchen cabinet refinishing or how painted cabinets hold up. We share how to refinish your cabinets yourself, including reviews for painted cabinets, cabinet painting kits, milk paint and chalk paint for cabinets, and restained cabinets.
Over the years, we’ve redone and featured a LOT of kitchens and baths — and many of those kitchen have featured refinished or painted cabinets. And for good reason! Painting cabinets is a relatively inexpensive way to make a biiiig change to your kitchen or bathroom.
But, one of the most common questions we get is “How are they holding up?” Painting cabinetry isn’t a simple “snap and it’s done” type of DIY job, so it’s worth doing the research before you pick up your paint roller, to ensure that your hard work will be worth it!
So today, we’re saving you some Googling — we’ve gathered up painted cabinet reviews from some of our favorite bloggers and from some readers like you to help you see, all in one place, how painted cabinets have held up for others.
We asked our reviewers
how they painted their cabinets (because there are as many methods as there are paintbrush types!),
how they would rate the durability of their cabinets,
if they had any problems (chipping, peeling, etc) and
tips that they would give to someone wanting to paint their cabinets.
We’ve broken the cabinet refinishing reviews into 4 sections today:
“I’m thrilled with how well they’ve held up. I had two tiny spots on cabinet doors near the handles that I had to retouch after a bit of the paint was scraped off by a fingernail. I think I did a poor job of prepping/sanding those parts because it hasn’t happened anywhere else and those were the first doors I worked on, before I really had my technique down. The great thing is how easy they are to retouch. Just lightly sand, dab on a light touch of primer, then a tiny bit of paint. The self-leveling paint leaves no edges or marks. (I’m attaching a closeup of one of those spots so you can see how nicely they touch up!)
I’ve had to clean multiple places where my blender exploded, the kids missed the trash can scraping their plates, and smudgy fingerprints landed, and everything wipes right off, usually with just a damp paper towel. On one mess, I had to attack it with a scrubby dish sponge, and the finish on the paint held up perfectly.”
YES, Meredith would “definitely recommend this technique again. It’s not a quick and easy process, but it looks beautiful and will stand the test of time. Totally worth the effort!”
And Meredith rates it as a 5+ for durability and wear (Amazing. I expect this to last for many years.).
Meredith’s tips: Read 13 things she learned while painting her cabinets here.
Tamara’s Enamel Painted Bathroom Vanity
Tamara from Provident Home Design painted her bathroom vanity over a year ago. She cleaned and used deglosser on her cabinets, and then painted with a quality enamel paint — full details here.
“It’s been over a year and it’s held up wonderfully! It’s in a kid’s bathroom so it gets a lot of abuse but we’ve had absolutely no problems with it!”
Tamara says “YES, again and again!” that she would use again and recommend this. “I would definitely use and recommend this paint for painting cabinetry because it is rock hard and in most cases doesn’t require sanding or a primer (just a deglosser). In fact, I recently used it to paint the railing going down to the basement espresso. I know it will hold up to lots of use and the semi-gloss sheen gives it a professionally lacquered look!”
She rates the durability as a 5 (Amazing. I expect this to last for many years).
Tamara’s tips: Use a foam roller and foam brush for a flawless application. Let the paint dry/cure about 7 days before putting the knobs back on. Once it is dry it is hard as a rock!
Christy’s Enamel Painted Kitchen Cabinets
Christy from Confessions of a Serial DIYer painted her kitchen cabinets over a year ago; she cleaned, sanded, primed, and then painted with an enamel finish paint — full details here.
“I am extremely pleased with how they have held up. We had one drawer that gets abused daily that was just starting to show a tiny bit of wear near the handle, but it took me mere minutes to touch it up. Other than that one area, my cabinets have held up fantastically!”
YES, Christy would do this again, “Absolutely! My kitchen still looks as fresh and new as it did over a year ago,” and she rates it as a 5 (Amazing. I expect this to last for many years).
Christy’s tips: If you are taking on a project like this and want beautiful, long lasting results, don’t take short cuts. Take the time to prep properly! You’ll be glad you did.
“My white cabinets are still white 2 years later – and I have a five-year-old. The key is great paint and an amazing poly. There have spills, paint, stain and everything else you can think of and they have cleaned right up.”
YES, she would do it again, and she rates the finish as a 5 (Amazing. I expect this to last for many years.)
Jill’s tips: Take your time and buy quality products. The products make or break the project.
PS: Check out the gorgeous color that Jill painted the interior of her cabinets! See her full kitchen reveal here.
Nina’s Painted Oak Cabinets
Nina from Everyday Enchantingn painted her oak kitchen cabinets nearly 2 years ago; she and her husband filled in the grain with Drydex, primed with Kilz, and then painted (using a sprayer) with Insl-X Cabinet Coat — full step-by-step details here (including a free e-book!) “We took our time with the project, but I have been in touch with blog readers and friends who used our process and did the project in one-two weeks (depending on kitchen size).”
“They have held up better than I would have ever expected! It has been two years since we began painting and I am still incredibly pleased with the results from our process. We have recently had a tiny bit of chipping on one water damaged and rotted cabinet door (from under the kitchen sink). We had opted to try to fix that door rather than replace it, which didn’t work out. Otherwise they look as fresh as the day we painted!”
YES, Nina says, “I would definitely do it again, yes! It was a lot of work, but I truly feel as though we saved a lot of money and achieved a designer kitchen look on a tight budget. A neighbor who was friends with the previous homeowners thought we had the cabinets replaced! She was blown away that they were the same cabinets that had been there for almost 30 years.”
Nina rates the durability of her painted cabinets as “Definitely a 5 (Amazing)! Other than the one spot I mentioned with the water damage they are holding up wonderfully, even though we opted not to use a topcoat.”
Nina’s tips: Don’t skip the sanding, caulking, or grain filling! It’s by far the most frequent question I receive, because I know those steps are a bit daunting. However, I truly believe filling the grain gave us the professional results that we are so happy with today!
Corey’s Painted Cabinets: No Shortcuts, Only Results
Corey from Sawdust 2 Stitches refinished her cabinets about 3 years ago. Her process (full details here):
wood grain filler
sand
caulk edges
primer
fine grit sand
primer
fine grit sand
paint
fine grit sand
final topcoat
YES, Corey would do this again, and she rates her cabinets as a 5 (Amazing. I expect this to last for many years.)
Corey’s tips: Use a good quality paint! I found that if you are using a paintbrush/roller the cabinet foam rollers work well. I caulked my edges (paneled cabinet doors) and it doesn’t collect dirt and crud in the crack.
Allie’s White Refinished Cabinets
Allie from the blog Scott and Allie Buy A House redid her cabinets about 2 years ago:
“We painted inside and outside of the cabinets as well as the doors. We used Benjamin Moore Advance paint in their stock white color. We sanded, deglossed, wood filled and painted. We used Benjamin Moore’s Fresh Start Enamel Underbody as our primer. We did one coat of primer and two coats of paint.”
YES, she would do this again, and she rates it as a 5 (Amazing. I expect this to last for many years.)
Allie’s tips: Take your time!!! Cabinet painting is easy, but make sure you wait the recommended time between coats for drying. Also, wait a few days before re-installing your cabinets to allow them to cure. Nothing is more frustrating than messing up all your hard work because you couldn’t wait to get the cabinet doors back up!
Crystal’s Spray Painted Kitchen Cabinets
Crystal from MyBlissfulSpace redid her cabinets about a year ago, and she went big and used a paint sprayer!
“After putting dropcloth down and taping (ALL OVER THE KITCHEN), my husband used a Wagner paint sprayer to apply Clark & Kensington semi-gloss paint from Ace Hardware (they had a BOGO promotion at the time). We did cream on top and chocolate brown on bottom. The doors were painted outside, the cabinet bases obviously inside. Then we spray-painted the hardware with Rustoleum oil-rubbed bronze paint.
This was a lot of work but for a home that we’re not planning to stay in many more years, it was an affordable solution to cruddy looking cabinets. As with any DIY we made mistakes that we learned from and there are things we wouldn’t do again. I can’t say that I wouldn’t paint cabinets again, though. They look great and I think especially on better quality (cleaner) wood cabinets, it would hold up even better.”
YES, she would do it again, and she rates it as a 4 (Great. It has lasted well and longer than I had anticipated.)
Crystal’s tips: First, don’t attempt to do a really dark color on cabinets. Sherwin Williams told me they couldn’t mix their Pro-Enamel paint darker than a grey/greige shade because the amount of pigment required (to do the chocolate color I wanted) would throw off the consistency. I wish I’d have listened. Though I like the two tone and the colors I chose, and the dark brown hides the drips and dirt that’s more likely on lower cabinets, the dark paint a) took forever to dry to the point of not being tacky and b) has more little chips and dings than the cream. It still looks good overall, but I think there definitely was a consistency difference. (Note: We wound up getting semi-gloss at Ace because of a sale. The paint was really good for the price, and despite being a huge SW fan, I would probably buy CK again.)
Second, my husband insisted on spraying the bases though most pros I’d read about brush them. It did create a smoother finish and was “faster”, however, it required taping and putting drop-cloth all over the kitchen, and even then we didn’t cover well enough and had overspray on the floors and walls/door. That “saved time” cost us in clean-up, and the door still isn’t cleaned off.
We have old, cheap wood cabinets. Painting did a world of wonders, but the insides needed it as well and there was years of grease and grime apparently within that wood. The paint has not held up well where we are putting in and pulling out pans and stoneware all the time. We’d have been better off lining with shelf liner.
The hardware fix was a fairly easy one for the cost. Hardware is pricey. We replaced the hinges with oil-rubbed bronze but painted the pulls. The ones that we use often are wearing away a little bit, but overall it’s holding up well considering what we paid to do it. If you want a longer-term solution you may want to just purchase the pulls you want.
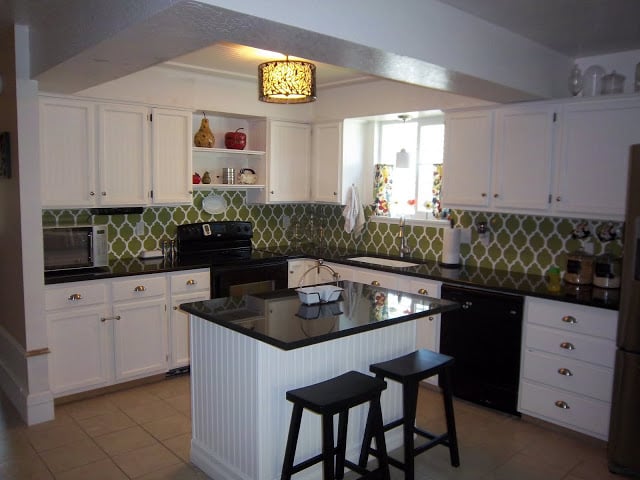
“The lower cabinets a medium gray called Amazon Stone and the top cabinets and walls a creamy white called Eloquent White.
Additionally we tore out a cabinet in the adjacent butler’s pantry, can be seen to the right of the refrigerator, that didn’t work for us. We customized the area with a modified dining room hutch that we purchased at a thrift store for $125. I blogged about it and if you are interested you can find that post here.”
YES, Nan would do it again, and she rates the finish as a 5 (Amazing. I expect this to last for many years.)
Nan’s tips: Prepping is key to a good and lasting finish.
Carol’s Refinished Kitchen Cabinets
Reader Carol refinished her kitchen cabinets about 12 years ago — TWELVE!
“This is in our cottage and the upper cabinets are all a beautiful pine to match the logs; but the lower cabinets were a dark laminate that had to go. I first used sand paper to scruff them up. I removed the cabinets and drawer and hardware and worked on the floor with plastic coverings everywhere. I used a very good primer. I put one or two coats of BM latex paint in a mustard/brown color. Then I painted two coats of the BM latex green paint on top. After it was thoroughly dried, I sanded in various places to let the other color of paint show through. Then I put two coats of a polyurethane over all. I did both the front and back side of doors and drawers. The painted cabinets were done 12 years ago and there aren’t any chips or real worn spots anywhere! They have held up unbelievably great.”
Carol says she would MAYBE use this method again, but she rates the cabinets as a 5 (Amazing. I expect this to last for many years).
Carol’s tips: I bought the best paint, primer and polyurethane we could afford. I’m very partial towards Benjamin Moore. I would do everything as I did and take your time. The only thing I noticed afterwards was where I wanted the worn out spots and areas to be, the polyurethane finish didn’t make it look as real as I would have liked. If you skipped the first color of paint and just painted with one color only, it would probably be better.
Lauren’s DIY Refaced Kitchen Cabinets
Reader Lauren painted her cabinets about a year ago and did the refacing herself to replace the doors, too. (She also painted her countertops, so watch for that coming up later in the week!)
“I have always wanted a white kitchen, so the first thing we did before even moving furniture into the house was to makeover the kitchen. I wanted to replace the doors with modern slab style doors, so we got MDF cut to size for every cabinet door and primed and painted them. The corner door for the lazy susan was a pain, and it’s still a teensy bit crooked, but I’m just glad we managed to pull it off. We also got all new hardware.
The cabinet boxes we kept but I also painted them which involved cleaning with TSP, sanding, and tacking. I painted two coats of primer and one or two coats of paint – I can’t remember. I used Sherwin Williams Premium Wall and Wood Primer, and their plain white semi-gloss paint. I sanded and tacked between each coat of paint as well.
So far the cabinets have held up great and are easy to clean. I don’t find that the white gets any more dirty looking than oak cabinets I have had before, and in fact gives me more incentive to clean (in a good way).”
YES, she would do this again, and she rates the cabinets as a 5 (Amazing. I expect this to last for many years.)
Lauren’s tips: Prep is key! Do as the professionals recommend and clean and sand, clean and sand. It is so important and really helps the finish to be strong and smooth. You will go through a ton of tack cloth and sanding blocks but it is worth it! Also, don’t skimp on the coats–and it’s usually easier (and cheaper) to do multiple coats of primer and 1-2 coats of actual paint.
LeeAnn’s Gray Painted Kitchen Cabinets
Reader LeeAnn recently painted her kitchen cabinets, and she is so pleased with the results!
“We removed all the doors and hardware. Lightly sanded all the wood. Painted, 2 coats, with Benjamin Moore Days End. Replaced all the cabinet hardware with pulls from Home Depot (economy packs). Also removed the previous old tile backsplash, replaced with drywall and painted with Benjamin Moore Cottonwood. The open shelves were made from 1 10×12. The 50s table was sanded and refinished and legs painted. The metal chairs are from Target. The old wood bifold doors; we removed the wood panels and replaced with metal sheeting to give it a pie cabinet look and painted to match. The total cost for everything was under $800. I have to give credit to Designing Dawn for the inspiration. We have nearly the same kitchen space and I copied her design! I was terrified to paint the cabinets since there were new 3 years ago when we moved in but the result is amazing and we’re very happy with the updated change!”
YES, she would do it again and she rates it as a 5 (Amazing. I expect this to last for many years.)
LeeAnn’s tips: TAKE YOUR TIME!! We spent a week just on the bifold door and another 2 weeks painting the cabinets and shelves plus another week on the table. If budget is an issue, do your homework. We made the open shelving/brackets for a total of about $50. The cabinet pulls were a economy pack from Home Depot, total $60 for 22 (we have a couple left over too). The chairs are from Target online and with coupons was $105 for all 3. Always use quality, durable paint; we used Benjamin Moore.
Erin’s Two Tone Painted Cabinets
Reader Erin redid her kitchen cabinets over 8 years ago (eight!), and it’s lasted her well!
The steps Erin followed:
Wash with TSP Alternative
Wipe with liquid de glosser.
Prime with Zinser B-I-N shellac based primer tinted dark. (oak)
Paint Behr latex, almost black.
Brushes and rollers…..no sprayer.
Add beadboard to all ends of cabinets, cover 1980’s ceramic tiles with bead board too.
“This has survived two boys and numerous dogs, never used special treatment after painting. Wear at sink and two cabinets (pictured) which house dishes and glasses , I could add to the distress and it would work.”
YES, Erin would do this again and she rates it a 4 (Great. It has lasted well and longer than I had anticipated.)
Erin’s tips: Do the prep work throughly. Remove all doors and hardware. Use a flat surface for doors. Use blue painters tape on inside of cabinets to produce a clean paint line. The base board (pictured) at the breakfast bar has been abused, with boys and dogs I mop often. I did this project over 8 years ago. I would let the paint cure then cover with a satin urethane on the base boards. We are prepping to expand the kitchen now, the stove wall will be pushed back by three feet. The cabinets wil be reconfigured. I will distress the edges and change the hard wear. We are so pleased with the original results that we will continue to use them in the new kitchen.
Holly’s DIY Painted Two-Tone Cabinetry
Reader Holly painted her kitchen cabinets about a year ago.
“I sanded down all surfaces with a power sander. I also used a deglosser in corners and areas that were harder to reach with the sander. I then painted with Valspar semi gloss latex paint, two coats of the gray and 4 of the white. I did not use a sealer. The finish has help up well, however I have had some small areas of peeling when I’ve had to scrub really sticky messes. I have the paint on hand so touch ups are an easy fix.”
YES, she would use this method to redo her cabinets again, and she rates it as a 3 (Good. It did the job.)
Holly’s tips: Make sure to sand all areas well. My cabinets have held up well, however I have noticed that if I really scrub them the paint does come up in corners and areas that I was not able to reach with the power sander. I would also recommend using a sealer and sanding in between coats of paint to avoid brush marks.
Julie’s Primed and Painted Kitchen Cabinets
Reader Julie repainted her cabinets over 5 years ago:
“I sanded the cabinets, primed with Kilz, then painted them white. I did not use a top coat and probably should have. This was my first attempt at refinishing something. I didn’t know about using a roller to minimize the brush strokes. I wish I would have done that. I also wish I had put on a top coat. I wonder if they would have worn better. The corners where the hardware is chipped after a year or so and the cabinet under the sink chipped badly, maybe from cleaning it more frequently than the others. All in all I would do it again. They were hideous, dark, 70’s cabinets and painting them made me much happier with my home.”
YES, Julie would do it again, but she’d only rate it as a 2 (Poor. It didn’t last, had problems, etc.)
Julie’s tips: Use a top coat.
JC’s “Don’t Skip The Prep”Cabinets
Reader JC’s painted cabinets have held up well for 5+ years! The process: “Clean, sand, liquid sand, two coats primer, then 2+coats of paint. Unfortunately I think the secret is the prep. The part that is sooooo no fun!”
YES, JC would do it again and rates it as a 4 (Great. It has lasted well and longer than I had anticipated.)
JC’s tips: Roller helped for smooth finish. Paint may dry in a couple days but if you can let doors “cure” for two weeks there will be fewer chips especially if it is at all humid in your house. Also paint now seems to dry a lot faster so if I did this again I would use the additive that prolongs the time it take for the paint to dry. Never had this problem 10-15 years ago. Thinking about painting current cabinets for the second time.
“Our kitchen cabinets have held up really well to cleaning; any dirt of grime has come off with just using lysol wipes. The absolute only wear we’ve encountered is a bit around some of the most used cabinet knobs.”
YES, Tamara says, “I would still use and recommend this product because other than the wear around some of the knobs (that I can easily touch up) I love how the cabinets look and feel. They don’t have a ‘painted cabinet’ look. They look like they have always been white. In fact when an acquaintance (who had previously tried to talk me out of painting my cherry cabinets white) saw them she thought I had bought new white cabinetry not painted them!”
Tamara rates the kit as a 4 (Great) — “I would give it a 5 if it wasn’t for the wear around the knobs.”
Tamara’s tips: A tip to prevent the wear around the knobs can be found here.
“Our cabinets have held up great. I wipe them down a every week to get off any dirt and dust but hasn’t caused them to fade or chip. My biggest concern was the island where many feet kick it, but so far no chipping or peeling.” See more here.
YES, Andrea would “definitely use this kit again. Only, I would choose a darker finish from the start this way I wouldn’t need to use the glaze. Also, I would roll on instead of brushing. I like the effect the brush strokes and glaze gave the cabinets, but if I ever want to change the color of the cabinets, I would have to sand down the strokes to give them a smooth finish. I would recommend the kit to a friend because you can skip the sanding.”
Andrea rates the cabinet durability and wear as a 4 (Great). “Being that the cabinets are painted, I was expecting much more wear. They look just as good now as the day they were painted.”
“I was off for the Thanksgiving holiday with no travel or cooking plans. So I thought I would repaint my kitchen cabinets. Cabinet transformations had me at “no sanding required”. I bought the kit and one kit did my entire kitchen (it’s not big). I took off all the cabinet doors and labeled the doors and the openings with numbers written on paint tape (as suggested). Then I set up an area in my garage with saw horses and to put the doors on. I was only able to do a few doors at a time so this was a slow process. Then I used the cleaning solution, primer coat, base coat, antiqued and finally the clear coat. While the doors dried I went inside and did the cabinet frames. So there wasn’t a lot of downtime.
I won’t lie, this was not an easy process even without the sanding. It isn’t for the faint of heart! I also had some cabinet hinges that were brass that just weren’t attractive. Unfortunately I couldn’t find a replacement anywhere. So I got creative and spray painted them black, then sponged a layer of copper and finished them with a sponge of black. This matched the new handles I put on and I was very happy with the result. They have held up really well. There is one cupboard that has a few scratches from fingernails, but I figured when it gets bad enough I’ll redo it. Right now it’s not really noticeable.”
YES, Tami would use this kit again, and she rates it as a 5 (Amazing. I expect this to last for many years.)
Tami’s tips: Allow yourself plenty of time. Don’t rush the cleaning process. This is important to get any grease and grime off. If you scrimp here your paint will not last. If you choose to antique your cabinets go light. If you get too heavy the look will be dirt not antique. I have used chalk paint on my bathroom cabinets and I love this process….also no sanding and you can finish it with either paste wax or varnish depending on the look you want. I painted before replacing the countertops. If you have tile and plan on replacing it I would suggest demolition first. It’s quite messy and ours involved sledge hammers! LOL
More painted cabinets from readers
We also asked our Facebook followers about their experiences with cabinet painting kits — read all about it here, and feel free to join the conversation!
“They have held up PERFECTLY! I am amazed. This photo was taken over a year after we finished painting them.”
Tasha says YES, she would do it again and recommend this to a friend: “Absolutely! It’s a cost effective way to completely update a kitchen on a budget, and it is holding up to a ton of wear and tear in our busy household! Plus, it’s a doable project for busy families since you don’t have to sand or prime first!” She rates the durability as 5 (Amazing. I expect this to last for many years.)
Tasha’s tips: Read more in her step-by-step post here.
Heather’s Chalk Painted Bathroom Vanity
Heather from The Heathered Nest painted her bathroom vanity about a year ago with “chalk paint baby! No prep, just did it on the fly. Made a big difference for a little investment of time, and not a big investment of money, either.”
YES, Heather would do it again, and she rates it as a 4 (Great. It has lasted well and longer than I had anticipated.)
Heather’s tips: Definitely clean the surface well. I didn’t, because I’m lazy and like instant gratification. If you want the finish to last, do some prep.
Jessica’s DIY Chalk Painted Cabinets
Jessica from Mommy Envy refinished her kitchen cabinets about a year ago, using her own chalk paint recipe. She also antiqued the lower cabinets with a stain.
YES she’d do this again and she rates it as a 4 (Great. It has lasted well and longer than I had anticipated.)
Jessica’s tips: Make sure you’ve cleared your schedule for the weekend and be ready to work. Plan to eat out because your kitchen will be out of commission.
“The cabinets have only been painted for 6 months but no marks or scratches have happened yet. I have used the Decoart paint on many projects and I have always had great results. Holds up very well.”
YES, she would use this method again and recommend it to a friend; she rates the durability as a 5 (Amazing. I expect this to last for many years).
We didn’t originally plan to also cover gel stained or waxed cabinets, but since we received the info from our great readers, we figured we may as well share! If you have an experience you’d like to share, comment below or contact us.
Mel’s Gel Stained Bathroom Cabinets
Reader Mel redid her cabinets about a year ago, using the “as seen on Pinterest” Java Gel stain by General Finishes. “Tutorials for this are all over the web. 3 coats applied with a sock, allowed to dry for 12 hours between coats, and sealed with the same company’s sealer. We are hard on stuff. I use over-the-door hooks to hold towels and pot holders, and they slide all along the top edge of the cabinet doors. The finish has not come off.”
YES, Mel would do this again, and she rates it as a 5 (Amazing. I expect this to last for many years.)
Mel’s tips: Low humidity, lots of ventilation. And it wouldn’t hurt to watch a marathon of your favorite show. This is tedious work.
Marty’s Wax Refinished Wood Kitchen Cabinets
Marty from A Stroll Thru Life refinished her kitchen cabinets over 5 years ago, and she’s still happy with them! She used a dark wax to darken the color of the existing cabinets.
“I cleaned the cabinets really well with soap and water, then simply applied a dark stain wax. I buffed them to a soft sheen. The wax darkened the cabinets about 2 shades to a beautiful medium wood tone. They turned out looking fabulous with so much more character than the really pale color before. A little wax, new hardware and a thrifted piece of granite totally changed my kitchen.”
YES she’d do this again, and she rates it as a 5 (Amazing. I expect this to last for many years.)
Marty’s tips: If you have oak or any type of wood with a really strong grain, test how it looks on the inside of your door first. You may not like how the grain looks once the stain is applied.
We painted our light oak cabinets white. Biggest regret–We used an oil based paint, thimking it would be toughe and more durable. Then, about six months later, we noticed that “white-white” wasn’t so white any more! They were turning slightly yellowish. A DIY friend told us that oil ALWAYS begins to turn yellowish! Wished we had known and had used a water based, enamel paint. We DID carefully sand doors, drawers, and cabinet frames meticulously. Then used a sprayer (2-3 coats). Cabinet frames were painted with a brush and/or roller. Over all, the paint held up great and we are getting ready to repaint cabinets in our new house….but with WATER based paint this time!
I painted my cabinets bright lemon yellow, all by hand with a brush over the ucky “whitewashed” look that was popular 30 years ago. I wanted that old, country kitchen look with the cabinets looking like they had been painted many times over the years (hence using the brush) and got exactly the look I wanted. I only lightly sanded with one of those spongy sanders, and used a nice water-based high gloss for easy clean-up. We tried removing a door, painting it, and replacing it, but it didn’t sit right after that so I used an artist’s brush around the hardware. Paint has held up well and messes wipe right off.
Hello, I had white cabinets that needed light touch up so I meant to just touch up the dings and ended up fanning out and painting larger sections that I wanted….got over zealous.
When the light doesn’t hit them, they look good, but when the light hits them you could see paint marks that look and feel rougher than the professionally finished sections.
So I bought 600 to 800 grit finishing sandpaper and lightly sanded it. I can’t tell if it made things worse, it’s smoother but it kinds looked like it scuffed it more too. Then I applied (per the cabinet manufacturer recommendation) Deft satin brush on lacquer to try and blend the flat look into the more satin finished areas, they look ok but is there any way to buff out the rougher/scuffed looking areas?
Please help, I’m worried I ruined my nice cabinets. Thanks!
Stephanie — will you message us over on Facebook with your question and if possible a couple of photos? I don’t have particular expertise here but I bet our readers there do! https://www.facebook.com/Remodelaholic
I wish you would have included a couple chalk painted technics. As my husband and I are planning to do our kitchen cabinets that way. Would have loved seeing how it has held up for anyone who went that route.
I can not tell you how helpful this post has been!! I have been going back and forth about what method to use to paint our kitchen cabinets and then I found this post! I feel much more confident now making a choice! Thank you for doing the legwork to seek out the results of these different painting methods! It has been invaluable!


We painted our light oak cabinets white. Biggest regret–We used an oil based paint, thimking it would be toughe and more durable. Then, about six months later, we noticed that “white-white” wasn’t so white any more! They were turning slightly yellowish. A DIY friend told us that oil ALWAYS begins to turn yellowish! Wished we had known and had used a water based, enamel paint. We DID carefully sand doors, drawers, and cabinet frames meticulously. Then used a sprayer (2-3 coats). Cabinet frames were painted with a brush and/or roller. Over all, the paint held up great and we are getting ready to repaint cabinets in our new house….but with WATER based paint this time!
Thank you for sharing, Gail — and good luck with your repainting!
Thank you for sharing our kitchen. It was a pleasant surprise. 🙂
Thank you, Nan! Have a great day!
I painted my cabinets bright lemon yellow, all by hand with a brush over the ucky “whitewashed” look that was popular 30 years ago. I wanted that old, country kitchen look with the cabinets looking like they had been painted many times over the years (hence using the brush) and got exactly the look I wanted. I only lightly sanded with one of those spongy sanders, and used a nice water-based high gloss for easy clean-up. We tried removing a door, painting it, and replacing it, but it didn’t sit right after that so I used an artist’s brush around the hardware. Paint has held up well and messes wipe right off.
Thanks for sharing your experience, Lisa!
Hello, I had white cabinets that needed light touch up so I meant to just touch up the dings and ended up fanning out and painting larger sections that I wanted….got over zealous.
When the light doesn’t hit them, they look good, but when the light hits them you could see paint marks that look and feel rougher than the professionally finished sections.
So I bought 600 to 800 grit finishing sandpaper and lightly sanded it. I can’t tell if it made things worse, it’s smoother but it kinds looked like it scuffed it more too. Then I applied (per the cabinet manufacturer recommendation) Deft satin brush on lacquer to try and blend the flat look into the more satin finished areas, they look ok but is there any way to buff out the rougher/scuffed looking areas?
Please help, I’m worried I ruined my nice cabinets. Thanks!
Stephanie
Stephanie — will you message us over on Facebook with your question and if possible a couple of photos? I don’t have particular expertise here but I bet our readers there do! https://www.facebook.com/Remodelaholic
A kitchen remodel definitely seems like a lot of work but the results seem worth it.
I wish you would have included a couple chalk painted technics. As my husband and I are planning to do our kitchen cabinets that way. Would have loved seeing how it has held up for anyone who went that route.
I can not tell you how helpful this post has been!! I have been going back and forth about what method to use to paint our kitchen cabinets and then I found this post! I feel much more confident now making a choice! Thank you for doing the legwork to seek out the results of these different painting methods! It has been invaluable!
You’re welcome, Virginia! Thanks for the kind words.