Get organized! See our favorites in the shop

Remodelaholic

DIY tutorials, Woodworking plans and more.

FREE BONUS: Kitchen Organization Boot Camp
  • Home
  • About Us
    • About US
    • Contributors
    • Facebook
    • Pinterest
    • YouTube
    • Instagram
    • Disclosure and Advertising
    • Contact Us
  • Shop
  • Project Ideas
    • Our Houses
      • Birch House (current projects)
      • Canyon House
      • Park House
      • Downing House
      • Logan House
    • DIY Project Plans
    • All projects
    • Barn Door Baby Gate
    • Dutch Door
    • Framing A Wall Mounted TV
    • Indoor Playhouse
    • Beach Themed Living Room Design
    • Chicken Coop Building!
    • Computer Desk
    • Computer Desk Plans
    • Custom Newel Posts and Stair Remodel
    • Family Room Sneak Peek
    • Headboard Tutorial
    • Living Room Progress
    • Mood Boards
    • Scrabbled Family Names
    • Pets
  • Design By Room
    • Bathrooms
    • Landscape
    • Kids Bedrooms
    • Kitchen
    • Living Rooms
    • Laundry Rooms
    • Master Bedrooms
    • Mood Boards
    • Office
  • Holiday
    • Christmas
    • Halloween
    • Patriotic
    • Easter
    • Fall
    • Saint Patrick’s Day
    • Thanksgiving
    • Spring
    • Valentines Day
    • Winter
  • Crafts
    • Printable
    • Art
    • Paper Crafts
    • Kids
    • Fabric Crafts
    • Decorate
  • Recipes
    • Appetizers
    • Beef
    • Beverages
    • Breakfast
    • Chicken
    • Desserts
    • Dinner
    • Fruit
    • Healthy
    • Holiday
    • Lunch
    • Main Dishes
    • Salads
    • Sandwiches
    • Sauces
    • Seafood
    • Side Dishes
    • Soup
    • Vegetables
  • Videos

DIY Stump Side Table

Written by Sarah Milne

  • Facebook
  • Twitter


Hello there! Sarah from The Created Home here, and I am excited to share this diy stump side table with you! Do you like DIYs that save you a ton of money and allow you to have that really cool piece of furniture for a fraction of the cost of the in-store version? Of course, if you want to get something for almost nothing you are going to have to put in some sweat equity, right?

How to make your own DIY stump side table and save hundreds of dollars

Get ready to sweat. And by that I mean sand. Because I’m going to show you how to make your own stump side table that will bring an awesome element of natural beauty into your home.

DIY Stump Table

This post contains affiliate links for your convenience. Learn more and read our full disclosure policy here. 

Here’s what you will need to make a stump table:

  • A dry stump
  • sandpaper in various grits
  • *wire brush drill attachment
  • *chisel
  • varnish
  • orbital sander
  • belt sander
  • dust mask
  • varnish
  • patience

*For stumps with crevices only

Step 1:

Ideally, you’ll want a stump that has had some dry time. The rule of thumb for working with fresh cut lumber is to give it 1 year per inch of thickness. So a stump takes a while. While you may not give it 14 years, the dryer it is, the better.

Stump Table (1)

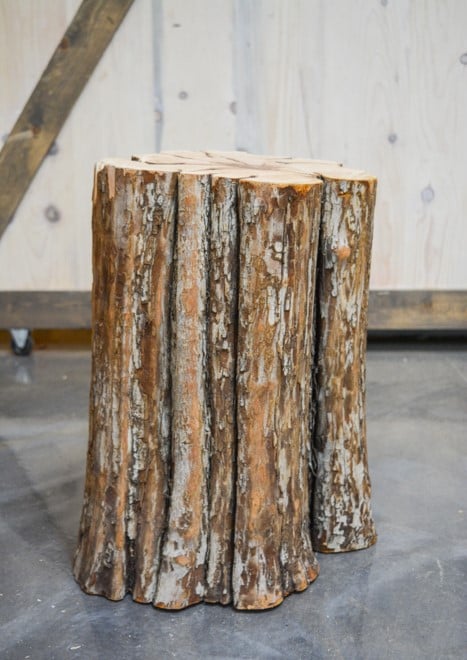
I spotted this stump a year ago in my father’s workshop. He’s an arborist by trade, so this was from a tree he had cut down. He saved it only because my brother thought it looked so interesting that he should do something with it. I’m not sure how long it had been sitting by that point. I love the curvy uniqueness of this stump, and that the segmentation means more air can get into the stump so drying time decreases. In case you are wondering, the wood is hawthorn, and it’s hard as a rock when it dries. It’s also devilishly hard to sand, which is something to take into account if you decide to do something like sand it.

Step 2:

Start removing material. Get the bark off. Actually, Step 2 is where you will live for most of this project. I started by using a wire brush drill attachment to get into the grooves of the wood. This photo is after the initial wire brushing. Obviously if your piece doesn’t have deep grooves you are in the clear on this one. Lucky you.

Stump Table (5)

Then sand. And sand. And sand. Different varieties of wood will respond differently to sanding. It could be that your stump cleans up nicely and you’ll be done in no time. Or you might have one that requires a lot more work. My preference is to take off as much of the bark as possible, since bark loosens as it dries.

Stump Table (9)

While the bark came off easy, the cambium layer underneath was another story entirely. Since parts of it came off I made the (unwise?) decision to try to remove most of it.

Stump Table (11)

Again, if you have deep grooves in your piece you’ll need to work on those a bit more. I found it very useful to chisel out the inside of those grooves to remove the bark.

Stump Table (12)

Step 3:

Level the stump. Hopefully your stump was cut relatively level. To finish it off you may need to use a belt sander. We leveled ours with a chainsaw, and follow up with the belt sander, then the orbital sander.

Stump Table (14)

Step 4:

Finish. I used Enduro by General Finishes to seal the stump after sanding it up to 220 grit. I can’t say there was a whole lot of reasoning behind the varnish decision except that I had it on hand and I really like General Finishes products. I like how it turned out!

Stump Table (6)

Step 5:

Bring a little piece of the outdoors in and enjoy!

DSC 2857

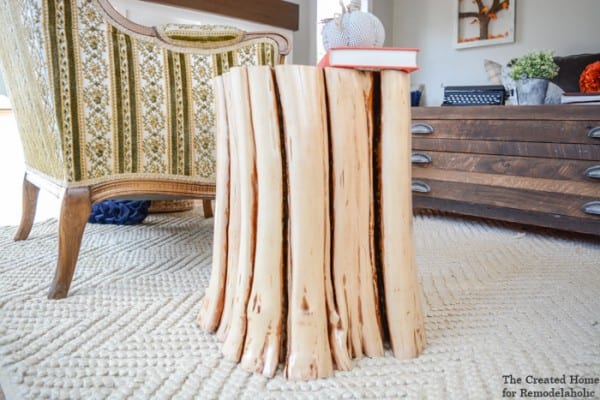
I love how the curve of the base makes it look like it is growing out of the floor.


diy stump side table

And it’s a great spot to sit and read a book now!

diy stump table

If you have an questions please do not hesitate to ask. Thanks for reading!


More easy DIY side tables:

Easy $15 side table

Moroccan style hexagon end table

build your own hexagon Moroccan side table, Remodelaholic

Rustic square side table

DIY Simple Square Bedside Table Plans - Rogue Engineer

  • Facebook
  • Twitter
Remodelaholic is a participant in the Amazon Services LLC Associates Program, an affiliate advertising program designed to provide a means for sites to earn advertising fees by advertising and linking to amazon.com. Please see our full disclosure here.

Published: December 20, 2017Filed Under: Remodel Inspiration By Room Tagged: end tables, Side Table, stumps, Wood

About Sarah Milne


free email bonus

Kitchen Organization Boot Camp

Is your kitchen a zen paradise? It can be. I'll show you how.

Previous Post
Art Printable: Winter Wonderland Ski Poster
Next Post
Holiday Cranberry Bread

Comments

  1. Sharon Warren says

    December 21, 2017 at 11:41 am

    Absolutely love this! However at 70 years old, I don’t think I want to wait 14 years! The use of organic elements in a room make it interesting, connected to nature, and artistically appealing. Great job on your table. It was so worth all the effort. Thanks for sharing.

    Reply

Leave a Reply Cancel reply

We love hearing from fellow Remodelaholics, so let us know what you like about this and leave any questions below in the comments. If you have followed a tutorial or been inspired by something you have seen here, we would love to see pictures! Submit pictures here or by messaging us over on Facebook.
Recipe Rating


Hey there, I am Cassity! Nice to virtually meet you!

This blog is about DIY at its finest. We are obsessed with it and so are you, so while we're working and have nothing to show you of our own projects we show off yours. So submit your projects! More About Us…

Categories

  • Facebook
  • Instagram
  • Pinterest
  • RSS
  • Twitter
  • YouTube

Meet The Team

Privacy Policy

Remodelaholic is a participant in the Amazon Services LLC Associates Program, an affiliate advertising program designed to provide a means for sites to earn advertising fees by advertising and linking to amazon.com. Please see our full disclosure here.

© 2005-2016 Remodelaholic LLC, All Rights Reserved

  • Facebook
  • Instagram
  • Pinterest
  • RSS
  • Twitter
  • YouTube

Copyright © 2021 · Remodelaholic

  • Pinterest
  • Facebook
  • Twitter