A pendant light is a quick project to add some character and needed lighting to any corner of any room. Our guest today took an old drum shade and turned it into this fun wood shim pendant light:
Hey y’all! My name is Chaney and I blog over at May Richer Fuller Be. I’m so glad to be here today to share one of my DIY projects: a wood shim pendant light!
Before I get started, let me tell you a little bit about myself. May Richer Fuller Be is my little blog where I share bits about my life and loves – big and small. I dabble in graphic and interior design, and would rather DIY something than buy it. I’m a genetic counselor by day, and a blogger by nights and weekends. I started May Richer Fuller Be as a creative outlet to share all the projects that were constantly popping into my head and so that my husband wouldn’t have to listen to me chatter away about my next creative endeavor :). In addition to being a wife to a wonderful man, I’m also “mom” to a silly lhasa apso/poodle mix named Jackson. You’ll see him pop up from time to time on the blog. He likes to make guest appearances.
Now onto the project of the day – the wood shim pendant light! This project is really simple and you don’t any electrical skills to make it work, I promise.
The dining area in our tiny apartment is basically just a small section of wall between the living room and hallway to the bedroom, so I wanted to put a pendant light over the table to give it a little more definition and provide some light in that area. Since we’re renters, I didn’t want to spend a fortune on a temporary light, so I came up with this solution. Here’s how I did it.
Supplies needed:
Drum shade
2 packages of wood shims (amount will vary depending on how large your drum shade is)
S-hook, a small corner brace and screw to hang it (check your ceiling material to see what kind of screws and/or anchors you need)
Cord clips
Step one: Gather your supplies.
I used an old drum shade I already had that I got on clearance from Target. I removed the turquoise bands on the top and bottom so I’d have a plain white shade to work with for the project. If you don’t have an old drum shade to use for this project, I’d check your local thrift stores first for a cheap (and likely ugly, ha!) one since you’ll be covering the outside completely.
My HEMMA pendant light kit came from IKEA ($5) and I picked up two packages of wood shims from Lowe’s for $4 each. In total, this project only cost me about $15 in new supplies. Hooray for budget-friendly lights! If you had to purchase everything for this project, it would probably cost $20 max with a thrifty drum shade.
Step 2: Plug in your hot glue gun and get gluing!
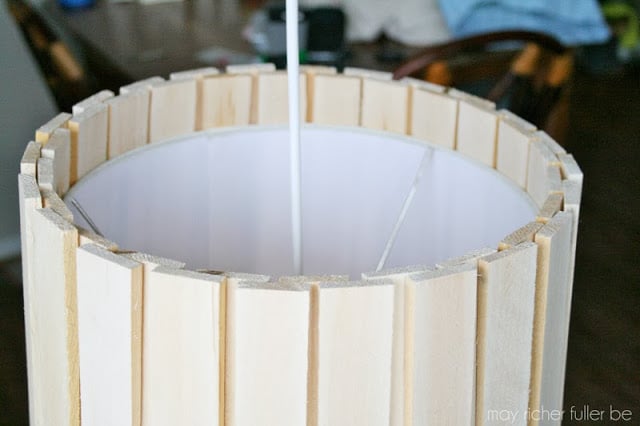
Wood shims are really lightweight, so you just need a couple of dabs of hot glue on the top and bottom of the shade to secure them. One thing to note about wood shims if you’ve never worked with them before is that they are tapered (one end is thicker than the other), so pay attention to the orientation as you’re gluing them on so that they’re all the same.
Since my drum shade was tapered as well, with a wider opening on the bottom, one layer of shims wasn’t going to provide the coverage or look I wanted. I staggered two layers of shims to completely cover it. I left a small gap in-between the first layer of shims, so once you finish gluing it will look like this:
(It’s upside down in this photo, just FYI!)
When you glue down the second layer, make sure to cover the gap between shims in the first layer. This isn’t only functional – it provides a cool overlapping effect and adds some dimension to your pendant light.
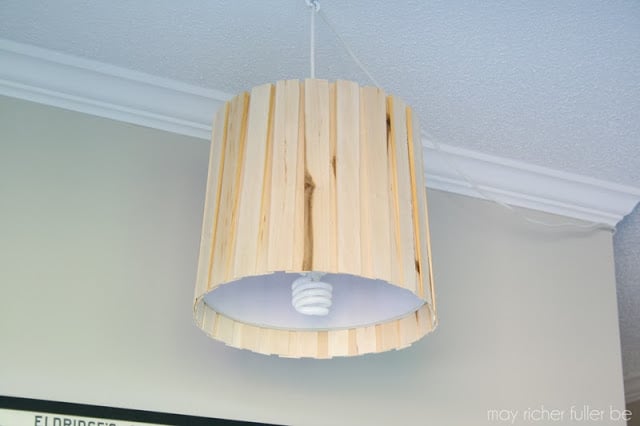
By the end of all your gluing, your finished pendant light will look like this! I’ll tell you how I attached the light kit in the next step.
Step 3: Attach shade to the pendant light kit/cord set.
My cord set is of the plug-in variety. I chose this option because I live in a rental and I can’t install permanent overhead fixtures (yay renting!). If you can install an overhead light, I’d say do it! That way, you won’t have a pesky cord to hide once you get it rigged up. You might need any electrician to do that for you – I would :).
Since I used a drum shade with a slip UNO fitter (if you’re going, “huh?” at that term, take a look at this article) as my base, attaching it to the cord kit was pretty simple. I just put the socket end of the kit down on one side of the slip UNO fitter and screwed in the bulb from the opposite side of the fitter to secure the cord kit to the shade. The kit from IKEA is pretty self-explanatory – just read the directions if your drum shade is different from mine.
Step 4: Install pendant light.
This step could be really easy or a bit more challenging, depending on what your ceiling material. Mine was concrete, so I had quite a time installing a hook in the ceiling with a hammer drill and Tapcon screws. Hopefully your ceilings are made of something that’s a little bit easier to drill into! All that to say, I screwed a small, 1″ corner brace (like this) into the ceiling and attached an S-hook to it. I threaded the cord through it and pinched it tight so it would hold the cord in place once I figured out the correct height.
In terms of height, the recommendation is often to hang a fixture above a dining room table 28″ to 32″, but I’d say use your judgment. Mine is about 36″ above the tabletop, which was what looked best in our small apartment since it didn’t mess up any sight lines.
To make the cord less visible, I swagged it over to the wall, then ran it along the ceiling, down the corner of the wall, along the baseboard and plugged it in. The HEMMA cord is plenty long for that, which is nice! To keep it in place, I used tiny cord clips that I had left over from another project. Command also makes them if you need to purchase some.
Here’s how our dining room looked before without the light:
And now with the pendant light all hung up:
I’m really happy with how this turned out. It really makes our dining space feel like a dining space – if you know what I mean, and the light is completely unique! And since there was no hardwiring involved, my landlord will be happy as well when we move out!
—————————————————
Thanks for sharing with us, Chaney! What a simple way to define a space — and yay for keeping a landlord happy, too!
Visit Chaney at May Richer Fuller Be to see more of her fabulous ideas and DIYs.
I love it! Ingenious! Can you just imagine all the colors the wood could be? Well…of course you
can. 😀 Wouldn’t these be great on a big country porch. Yep. I love it.


I love it! Ingenious! Can you just imagine all the colors the wood could be? Well…of course you
can. 😀 Wouldn’t these be great on a big country porch. Yep. I love it.
JaG