How to Create Faux Reclaimed Wood Countertops

Achieve the rustic charm of reclaimed wood countertops without the cost or hassle with this easy DIY guide which uses new wood and some creative staining to create the farmhouse wood countertops of your dreams.
If you like this post you’ll also want to check out this popular Painted Faux Marble Countertop Tutorial, plus 15 Budget-Friendly Countertop Options and 10 Great Options for DIY Kitchen Countertops.

Some of the biggest expenses in a kitchen remodel are countertops and cabinets. So what’s a budget-savvy Remodelaholic to do? Paint the cabinets and DIY the countertops, of course! Today’s guest has a fabulous tutorial to show you how to create beautiful *faux* reclaimed wood countertops, using new wood. Don’t they look great in her farmhouse style kitchen?
Buckle up and take a ride with Alyson (remember her camping tent bed tutorial?) to learn how to create your own faux reclaimed wood countertops.
Hi all, I’m Alyson. I am so excited to be a guest on Remodelaholic! When I originally found this blog, I knew I had found my place. I am definitely a remodel-aholic, decor-aholic, and paint-aholic…which you can read all about, over at my blog The Ragged Wren. I have been a faux painter for almost 14 years now (gosh that makes me feel old).
I love my job….and as style, and design changes, I keep changing right along along with it. Not so much conforming, but creating new, and better ideas. It’s an addiction really, which can get expensive…really expensive (just ask my husband). So to keep things budget friendly, we do the work ourselves. Luckily my husband is quite handy, so we make a really good team!
We bought our current home almost 2 years ago (it’s still not finished of course…my work is never done). The kitchen was the space I was most excited about. I paint so many people’s kitchens and cabinets on a day-to-day basis, that I knew exactly what I wanted in my kitchen. I knew I could turn this ugly, builder-grade kitchen into my dream kitchen.
With pressing schedules at work for both of us, it wasn’t even addressed for 8 months after we moved in. It’s a terrible feeling walking into a ugly kitchen, knowing you have the ability to fix it, and no time.
So we finally made time to start our remodel just after Christmas in 2012, when we both had off.
I had this big plan, for black leathered granite counter tops for the island, and a beautiful white and grey granite for the other counters. After getting my first quote, we realized it was way out of our budget…and I wasn’t going to give in on quality for cost!
So I decide we would have to make them ourselves. First we looked at using real reclaimed wood. I found some gorgeous planks, that had been torn off of an old barn. They were wide and had such great character. Then, I found out you had to “plane” them 1-2 times to get them to a usable state…which would take all the character away. So we decided it wasn’t worth the money.

Looking for another option? See how this DIYer used old wood doors to create her gorgeous wood countertops.
We realized our only option was to start with “new” wood, and make it look “old”.
I didn’t want these to look like butcher block countertops, so we played around with several sizes, and types of woods. We finally decided on Poplar – it’s affordable and available (though if you’re looking for a harder wood and willing to pay more for hardwood tops, you could use white oak, black walnut, or red oak for beautiful wood tops, just with a higher cost per square foot).
To do a trial run, we focused on the island counter, and vent hood. They seemed like things that would still work in the overall kitchen design, even if we decided to scrap the other wood counters and go with granite. These rustic wood countertops could also be used to make a reclaimed wood tabletop.
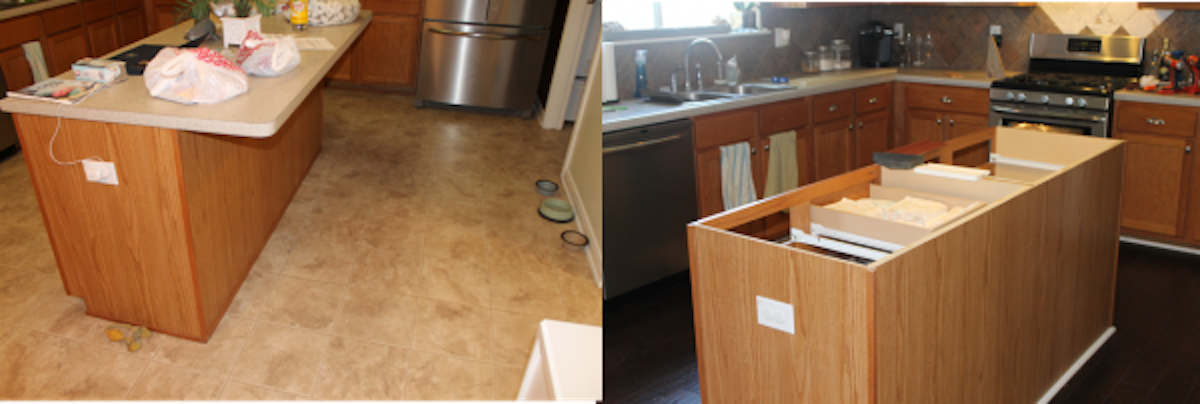
Kitchen Before and After
Here’s where the kitchen started when we moved in:


I know…blahh! For the record…not my faux painting job on the walls 🙂
And here is what it looks like after these DIY reclaimed wood countertops and a few other DIYs:

The counters here, really make the kitchen. They play such a big part in the farmhouse feel of the kitchen, that we couldn’t have gotten from granite.
You can also see the whole kitchen remodel over at my blog.
Step-by-Step DIY Faux Reclaimed Wood Countertops
Materials Needed for Faux Reclaimed Wood Countertops
Wood and Base
- Poplar boards in desired widths (e.g., 6″ and 8″)
- Pine edging (1 1/4″ thick)
- Plywood for base
- Pine trim for decorative molding (optional)
- Wood posts for legs (optional)
Fasteners and Hardware
- Screws
- Wood putty
- “L” brackets
- Nails
Tools
- Saw (for cutting wood)
- Sander
- Drill
- Screwdriver
- Foam brush
- Palm sander
Finishing Materials
- Stain (e.g., Summer Oak by Rust-oleum, Dark Walnut by Minwax, Sun Bleached by Rust-oleum)
- Paint thinner
- Waterlox sealer (medium sheen)
Optional Distressing Tools
- Chicken wire basket
- Large garage hook or screw with heavy thread
Step 1: Remove Old Countertops & Install New Plywood Base
To start, we took off the laminate counters. Only a couple of screws hold it on from the underneath, so no biggie there.
Next we installed a plywood base. This is the spot to make changes to your existing layout/footprint, if you have the room. We extended the island out an additional 4″ from it’s starting point. We also added decorative molding, and legs, to give it more of a furniture feel, and add to the stability.
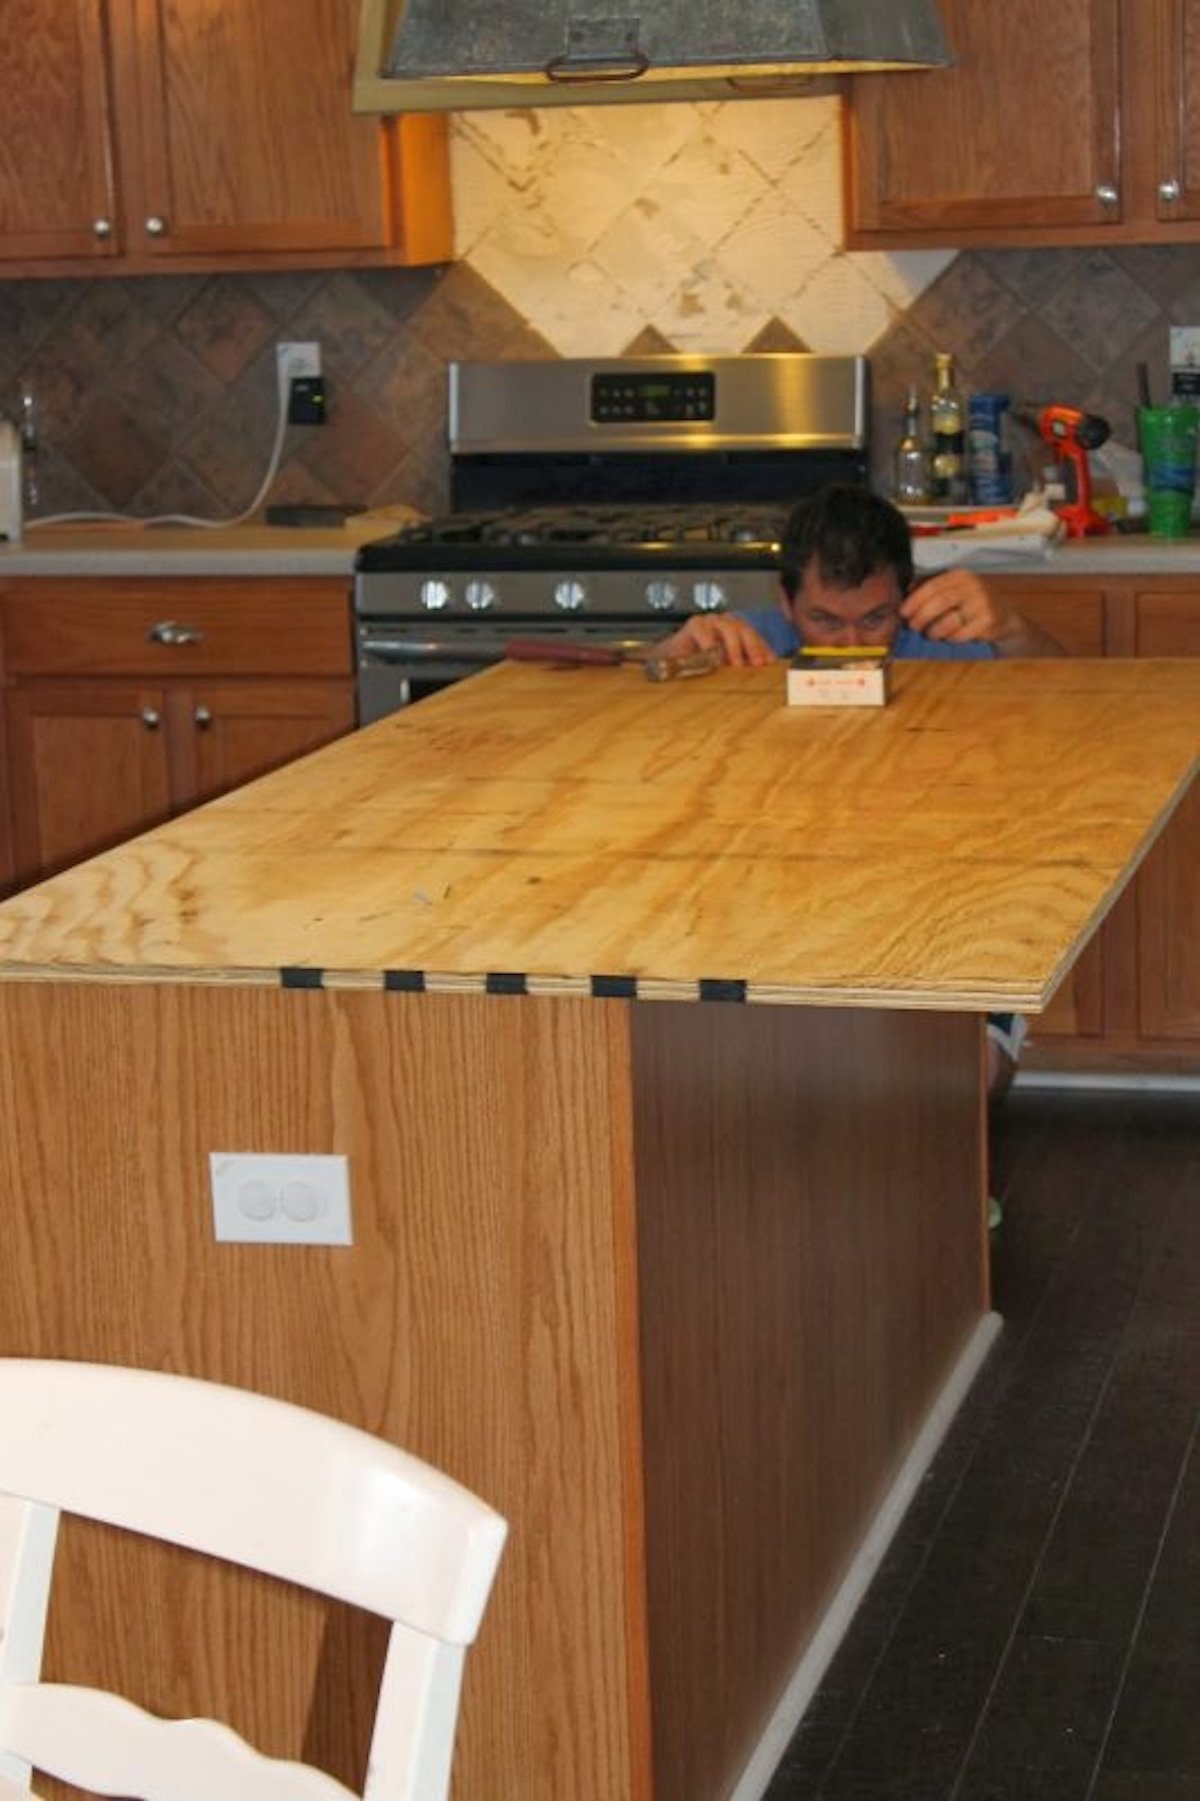
The plywood was screwed directly into the cabinet base, and 4 “L” brackets were used underneath the overhang. Adding several nails, helped hold it in place, for installation.

Step 2: Install New Wood Planks
For the the top layer of visible wood planks, we used Poplar. Pine is already a yellow colored wood, so stain makes it even yellower. Poplar tends to have a green tint to it, but a stain with a red tint to it can counteract this. Poplar is also considered a soft wood, but one of the harder ones. Pine would have shown too many dents. The poplar will show a little bit over time, but that just adds to the character.
We chose 2 widths of planks (so it didn’t take on a perfect, butcher block look), at 6″ and 8″ wide. We took the easy way out, by having the guys at Lowes cut our wood for us to exact specifications… cheating I know, but a major time savor. Mapping out the sizes, and placements was key here. You’ll also want to pay attention to the grain pattern.
The first thing we attached was a 1 1/4″ thick piece of Pine trim to each edge of the plywood. These long strips, when finished, will give the appearance of the wood being thicker than it really is. We mitered the edges, leveled it with the top of the plywood, and screwed it directly into the sides of the plywood. The holes were filled with wood putty. It’s a lot harder to get a good seam here if the top pieces are already on. So doing this first is important to have nice square edge profiles and clean joints that aren’t very visible.
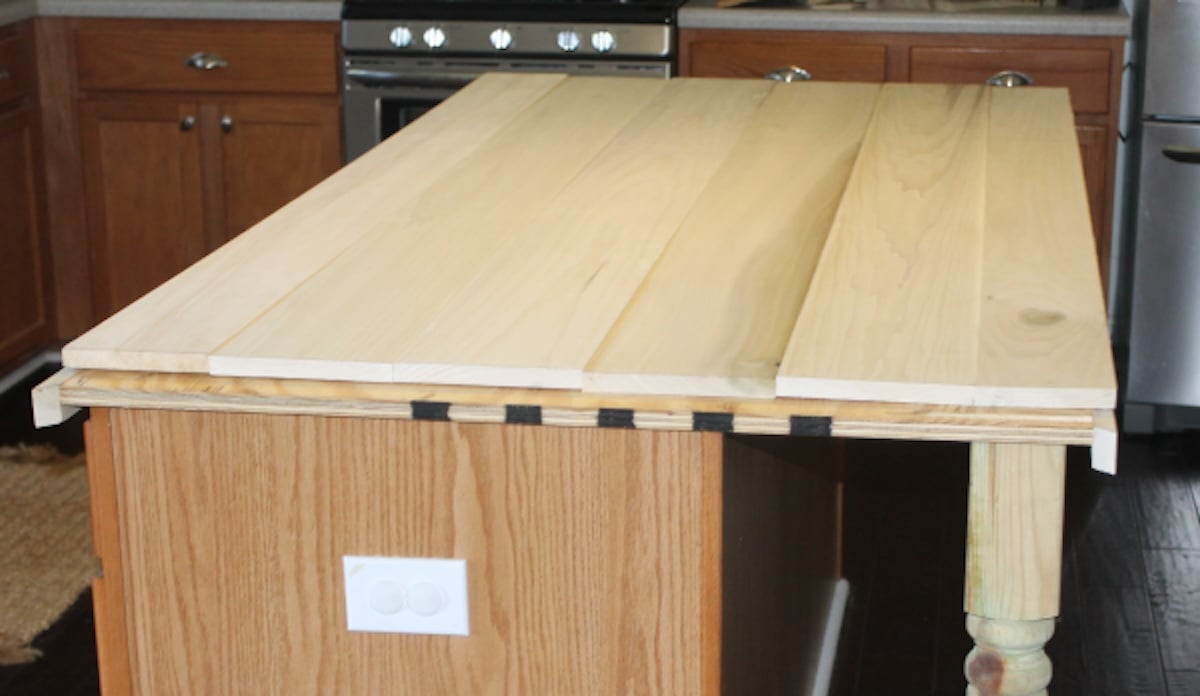

Next each piece of poplar was screwed on, starting from one side working to the other. This is a two person job. My husband screwed from underneath the plywood, into the poplar, while I held pressure on the top of the board (sometimes having to lay on it to give it pressure, like in the center). You could add wood glue if you’d prefer, too.
Make sure the screws your using aren’t to long, you don’t want them poking through. They just need to be long enough to catch a bit of the poplar, and don’t counter sink them. Don’t worry if the boards aren’t perfectly level, it’s meant to look like reclaimed wood, so it shouldn’t be perfect!
Here is the wood countertop after all the wood planks were put on.

Trade professionals and skilled craftsmen can do fancy things like bookmatching, edge grain construction, special textures, fancy edge style, etc — but I am so happy with the finished look AND the cost and time on this DIY wood countertop.
Step 3: Sand and Distress the Wood
This is where we start making the new wood countertops look like old wood! This same process of distressing and staining would work for wood beams, table tops, stair tread, etc.
The corners ended up being pretty sharp, and with little ones that run laps around our kitchen, we had to take those down a bit. I just used a palm sander, and wore down anything that had a hard edge.

Since the new wood countertops are supposed to look old, I ran the sander down the center of the seams as well, between each board. Making a deeper grove in some areas, by alternating pressure. (Wire brushing here would also work to open up some of the timber grain.)

To rough up the tops of the counters, and give them an aged look….I used some top secret tools and objects from around the house.
A chicken wire basket…. hold it over the area, and bang in one quick hard motion…super high tech, I know (no baskets were harmed in the making of this counter).

A large garage hook… This will get damaged, so don’t plan on using it again. A large screw, with a heavy thread, would work here too. I held it down, and whacked the threaded end, sometimes dragging the marks close together like scratches. Other times, making rows.

I also used the pointed end of the hook to make grouping of nail holes. Use a hammer to get a deeper hole (or an actual nail instead of a screw).

Step 4: Stain the Faux Reclaimed Wood
Staining was next.
I’d love to give you some secret formula, but as with most of the stuff in my house, there was a lot of make it up as you go. I made a lot of samples, using the scrap woods…this is about half of them 🙂 My husband is very picky visual, and needed to see the final product, to commit.

Make samples on small wood pieces for yourself…I would try small cans of stains, writing down what you do, as you do it. I had all of these marked with codes. Make sure your looking at them in your rooms lighting. We ended up changing out our fixtures bulbs, to a bright white kind. This gave us a more natural light in the area, and not so yellow, as with a standard bulb.
I finally decided on a combination of several stains. To get a variation of color you need more than one color of stain.
I used three stains…”Summer Oak” by Rust-oleum, “Dark Walnut” by Minwax, and “Sun Bleached” by Rust-oleum.

I mixed a tiny bit of the colors together, and added a good amount of paint thinner. About 1 cup of thinner, to half a cup of stain. This really thins out the stain, making it a build-able color. I used a foam brush and started off with a light coat. Raw poplar takes stain very quickly.
The paint thinner will allow the dark stain the penetrate down to each pore of the grain…which gives it that aged look, unlike straight stain.


The stain will get lighter as it dries (you can keep building the base darker, with more layers of stain).
While the layer was damp, and not dry all the way through the wood…I took a darker version of the stain (still thinned out), and with the edge of the foam brush I started to highlight areas of the grain. You don’t want the wood to be completely dry, because the stain would be harsh, and stay right where you touched the wood. When the wood is wet, and the stain is thin, they bleed together, giving a softer aged appearance.
As the stain would dry I would go over, and over certain areas, to build the color.

Making it heavier over knots, or any distress areas, and down the seams of the planks.

Here you can see the variation in the color…


Step 5: Seal the Wood Countertop
Sealing this all in, and making it kid proof was key!
The best (and only in my opinion) product for this is Waterlox. Just like the name says, it “locks” out the water by sealing the pores. This prevents spills from becoming stains, and also allows for direct food preparation if you prefer. The can runs about $40, and covered all my counters, with left overs. I used what they call a “medium sheen” here. I purchased this at a specialty wood store here in town, it’s not carried at the local hardware store – but you can find it on Amazon.
This stuff is REALLY stinky! Be warned.

I applied this with a foam brush, going in the direction of the grain. Coat the surface with one thick coat. Once you have a full coat on, don’t touch it again. The sealer will start to pool together as it dries, so don’t worry about brush strokes. Some areas will dry faster than others, almost immediately. These are areas that are really porous, and this is the sealer going down as far as it can get.
Once its completely dry (24 hours is good), repeat this step. You will keep doing this until all of the sealer is sitting on the surface (no more fast drying spots), this layer will take the longest to dry. I put on 4 coats…which yes, meant almost 4 days, but this is such and important step, you don’t want to get impatient here (not easy for me). I lightly sanded between each coat, with a very fine grit. The wood starts to pucker, as the moisture is dries out of it, and can feel slightly rough.
When dried completely, the “medium sheen” looks more like a gloss, kind-of wet.


To take away the newness, and the gloss, I took the palm sander, laid flat, and gave the top a good sanding. Don’t worry about changing the durability of the wood. The grain is filled with the sealer, so taking off part of the top layer still keeps that intact. This gave me a polished finish without the shine.
We did lots of food, sauce, and water tests, before moving onto the rest of the counters. I even left water overnight, and it never soaked in, not a drop! I don’t have a single stain yet either (and they have had their share of stain-able junk, globbed on them). Taking the time when sealing the wood countertop has preventing me from having to take painstaking care of them on a day-to-day basis.

We made a vent hood, using the same treatment.


And finished off the rest of the counters…. a month later.


Its been a year now, and they have held up so well. I am 110% satisfied with the end result. I wouldn’t even trade them for granite at a really cheap price!

We don’t really use them as a cutting board but I guess you could, we get that question often.
So how much did it cost?
The Island
- Poplar boards
- Pine edging
- Plywood base
- $187
- Cabinet trim pieces (pine)
- Wood posts (pine)
- $85
Total Island Makeover: $272!!
Main Counters
- Poplar boards
- Pine edging
- Plywood base
- -rim molding (for the back splash seam)
- $185
Total Wood Countertop Cost: $372
I would say that’s a whole heap cheaper than granite, and totally in my budget!!
It may seem like a lot of work, but it’s really very simple, just lots of layers, and some patience (which I am not known to have). The biggest task is getting the project mapped out on paper, determining what sizes of wood, and how much.
From there it’s just a screw driver, a sander, and a paint brush!
Our house style is farmhouse meets beach house…..so these were the perfect fit!
Check out the rest of the kitchen remodel, and all sorts of DIY, remodeling, how-to’s, and painting projects over at my blog, The Ragged Wren.

————————-
Amazing work, Alyson! I love the finished kitchen, every last bit of it!
Visit Alyson over at The Ragged Wren to see more of her room makeovers, like her daughter’s shabby beach bedroom.. Plus, Alyson is a professional painter and she shares a ton of great painting tips, like how to paint cabinets like a pro, how to paint wood floors, and the ever-so-helpful white primer vs. gray primer.
————————-
If farmhouse or reclaimed wood aren’t your style, there are lots of other DIY kitchen counter options, too:


First published: 26 Apr 2014 // Last updated: 30 Sept 2024


Thanks for sharing my how-to with your readers! This is my favorite part of my home, and a bonus that we did it ourselves, and inexpensive it was. Hope everyone is inspired!!
We love it, too, Alyson! Thanks for sharing!
This is a beautiful make over — but please tell me more about your bar stools. I love them! Especially the paint job!
Alley
Those were something I custom painted. Just a lot of lYers of paint, and scraping!
I love it!! It looks amazing!! Love it!!
Thanks so much!!! Great idea and looks fab! I am looking into replacing our countertop very soon and this is a great idea!
I found this on pinterest. ~Mel
So glad you found us, Mel! We’d love to see what you end up doing!
I love these wood counter tops! I am curious how hard they are to keep clean, particularly the seams. Do crumbs and stuff get caught in the seams? My husband is afraid they will get yucky but I want to make these in the worst way!
These counters are super easy to keep clean. Any sort of cleaner works well, and won’t damage the surface. Food doesn’t tend to get stuck in the cracks……but after a super messy day of cookie baking I do run chip brush (with the bristles cut halfway down) down the grooves, and that loosens up any fine powders or debris.
This totally inspired us to do ours. I applied the 1st coat of waterlox tonight. Thanks for the awesome guide!!!
Be sure to send us pictures when you’re done! 🙂
I love your countertops! Just one question, have you had to reseal the wood since you initially installed them or has the Waterlox held over time?
No. I will never have to reseal them. The beauty of the Waterlox is, it isn’t a normal sealer that sits on the surface and wears away. It actually fills the pores of the wood grain, so it won’t fade away. I sanded off the sheen of the sealer, since it is shiny, so it will always have the dull reclaimed wood look.
Oh yes, I’d love to know too if you have had to apply another application of waterlox. How frequently do you have to reapply the waterlox? Love your kitchen!
Thanks LaDona! No, I have not need to reapply the Waterlox, and I won’t ever have to. The beauty of this kind of sealer, is that it seals in all of the pores of the woodgrain. Other sealers sit on the surface, this one is not like that. The sheen of the sealer is quite shiny so I sanded that all off, but the wood underneath will be the same forever. Even with dings or knife marks on top of the wood, what’s underneath won’t get damaged, or change in durability.
I would also like to know if you do a yearly treatment. I have heard with other but her block countertops you want to oil them once a year. Is this still needed with these?
Kali, regular butcher block does require them to be oiled frequently. Oils like this sit on top of the surface, so they do wear away. The Waterlox actually seals in the pores of the wood. So the surface won’t be affected by everyday wear and tear, even with dings or cuts. It creates a solid durable surface. I sanded off the sheen on the surface, so the look is more natural like a reclaimed wood would be.
This info is pricelessssssss! Esp the Waterlock – I have been debating about counter tops and love wood but not its maintenance, this solves it. Also PLEASE can you tell me what the make of your range is? I am replacing my appliances and love the look of your range. Many thanks!
I love the counter tops! I have read and re-read you post soaking in every detail.
The only thing I can’t determine is if you used the plywood and double layer of planks on the counter tops too? I have looked over so many tutorials and this by far is the one I’m leaning towards for our kitchen remodel.
Thanks!
Jennie
Jennie, we used one layer of plywood, and one layer of planks. A piece of poplar trim, wrapped the edges so it looks like one thickness of wood.
I know this is an old post, but I’m currently following your tutorial. 1) In your post, you said pine trim but in a reply you said poplar trim; which did you use? I was wondering if pine would stain the same as the poplar boards. 2) Why did you miter the top of the trim instead of either butting it against the boards or butting up underneath the board? 3) Any problems with clearance in front of a dishwasher, drawers, or stove?
TYSM!!!!
Thanks so much for clearing that up for me! I’m excited for our kitchen remodel, hopefully I will be able to get it to look as good as yours.
Can you tell me what color you did your cabinets in and the color of the antique glaze look? Thanks!
I adore your kitchen!! Please, please, please tell me where you got that beautiful sink. I have been searching for a sink just like that and have had no luck!
Hi Jennifer,
Alyson shared about it in her kitchen remodel post, linked at the end of the post above. Thanks!
I am in love with your kitchen, I plan on doing something very similar, could you please tell me where you got that beautiful sink?
I have the same sink and I got it at Ikea. It was around $350.00 Canadian
I love these countertops and would like to use them in a condo renovation. How do these hold up to heat? Can I set something straight out of the oven on them, just like granite? I have a kitchen island in my house with a converted dining room table top on it, and anything the least bit hot (including a coffee cup!) will leave a mark in the finish.
Hi great job on your remodel it looks great! Where did you get your sink? What brand is it do you remember?
Thank you!
Rebecca
Love your kitchen and the information. This looks doable and I can’t wait to get started. Thanks for sharing.
Which sandpaper grits (e.g. 40, 80, 150, 240, 600) did you use to sand the wood initially after installation and after apply the sealer to reduce sheen and smoothness? Also what thickness of wood planks and plywood did you use?
Your counters are amazing! I wish I could put wiod counters in my kitchen but I love our hickory cabinets way too much to paint them. II think I’ll be using this tutorial for our master baththough.
Did you guys install that beautiful apron front sink yourselves and if you did, do you have a tutorial on how?