Okay, so this post isn’t really about laundry, it is about our laundry room / pantry.
Technically I LOVE my launtry (laundry-pantry hybrid name..) room. If I were to design it, I am sure it would be a little different, and include room for my freezer, a sink, a sewing nook and a foot ball field scratch that last one, I was getting carried away… but you know what I mean, for the most part it is a great space.
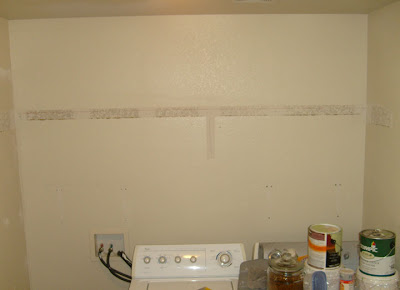
Well the Laundry side of the room was really lacking when we first moved in, it had one little shelf across the top with a bar and nothing else. This screamed “I need to be loved” to me. (what it looked like after we removed the shelf)
So, about a year and a half ago,
we started organizing it. I found some great cabinets at the Habitat Restore. A set of 2 that match our kitchen cabinets and a tall one that doesn’t exactly match door styles, but still looks great, we installed them and that is as far as it went.

I literally shoved junk in them and haven’t looked back.
Well, that is until about 3 months ago when I decided to paint the cabinets. I took off all the doors, had my husband install the crown and slapped one coat of paint on there before moving on to bigger and better projects.
So, now, instead of at least having doors to cover the utter mess, (they were off waiting to be painted ). The chaos that was the inside of my cabinets reined supreme, every time we walked into that space it was like a slap in the face. Like having a rock in my shoe for the last 3 months, it has been really bothering me, but I’ve just been too busy.
That is until Thursday night, last week. I was putting Etta down for bed and I have some time to just think. I realized I actually had the energy and desire (all at the same time WOW!) to actually work on a BIG project, and because of the snow Justin had a long weekend… So, I came down and Justin asked What do you want to do?… (I love you Honey)
We put on our paint clothes (note to self show you a picture of those… they are pretty trashed HOT) We dusted off the paint brushes and started painting…. We are not quite done, but I am actually determined to finish, AND organize the space sometime this decade, and it is looking so good that it is making me want to work. Here is a little bit of what we accomplished. Oh and please don’t judge me on the state of the cabinet interiors, floors, shelf organization… I promise, when the room is finished that they will be organized and beautified! But for now people, it is just a true MESS! to quote the rest of the blog world… here is to keepin’ it real!
First one of the doors was crushed and cracked. Justin glued and clamped that baby right back together good as new and patched it within an inch of it’s life. But now, you can’t even tell. Now that is the power of paint! We lightly sanded it all, but focused our sanding on where they would be most handled.
The last thing we are doing is adding a little “doggie” door for the litter box. This will help to hide the ugliness and hopefully coral all the extra litter. The door is still not totally finished.

I figured out a little tip while painting my bookshelves from
this project, that I thought was share worthy. You know the little holes that you have for adjustable shelves, pictured below.
Well painting them is a total hassle, but you can’t just leave them. Here is what we did. (p.s. the cup is our cheap answer to portable paint) Grab some Q-tips and your paint.
Dip your q tip in the paint, remove and swirl around in the hole, then remove excess. Do not load it up with paint or the supports may have a hard time fitting back in there. If you run into this problem you can clean it out by sticking a drill bit of the proper size in the hole and a pulling it out a few times. In that bottom right picture you can see the difference between the painted hole vrs the unpainted one. It just looks more uniform.
Here is our set up in the kitchen, which seems to be the painting location of choice. Maybe I am hoping I will drop a gallon of paint on the tile, so I will be required to replace them.
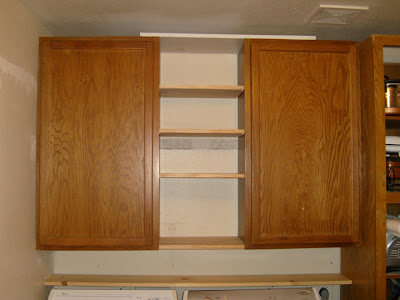
The shelves back in place and the first of the cabinet doors. As you can see the other cabinets are VERY full!
I need to point something out. Justin and I found the two large cabinets (pictured with doors on) at the Habitat Restore for $38.00. Then, on another visit we found the tall unit for $25.00. We decided to get them both for this space ( the doors don’t match but we may fix that later.. The problem was that the 3 large cabinets were still not big enough to fill the whole space.
How did we fix that? Easy, we bought a piece of pine and cut shelves to add between the two large upper cabinets. We painted the back wall the same color and wrapped it all with crown. Now it looks like a cohesive unit. What do you think?
Here are the rest of the pictures… Someday I am hoping to get nice pretty front loaders.. but these work so for now I can’t justify the purchase just for the look of it.
The very latest news? Officially, last night I was struck with a great idea for the pantry shelves, it may take some time yet to finish this project, but it will happen! Just wait…. More to come later!


>Looks fabulous. Do you guys want to work on ours? It is chaos. On the front loader side, don't do it. We bought a front loader washer 4 years ago when we moved here and it barely lasted 3 years. It always had water in it so it would stink if i did not leave the door open, the computer part went out so I literally had to push a button every 10 minutes just to finish a cycle of washing, and it got clogged at least 3 times. We are now back to the top loading machines and life is pleasant once again.
>great job with the cabinets!! and i'm glad you weren't afraid to paint them!! we have oak cabinets, and my husband just can't seem to part with their orange-y glow 🙂 and i agree with staying away from front loaders.. we actually have some right now.. spent about 900 bucks a piece for them, and always talk about replacing them.. google it!! of course, they are probably working on a solution to the problem by now.. but i would wait it out until they have been proven worthwhile!
>I love what you do! It's fun to see the transformations you make. Our laundry room is bare bones right now, but I'm slowly getting ideas for putting it together. We're doing it as part of our "finish the basement one step at a time" so maybe I'll have a real laundry room in a couple of years? Nice thing is that I get to pick the tile and cabinets! Wahoo! I've got top loaders too. They are going on year number 7… 🙂
>This looks amazing! You all did a fabulous job!
>I think it looks fantastic! I didn't notice the doors weren't the same until you pointed it out.
>Oh it makes me want to get in there and do our laundry room! I'm looking forward to seeing the finished result! Lisa~ http://www.livingmybestlifeii-lisa.blogspot.com
>Beauty and function–can you ask for anything more. Great Job.
>Looks GREAT! I am currently drawing out plans for our mud/laundry room redo ~ Can't wait to get started!
>It looks great! I am jealous of your organization in your laundry room.
teri
>I am beginning to think that my dislike of housework might actually vanish if I had beautiful laundry rooms, larders and storage to do it in… Well, who am I kidding… But anyway, your laundry/larder looks fantastic. Adding the crown really gives it the bespoke look. White paint – say no more, love it! Well done!
>I think you need to paint the front of the two upper cabinet doors with Chalkboard paint (You can even make your own, in a custom color, just google for a tutorial) and that way, they will look like they are SUPPOSED to be different doors because they will be chalkboards and the other doors will be cabinet doors.
Your laundry room is looking fabulous!
>fantastic redo. I love the crisp white – just lovely!
~ Emily N. from "too Blessed to Stress"
>Looks great!
>Energy and desire at the same time? Nice!
Our laundry room is one of the ones we haven't touched yet. Your set-up is a lot like ours. Thanks for the inspiration!!
>A. I'm 100 percent jealous of your launtry area. I want a pantry bad. And, I love your idea of keeping all food in this area. Brilliant! Thank you for sharing that. I had a duh moment.
B. I adore the shelving, what a difference painting and the crown moulding had. I'm loving how you made them look "custom" by using the shelves.
C. I'm also a ReStore lover. I'm amazed at what you can find there, and what you can do with it if you really get creative.
D. Cannot wait to see what you do with the pantry area.
>I wish I could do this to my Private Married Quarters. Maybe when we buy our first house. Great job!
>That looks fabulous! I love the crown moulding! It makes laundry look sophisticated! When you paint your cabinets, what kind of paint do you use? Latex or oil-based? And if you use latex, how many coats? Do you have a problem with it scratching off or anything? I'm dreaming of a big kitchen re-do, and painting the cabinets is number 1 on the list. Thanks for your help!
>Carolyn, We used a latex paint, it took about 3 thin coats. When painting cabinets, never do thick coats, it makes it looks sloppy. Also, clean your brush every other door, to keep the bristles free from dry paint globs (which is a technical term by the way!!), which will leave a texture that you don't want.
After the latex, we did added two coats of water-based polyurethane in a satin finish with little sponge paint brushes. I was dreading this step, but it was SO easy, I am not sure why we haven't done it before!
Hope that helps!
>Looks teriffic!
>Thanks for the painting advice! I have a yard sale headboard to paint, so I'm going to try your techniques and evaluate my results. I can't wait! I am dying to tackle our kitchen, but my husband is terrified that the paint will look bad. I say, it can't look much worse than dark walnut 80's wood.
Thanks for all your great projects. You are helping me make changes in my house and think about the space differently. I'm sure you're inspiring everyone all over blogland! Thanks!!