How to Build a Pet Feeder — Choose Rustic or Modern Style!

Wouldn’t it be awesome if our pets had their own rooms to keep all their supplies in (cages, litter boxes, food, bowls, leashes, etc.)! A room just for animal stuff would be oh SO nice but most of us don’t have that luxury.
Neither did my friend Lolly who like me uses her laundry room as a dual pet supply room. When I helped, Lolly make over her laundry room a few months ago it was very clear to me that one important step to making her laundry room feel more glamorous and orderly would be to replace the towel and bowls set up with an actual pet feeder.

There are some gorgeous wood bowl feeders out there but most come with a hefty price tag. Lolly and I decided a DIY bowl feeder would be necessary.
Using a couple of pieces of leftover oak hardwood flooring she and her husband crafted this beautiful rustic pet feeder for her dog for only $10 (the price of the two large silver dog bowls)!


So, want to learn how to make this puppy (no pun intended)?

How to Make an Easy Pet Feeder
Can’t see the video? Watch it here on our YouTube channel and be sure to subscribe to get all our new videos!
This project requires a kreg jig but don’t worry if you don’t know how to use one, that’s what I’m here for!! I recently made a pet feeder for my cat and it was the first time I ever used a kreg jig. It was SO much easier than I anticipated!

This post contains affiliate links. See our full disclosure policy here, and thank you for reading and supporting Remodelaholic!
Supplies:
- Kreg K4L Pocket Hole Jig (it comes with the drill bits and screws you will need)
- Drill
- Jigsaw
- Wood glue (optional)
- Wood- We used left over oak hardwood flooring but you could use any 3/4 inch thick wood.
- Big Dog Size- 22.5″L x 12″Wx 6.5″H
- Cat or Small Dog Size- 15″Lx 7.75″Wx 4.5″H
- Bowls (with a lip, like these — that price is hard to beat!)
Tutorial:
Here is Mr. Kreg Jig (not scary at all)! Lay ‘him’ down on a stable surface. Lift the lever to the right to open the clamp and slide the piece of wood in. Once the piece of wood is positioned where you want it push the lever to the left to lock the clamp in.

Put the kreg jig drill bit into the drill and drill downwards into one of the holes on the jig as shown below. In this step you are creating a pocket hole for a screw to be screwed into in order to connect it to another piece of wood (see video for this step).

There are numbers on the side of the jig that tell you given the thickness of the boards what size screws you will need.

For my cat feeder I made 2 pocket holes in each side board that connected to the top board. My friend, Lolly, added an additional back to hers.
Below is a photo of the underside of her dog feeder. You can see that she created a total of 4 pocket holes in the side boards (2 to attach to the back and 2 to attach to the top board). And lastly two pocket holes going from the back into the top.

Are you still with me??? Good! It gets even easier from here!!:-)
After making the pocket holes, set the first two pieces of wood you want to attach together in place. With the kreg jig bit in the drill, drill the kreg jig screws all the way into the pockets holes.

Once you have all the screws drilled in, flip the feeder over (and celebrate because you used a kreg jig and not everyone knows how to use a kreg jig)!!:-)
Next turn your bowls over face down on top of the feeder. Trace around the bowls lightly with a pencil.

Remove the bowls and draw a circle parallel to the one you just made but about a 1/4 of an inch in.

Then erase the outer circle so you don’t get confused.
NOTE: We do this so that the bowl’s lip has wood to rest on (otherwise the bowl would go straight through the hole).
We are almost done!! Using a large drill bit drill a couple holes next to each other along the inside of each circle. We do this to create space for the jigsaw blade to fit in (see video for this step).

Using a jigsaw slowly follow along the line of the circle. When the circle has been completed the wood will drop out (see video for this step).
Remember the edge of the new hole doesn’t have to be perfect because the lip of the bowls will hide the edge.

Just slip the bowls in and you are done!! If you want to cover the pocket holes made by the kreg jig, they make these caps/plugs to fit right in or I assume you could just fill them with wood filler.


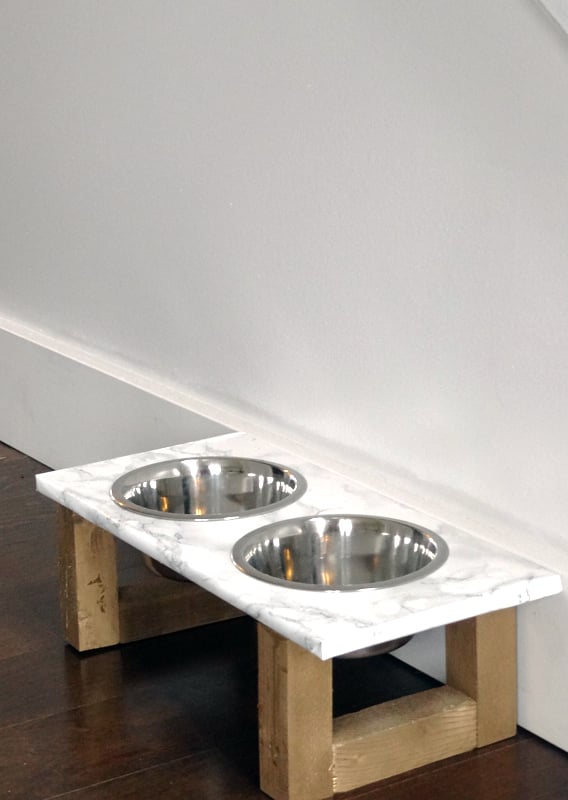
If you are into a more modern or chic style, here is a different option!

Above is my cat, Bengal. Can you tell she has a little bit of sass to her personality?:-)

I bought the faux marble contact paper (shown below) for another project and got the idea to use some of it to make a modern chic pet feeder. The plans are very similar to my DIY marble console table.

It is very simple to make. Cut a 2×2 into (6) 5 inch pieces. Then glue the pieces into the formations shown below with wood glue or Liquid Nails.

Let the glue dry for 24 hours. Once dry spray all sides of the base legs with gold metallic spray paint.

While the spray paint is drying cut a 1/2-3/4 inch thick piece of wood or MDF in a 8″ x 17″ rectangle. Place the wood onto the sticky side of the faux marble contact paper.

Wrap the board with the contact paper like you would wrap a present (except you don’t need tape).:-)

It will look like this when you are done. Now make the holes for the bowls to fit into by following the same steps as described above for the rustic pet feeder (also shown in video).

After the holes are made apply wood glue or Liquid Nails to the tops of the bases.

Measure and place the faux marble board evenly spaced onto the bases. Let the glue dry for 24 hours before handling. I shot a couple of nails from the top of the board into each leg with a nail gun for added durability and then filled the nail holes with a spec of spackle.
And it’s done!!
So there you have it, two stylish options for a pet feeder–rustic and modern. Which do you like better??

OR

I hope you enjoyed these tutorials! Please don’t hesitate to ask questions!!
Be sure to come visit me at Provident Home Design to see what I’ve been up to! Also, you can come check out the rest of Lolly’s laundry makeover, HERE! Lots of budget friendly ideas!!:-)

———————————————
More ways to use flooring (other than on the floor!)
Butcherblock style wood countertop from flooring
(and read how it’s holding up here)

Peel and stick flooring turned backsplash
or, read our tips for actually installing wood flooring 😉

and see our latest flooring choice and installation experience here


thank you for your wonderful blog, tamara! we found that its a good idea to seal the wood first. dogs drool and drop food around their bowls, so if the wood isnt sealed you end up with stains and the cleanup is harder. this is not really a concern if you only feed kibble, but dont we all slip table scraps or canned food into the bowl? plus, dogs drip water, which isnt good to leave standing on unsealed wood.
you can also use a piece of laminate countertop for the eating surface instead of plain wood. it requires modifying the plan a little, but the result is worth it.
best wishes!
Hi Donna! Thanks so much for mentioning sealing the wood! A protective finishing coat like a polyurethane would definitely be recommended.
Using a piece of laminate countertop is a great idea! Also melamine would be a good option too. It has a very similar surface material as laminate but comes in thiner sizes which might be more conducive to this project.
Thanks again, Donna, for your awesome suggestions!!:-)
This is really neat! Just one thing….I learned a long time ago with my beloved lab that some dogs, particularly large dogs should not have their bowls elevated. it’s important that they eat they way they are supposed to eat –head down, not like they are at a table (tables are for people). So I would just recommend making the feeding station, but keep it lower to the ground.
Thank you for the tip, Pam!