Installing A Wood Mantel On A Stone Wall
In our new place, the living room has an existing fireplace with a really large, river rock stone wall that runs from wall to wall and floor to ceiling. We are very excited to finally have a house with a fireplace, we’ve always wanted one, but never had one (which is why we built this faux mantel before). One problem though… it was missing a nice wood mantel. We have to have a mantel to decorate for the holidays right? I am a blogger after all… and come on, where else would we hang our socks for Santa?
We wanted to have something that was rustic but simple. Because of the stone, our house lends itself toward a farmhouse/country style so the rustic wood also fits in there! When we started ripping out this wall, it meant we needed a new place for our TV. So, we immediately made designs for our new mantel.
This project however was a whole new beast that we have never faced before, a stone wall…. (or if you have a brick fireplace it is the same deal) We couldn’t just tape the mantel on, so we had to do some research to figure out what to do. Once we figured it all out we wanted to share what we learned with you about installing a wood mantel on a stone wall. This was a little tricky and it required a new tool (a hammer drill) that we really need to add to our tool box.


Wood Mantel On A Stone Wall Supplies:
- (1) 2 x 6 x 8’ pine board (for the ledger)
- (2) 1 x 10 x 8’ pine boards (top and bottom of mantel)
- (1) 1 x 6 x 6’ pine board (middle supports)
- gray stain
- (36) 1 1/2” wood screws
- (12) 1 1/2” pocket screws
- (2) 1/2” wedge anchor bolts
- (3) 1/2” drop anchor bolts
- (7) weathered fence wood slats
- (1) 5/8” x 12” long concrete drill bit
- wood glue (for thin strips of weathered wood)
Wood Mantel On A Stone Wall Cost breakdown of the project $100
- wood = $30
- stain = $10
- pocket and wood screws = $10
- anchor bolts = $50
- weathered wood = free
Wood Mantel On A Stone Wall Tools we used:
- circular saw
- drill
- hammer drill (for drilling through concrete)
- Kreg Jig
- ratchet wrench
- nail gun
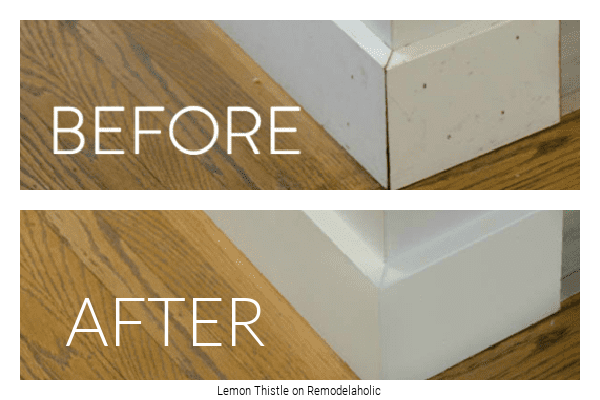
Here is a before picture during our move into our new place. Sorry about the mess, heck this actually looks pretty darn good compared to what it was some of the time!

We decided to do an eight foot long wood mantel, that would float above the fireplace.
Here I am posing for the mockup. We are trying to get an idea of how it might look (so we take a picture or two) and how high above the fireplace we wanted it. It was not easy posing for this picture. Hold a heavy eight foot board level from one end isn’t fun. I tried my best though, with all my manly strength.

Here we wanted to see how a layer of old weathered fence wood would look over the pine structure. We were excited to see that it really tied in all to colors of the stone wall. (sorry about the bright lamp, with that wall still in place, there NO natural light at all in the space)
")
After we found the right height, we leveled a string from wall to wall, to use as a guide where the top of the mantel would go. We also taped where the edge of the mantel would go for reference when we started drilling holes.
")
The first thing that we needed to do was, anchor a ledger board on the wall with bolts into the concrete wall. Behind the rock wall is the foundation wall. The ledger board required, holes drilled through 4” of mortar and 2” into the foundation wall. (Do not drill into the fireplace flue!!!)
Once the mantel location was decided upon, we had to map out the holes for the bolts. We started with only three, but then added two more, for a total of five. We decided not to drill through the stone, in case we wanted to make any changes in the future. The mortar can be easily patched, but stone? Not so much.
We drilled 5/8” holes in the thickest portion of mortar that we could find within the mantel dimensions. Keeping it in the thick mortar areas, prevented the mortar from chipping away from the stone and keeping the stone nice and secure.
We had to use a hammer drill to get the holes drilled. This type of drill saved my life. We tried to use a regular drill but it took about 10 times as long and it was not easy once we hit the foundation wall. We definitely recommend that you use a hammer drill if you have access to one. (We borrowed our uncles drill THANK YOU!)
Here is a picture of the level that we used. This is a level commonly used in laying out fencing. Also, here is the long 12” long 5/8” masonry drill bit that we had to use to get the hole deep enough.
|
|
|
")
")
Below is one type of bolt that we ended up using. It is called a wedge bolt. But they are only 7” long, and we also needed bolts that were 10” long. So, additionally I had to use a drop anchor and a 10” long threaded bolt for those deeper bolt holes. The drop anchor was a little tricky to use, but once I had a system down, it was pretty slick.
")
To add the blots, you need to clean the hole out with a vacuum to remove any loose debris. Then just tap the drop anchor all the way into the end of the drilled hole. When pushing in the drop anchor, you need to push it in with a metal rod that is the same diameter as the anchor to avoid engaging the wedging mechanism. Once the anchor is in place, you use a smaller rod inserted into the thread portion of the anchor to engage the wedging mechanism, til the anchor is snug. Then you bolt the ledger board in place, with your 10″ bolt that is threaded into the anchor until secure.
As for the wedge bolt, as you tighten the wedge bolt, it creates tension automatically and wedges the bolt snug within the mortar.
")
Below is the ledger board with two small anchor bolts in place to get it level. Once I had it leveled, I drilled the holes for all the other bolts.
")
")
Because the holes were so deep I had to come up with a way to clean out the debris. I used some copper pipe, slightly smaller then the hole, and a funnel to create a vacuum nozzle to push into the hole to clean it out.
|
|
|
")
")
Now that all the holes where drilled and the bolts in place, I just had to tighten the nuts with a ratchet.
|
|
") |
")
Here is a close up of one of the bolts, washer and nut, nice and tight.
")
The next step was to get the middle supports cut and in place. The ledger board was not level vertically, because of the unevenness of the stone surface. That required us to cut the support edges, that where against the wall, at a custom angle on each one. So, I scribed the angle onto the support when it was level horizontally. This made sure the the top of the mantel was level, even though the ledger board was not. Then i just trimmed the board according to the line that was scribed.
") |
") |
Once the supports were cut to length, I used my Kreg Jig to drill pocket holes for a strong tight fit.
") |
") |
This is a picture of the finished ledger board ready for the supports.
")
Here are the supports in place, 6 1/2” long x 5 1/2” wide. Two in the middle and one on each end.
")
") |
") |
Here is a picture of the installed top pine board, 9 1/2” x 8’ long. Just drilled through the top to the supports and ledger board.
")
Clamps are handy when you need an extra hand. All I did was screw the boards to the supports. You can also see here that the mantel sticks out from the wall on the edges, because of the uneven stone surface. We dodn’t mind how it looks, since you can’t really see it from any other angle in the room.
If you really wanted, you could scribe the stones onto the top board and cut it around the stone, for a nice tight fit. That would take a lot more effort, but it is definitely doable.
") |
") |
Here it is all assembled and ready for the weathered wood skin.
")
We decided to stain it gray, incase any portion of the pine it showed through the joints of the weathered wood. The images below show the sequence of the weathered wood installation.
") |
") |
") |
") |
This is how we decided to miter and wrap the corners. We didn’t have enough wood to cover the top and bottom, but you don’t really see those very much (especially since it is stained to a similar grayish color) and it makes the top easier to dust without getting slivers!
")
Well here it is in all it’s glory! Just wait until we really get to decorate it for the holidays.
The total dimensions are 8’ long x 10” wide x 7” tall.

Now that the mantel is done and we have a cool place for the TV (away from little greasy fingers and keeping eyesight intact), here is a picture of the wall starting to be torn down, and all the randoms from the dresser the TV used to be on now on the mantel and no I didn’t actually arrange anything to look nice, I just didn’t want the munchkins playing with it
")
What do you think?
Do you like how it turned out?
Here is a link to our faux mantel that we built in Texas, just in case you didn’t get a chance to see it finished.


That’s one good-lookin’ mantle! 🙂
Michele, thanks!
Looks good!! Can’t wait to see more! I love watching remodels unfold.
Thanks Ronda! I believe you and I have similar remodel loving souls for sure!
I am SO glad you posted this because we’re in the same situation. We actually bought a pre-fab mantel a year ago at a yard sale but have been researching how to install it forever and couldn’t find a set of concise instructions! thank you!!
Yay! I am so glad we can help! **just be sure to avoid drilling into the flue, and you should be all set!
Great documentation. I am a huge fan of old wood next to stone too. I need one of those Krag jigs, it looks pretty handy.
Yes, the Kreg jig is worth it’s weight in gold!
Kudos to you – I think it looks great!
Thank you! We are loving having it!
This turned out amazing. I hate the fact that we have no mantel on our stone harth. Pinning this!
Thanks Jen!
That was a big project! It sure looks good. We waited so long to do our fireplace makeover, and I know how much I love it. I bet you are just tickled with this!! Enjoy. It’s awesome 🙂
Thanks Shannon! We are happy to have it! I think it might just be a requirement to have a mantel in every future house! They are just fun!
WOW! Looks amazing! Thanks for the instructions!!!! Great post!
🙂 Cait
Cait! Thanks you so much!
honestly, it is amazing. What a difference it makes that space – Good Job Justin!
Thank you! I LOVE the difference it makes. The wall is SO vast, and not exactly what I would chose, but the stone is real and nice, and my dad installed it, so it has a nice history. The mantel makes a huge idfference, we will have to see what other things we can do to make the space more exciting
We have a fireplace in a brick wall and we want to add a mantel. Thanks to you and your husband, I know how to make one. Thanks so much for the tutorial and I think your mantel turned out beautiful.
Thanks for the comment, Carolyn!
Thank you for the tutorial! I’m actually looking at doing something similar with cross beams on my ceiling! Where did you find the thin weathered wood?
Free on the side of the road! it is just weathered fence wood! Keep a look out, if you see some, people tend to grab it fast.
Thanks for this great overview! I am in the process of doing the exact same thing on my stone wall/fireplace. I had the same issue with the length of the bolts, however I had to use very large toggle bolts in some areas and drop anchors in others. I am also running all the video and power cables through it for the TV mounted above it.
I’ll immediately snatch your rss as I can not find your email subscription link or e-newsletter service. Do you’ve any?
Kindly allow me know in order that I could subscribe.
Thanks.
Janette, here is a link to our rss. https://feeds.feedblitz.com/remodelaholic We would love for you to subscribe.
I would love to do this on a jagged white rock wall. What did you do about the gaps caused by the uneven rock between the wall and mantel?
Thank you,
Melinda
Melinda, I attached the ledger board snug to the rocks. I decided to leave the gaps between the mantel and rock. I could have cut the mantel wood to fit the contour of the rock, but that would have taken a long time. I found that you don’t even notice the gap since we don’t view it from above or below. You can kind of see what I am talking about in one of the small images in the middle of the post. I hope that helps!
Thank you so much!
Thank you so much!
Hello! I just saw this on pinterest, and almost had a heart attack! I have a stone fireplace a little smaller than yours that needs a mantle just like yours!! I loved this! My question is how did you put your tv up there? Everyone keeps telling me that the wires will show since I don’t have anywhere to hide them bc of the stone…any advice there? I really want my tv to go up there but not sure how it would work. Hope to at least try this mantle, yours looks great! Thank you!
Jamie, that is a great question. It can be done though. We have one extension cord that is the color of the grout that hides well. All of the other wires are hiding behind the TV. The TV sits on a stand that came with it. It can also be hung, but the stand was easiest in this situation. You could also drill a hole through the wall to the other side and manage your wires there, depending on what is on the other side. We have a garage, so that is doable for us. My point is that it can be done you just have to get creative with how you handle the wires. You could even hide them in the mantel itself, if you want. Just some ideas, I hope that helps. Good luck!
that’s awesome. this just solved my problems and gave me an idea….. 🙂
Glad to help Gerard!
Thank you so much for the detailed instructions! We have the exact same situation and couldn’t figure out how to put a mantle on our river rock stone fireplace. We are actually building ours this weekend before the holidays thanks to your project!
You are very welcome Amy!
I’m thinking of trying to tackle this for my in-laws this weekend. In your explanation you say you used wedge bolts and drop bolts but from the pictures I can’t tell where you used which one. Why or where did you use each type? And it also looks like you used some extra spacers when tightening the bolts (image after the Kreg Jig, fourth bolt from the left and first bolt from the left), what was the reasoning for that?
The additional spaces were for the longer bolts that I had to use. because of the rock mortar being different thicknesses I had to use different lengths of bolts. I can’t remember though which bolt I used where. I believe that the wedge bolts were the easiest to use. I hope that helps. Sorry that it took so long to respond!
It’s amazing how lacking the Internet is with this kind of installation. So glad to have found you guys. I have a brick fireplace with no mantel (there had once been a mantel but the previous owners took it), and with Christmas fast approaching, I’d like to have a place for stockings and such. I have a couple questions, if you please:
-Three holes remain in the mortar from the old piece, each 3/8″ x 2 1/4″ deep. I’d like to use those, plus add two more for a total of 5 holes to secure a 5-foot 2×4 ledger. I’m not sure why the previous owner stopped at 2 1/4 inches. How do I know if I can go deeper? Do I need to go deeper, if I have no intention of putting anything heavy on it?
-Now for the dumb one: How did you precisely line up the holes drilled in the ledger with those in the masonry? Paper template? Ultra-exact measurements? I’m baffled by this step.
Thanks again for the post, and for any insights you can share with me. Happy Holidays to you!
Stefan, that is crazy that they took the mantel. Sorry that it has taken me so long to get to this. I am not sure about their depth or what is deeper, but I would make sure that there is a strong hold in the hole. You might be okay at that depth, but I would try to go deeper if there is a concrete wall to drill into. You would have to use a hammer drill for that. As far as the lining up the holes, I would start with anchoring one, level it, then drill the others holes slightly bigger to give you some wiggle room to set it level. A cardboard template would be a good idea though. I hope that helps. Good luck!
Thanks for the response. I ended up not doing the ledger, but instead using 1/2-inch lag bolts (7 inches long), cutting off the heads, and mounting an old pine beam to those. Put the stain on it today and will hang stockings tomorrow. That said, your blog was very helpful throughout, so thank you.
Stefan, I would love to see a picture of how you did yours when you are down. Glad that our site was helpful.
I got working on our mantel today. However I’ve hit a HUGE snag. I got a hammer drill and I still can’t drill through the rock. We don’t have any space to drill other then the rock. Do you have any suggestions? My poor husband tried for 2 hours to just drill the holes and didn’t get more then a 1/2″ in. I really really hope you can help.
Thank you for posting this!! I love it!!!!
Jessica, I don’t understand why it won’t work. I got my hammer drill and it took about 10 seconds, after hours of trying it with a regular drill. There might be metal he is hitting, I don’t know. He might have to try another location. Although I didn’t have to drill through the rock. I went through the mortar and the concrete wall. The concrete wall was the hard part at first. you might have to find out what type of rock it is and ask someone at a hardware store of do some research online. Sorry, I don’t feel like I am helping very much.
First of all, make sure th drill is on “Hammer” mode. The dial on the chuck with the numbers needs to be turned all the way past the highest number to the Hammer setting.
Next, use a masonry bit. You cannot use a regular drill bit.
Lastly, add a drop or 3 (not much at all) of water to the hole. The available stone dust will act like sandpaper and will drill much faster.
Not all stone is easy to drill, as some are easier than others. Some bricks are very difficult to drill through. If worse comes to worse, you may need a diamond-tipped hole saw, made for drilling through tile.