Kitchen Renovation: Adding an Island
Submitted By: House Four
Might as well start off my new blog with a doozy of a first post about….kitchens. My kitchen, specifically, including lots of before and after photos. So sit back with a coffee and warm up those fingers. Lots of scrolling in this post, I’m afraid.
Most women I know have a pretty good idea what their “dream kitchen” would look like, if they had their druthers (and an unlimited budget). I am no different, in fact I’ve got a binder of kitchen ideas torn from magazines that I’ve been carting around from house to house since about 1999. Mine would have light cabinets (white, but not stark white), a large island at which I imagine my family eating and/or my boys doing homework, a combination of finishes like dark and painted wood, stainless steel appliances or, who am I kidding, completely concealed appliances. The closest we ever came to this look was House Two which we had built from plans. It was a large, beautiful, bright kitchen, but never quite what I imagined.
So when we moved to House Four and realized we could rather easily incorporate a few of our want-to-haves, we were pretty excited. This house is about 20 years old and the kitchen is going to need a big overhaul sometime in the next few years. We couldn’t afford to take on a project like that two years ago when we bought this place, so a “for now” renovation would have to do.
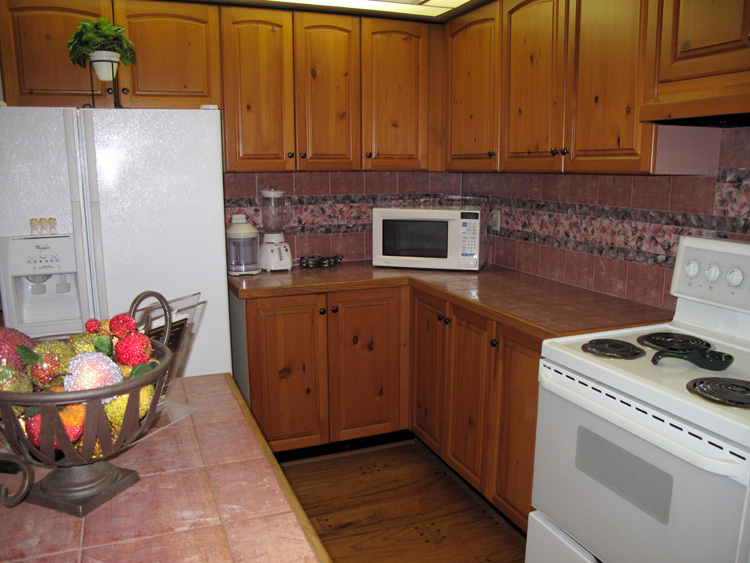
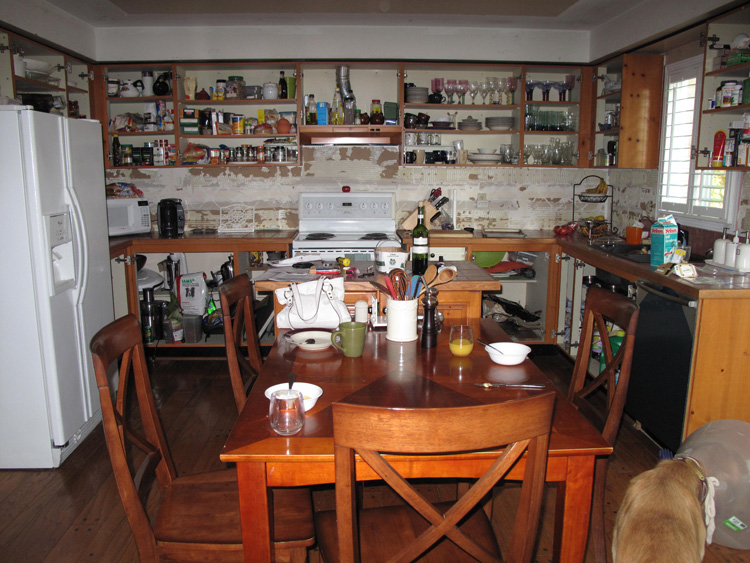
You’ll see from the before photos below that we had our work cut out for us. I’m certain the dusty rose ceramic tile on the counter tops and backsplash (not to mention the lovely strip of black and pink accent tile in the backsplash) was never intended for anything but a 1980’s bathroom, but somehow it wound up in this kitchen. In a big way. Couple that with knotty pine (solid, mind you) cabinets with stain that was taking on an orange hue, and the overall look of this kitchen was a pretty big assault on the eyes.
There was also a lovely bank of plastic, fluorescent cove lighting that wound its way around the ceiling above the upper cabinets – a fly graveyard, as we discovered the day we removed it. Gross.
Here are a few before photos (keep in mind these were taken BEFORE we purchased the home so all furniture etc belongs to the previous owner):
Yeah.
That awful cove lighting was the first to go, exposing the rather unfinished ceiling underneath and more than a few hanging wires. The first project was to close up those holes and fix the rough ceiling so it blended with the rest of the room. We also took down the useless “boob” light that was over the small island, and the ceiling fan that was over the previous owners’ kitchen table. These were replaced by four pot lights over the new island area, and the fixture you’ll see in upcoming photos which lights up the stove, sink and surrounding counter areas.
Next, we had a kitchen company quote a re-facing job for the entire kitchen as well as building a whole new island with a solid surface top. The quote for the doors alone came in at $8,000 and that was just for a basic, rather ugly white thermofoil door. NOT what we were after at all. If I remember correctly, the island was going to be an additional $8,000 PLUS the counter (items like soft-closing drawers and wood interiors vs metal would be big extras as well).
Remembering we already had wood cabinet doors, I started looking at options for painting the doors. So as not to bore you with the details, we went to Benjamen Furniture Refinishing in Toronto (Sarah Richardson’s guy) and he sprayed all of our cabinets and drawer fronts (36 in all) in a sturdy lacquer paint for around $1,200, taxes in. Seriously. They turned out more beautifully than I had imagined and I only had to paint the cabinet boxes to ensure a match (not hard to do). Not sure what he charges now…keep in mind this was in 2009.
While the cabinets were away being sprayed, I tackled removing the horrible pink tile from the backsplash:
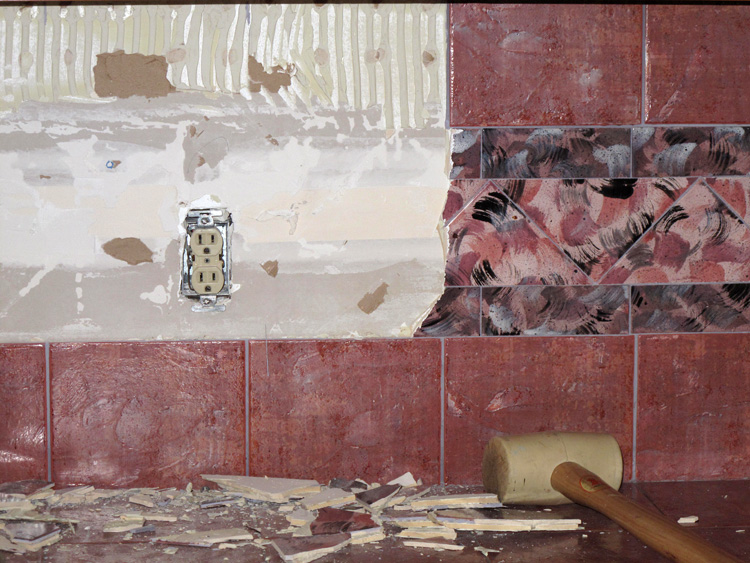
Seriously ugly. As was this job. It took me an entire weekend and that was just for the backsplash. The counter would come later. I could barely feel my arms after that and totally get why people charge an arm and a leg for tile removal.
I can’t even believe I’m going to post this next photo. Apparently I took it right after lunch – there is crap EVERYwhere. But, it does show what we lived with for a few weeks while waiting for cabinet doors, backsplash tiles, counters and an island to be installed. Yeah, it was bad:
This post is getting ridiculously long so on to prettier photos now…
Fast forward a few weeks and we have the backsplash installed, the island base installed and our cabinet doors back from the painter. Oh happy day:
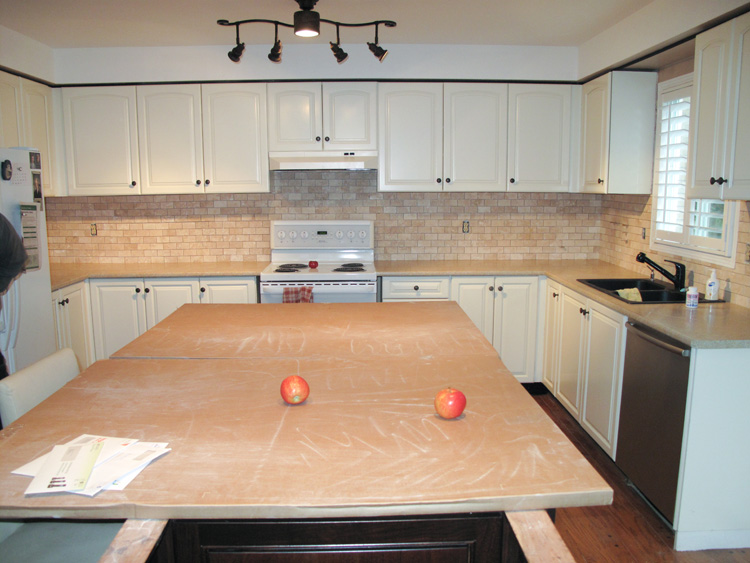

The end was in sight and believe it or not, we were thrilled even to have a cardboard counter at the island for the few weeks that we had to wait after the granite supplier measured the space. We joked that it was like being out for dinner at a kid-friendly restaurant. Hey kids – a counter you can colour on!!
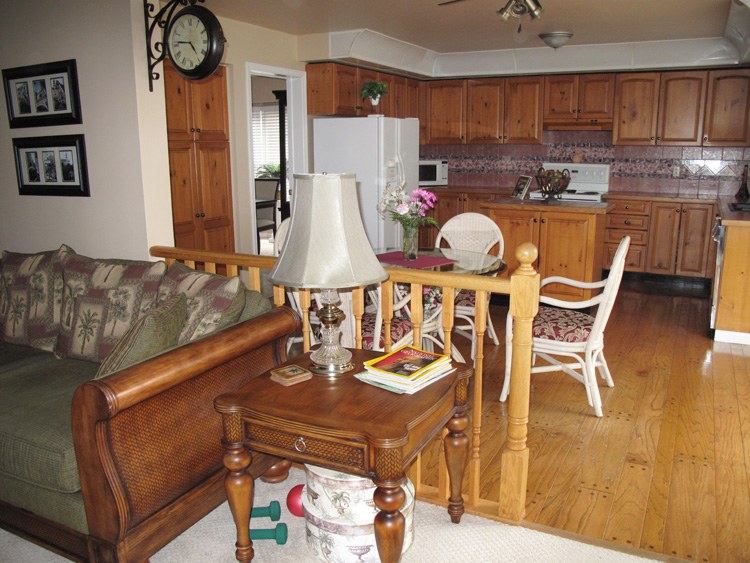
Finally, the backsplash was grouted and the island counter was installed. I painted the room (which I kind of regret now, more on that next time) and we have the kitchen you see in the following photos:
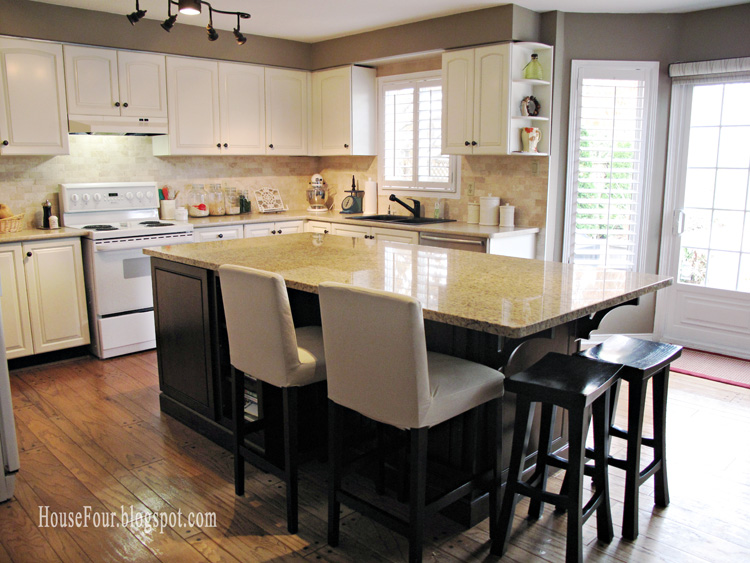

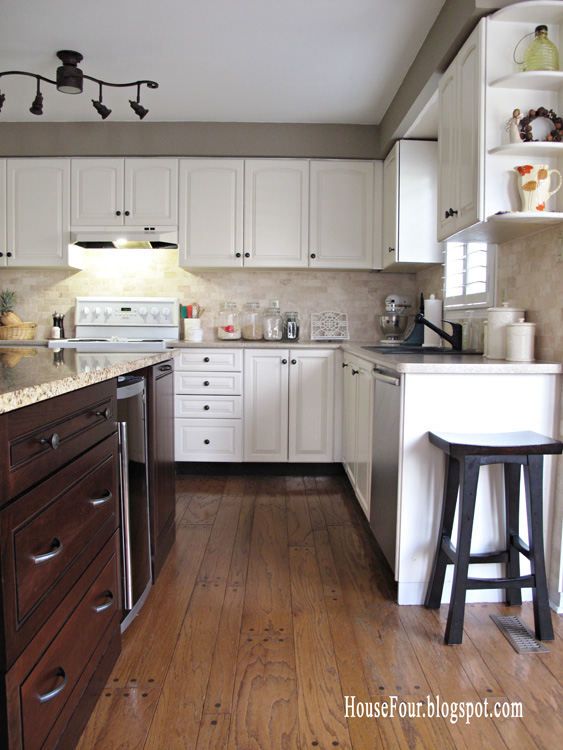
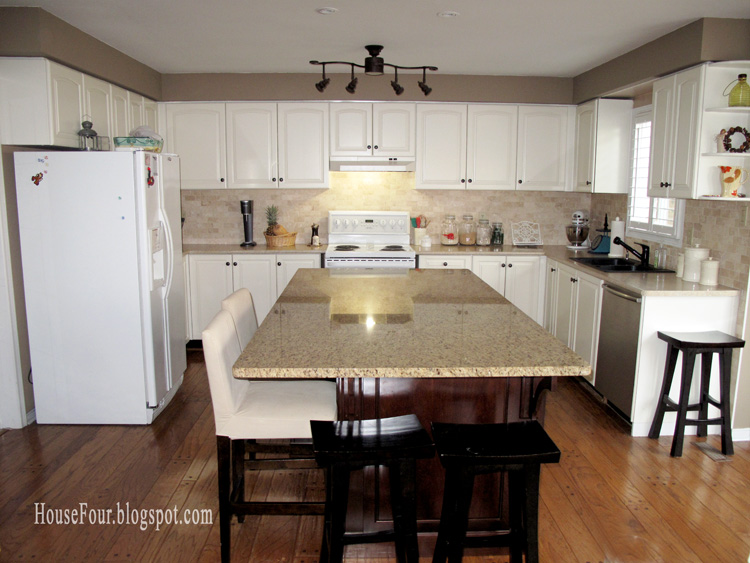
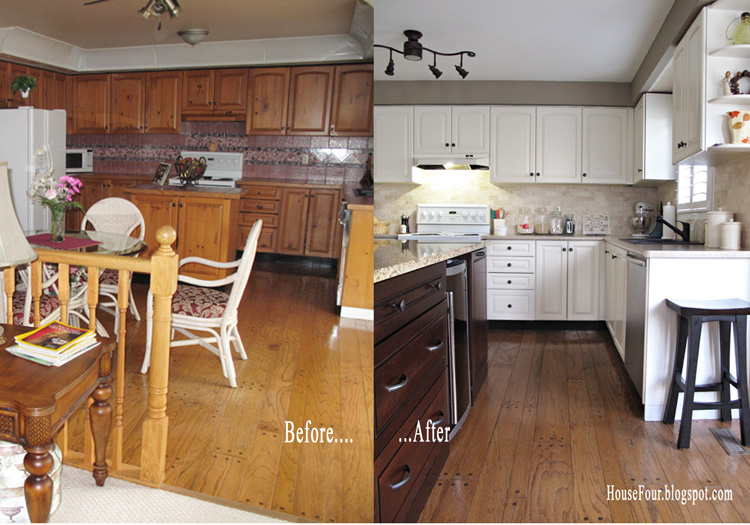
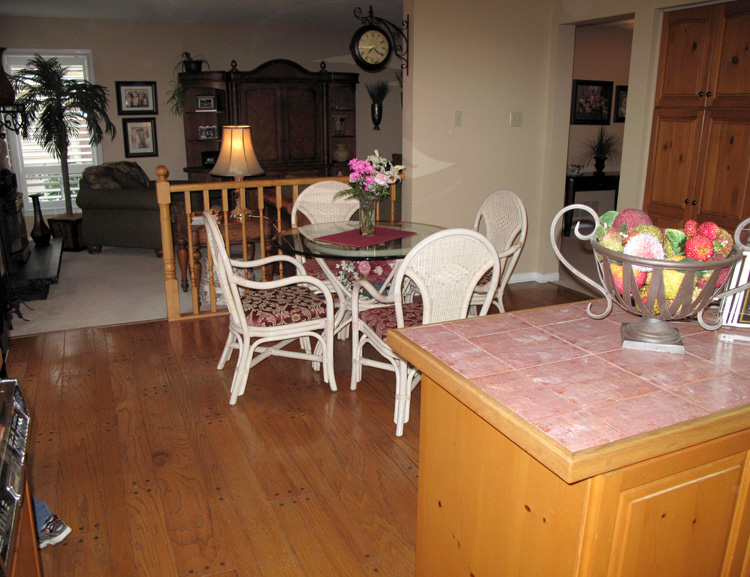
There is still quite a bit to do, but for now, we love it and the kitchen functions very well. Just as I had hoped, we eat breakfast and lunch at this island. Dinners are usually in the ACTUAL dining room, which is nice because that was a room we rarely used in previous houses. And, my boys do their homework at the island after school while I make dinner. We worried a bit about making the island so large because in doing so, we took away any space for a kitchen table and chairs. But now that we have lived with it for two years, I have no regrets and would do the same thing all over again.
This post is crazy long now, so I’ll just end with a few links to the suppliers we used for this project:
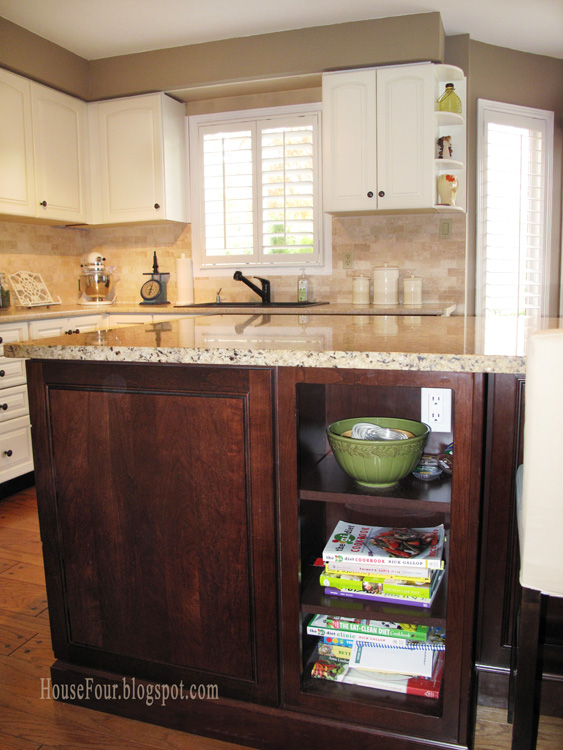
- Island Cabinetry is KraftMaid from Home Depot (the installer was great and they run a tight ship over there – highly recommend them for reno projects). The door finish I’ve linked to is not identical, but is the exact profile and very close to our doors. I think ours were cherry and the finish is darker.
- Painted cabinetry is a colour match of Benjamin Moore’s Timid White .
- The cabinet refinisher is Benjamen Furniture Refinishing in Toronto. If you’re Canadian and you watch HGTV or even Candice Olson now, you’ve seen this guy a lot!
- The perimeter counter was also from Home Depot and is a laminate (not sure what the colour is but it went well with the granite on the island!).
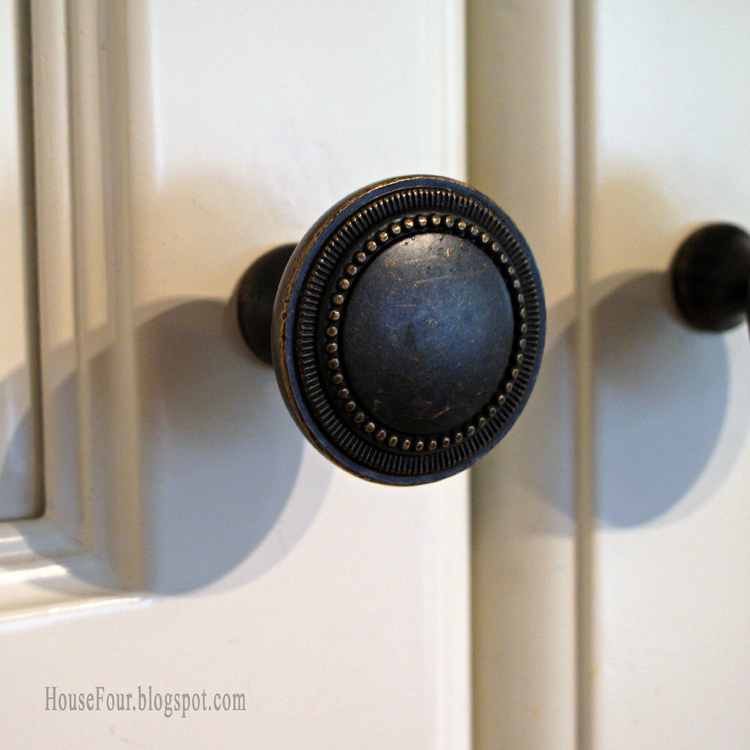
- Knobs and pulls for the entire kitchen were from Lee Valley Tools. They have a huge selection!
We installed a new dishwasher after the Flintstone-era one that was here caught on fire the first week after moving in. But, we haven’t tackled the rest of the appliances yet because my plans for those involve an overall reno in the kitchen (more in a future post) so we’re making do for now. Everything works great, fortunately.
If you’ve read this far, you deserve a cookie but after writing this post, I’m way too tired to bake. I’ll try to keep the long posts to a minimum from now on 🙂
Hope you’ll check back again sometime and thanks for visiting!


Wow! They did a phenomenal job! It doesn’t even look like the same space! I have to say that I’m in love with their pegged floors and am so glad they kept them. Thanks for sharing.
Love the island, and the back splash! I have decided that one day in my forever-home, I shall have a small fridge installed. You did a great job.
Beautiful!!! I love the changes!! It looks so different! Love the mix of cabinets – white with the stained island. So much lighter and brighter! I like the new paint color too!!!
Wow, I love your kitchen! Do mine next? 😉
I love that large island! What a statement piece!
I do like the idea of white cabinets, but not stark white. Good choice. I’m curious why you regret painting the kitchen?
Hi Liz. The wall colour works well with the kitchen and I do like it, but I don’t like the dark stripe it creates on the bulkhead over the upper cabinets. I think I liked it better when that part of the wall was closer to the cabinet colour – it didn’t emphasize how short the upper cabinets are. I’m still contemplating changing it back. Thanks for the question!
Hi, it’s the first time that I visit your website. Nice info, thanks!
You are very welcome! We hope that you come back often!
Justin
I’m curious about the color of stain used on the pegged oak floors of the kitchen remodel which was submitted by House Four. Thanks so much.
Hi. just curious since I would like to install a granite countertop for my kitchen island. How much did you granite countertop cost?