My Uncommon Slice Of Suburbia Kitchen Transformation!!
I am really excited to show off Kristin’s kitchen today. Her kitchen is one of my favorite kitchen transformations in all of blogdom! It is so inspiring, let’s see what she did to create this:


So here is my before picture right before we moved in. Over the years I kept a binder with pictures of my dream kitchens and drooled over model homes with eat in islands and gourmet stove tops. Remember the kitchen from the movie Something’s Gotta Give, talk about making my heart pitter-patter. It is renowned for its elegant simplicity:

I love white kitchens, and consider them to be a classic. In my mind, you can never go wrong with a white kitchen and there is such an elegance about them.
I also love the look of cottage kitchens; I needed to come to a happy medium.
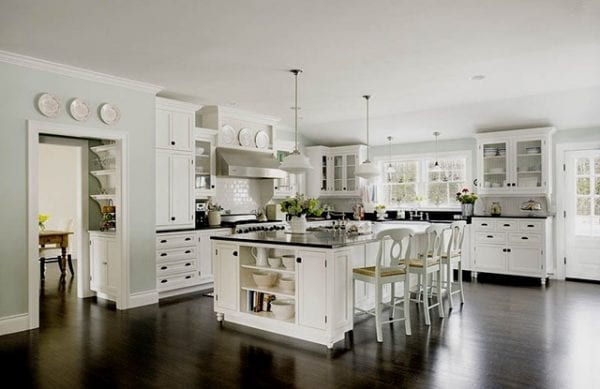
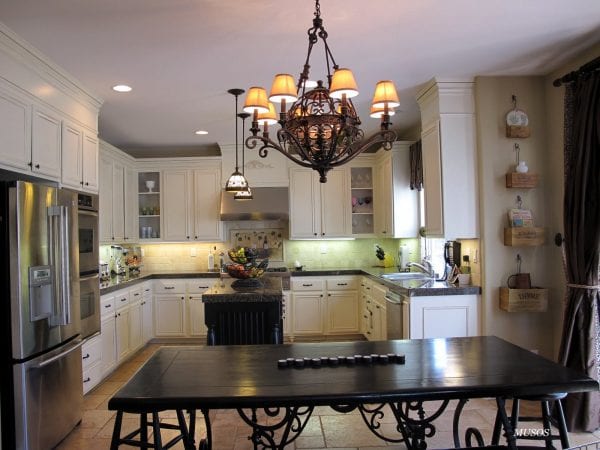
Overall, in the end we achieved a pretty traditional kitchen yet toned down with a twinge of French and cottage:

Remove all of your doors
Prep the room covering everything you don’t want painted
Remove hardware and your hinges.
If your cabinets have gaps or dings fill them with wood filler.
Empty all your cabinets
Degrease all the doors, draws and frames. Tsp is a great degreaser as is vinegar and hot water.
Sand everything I used an electric sander with medium grit (80 or 100).
Prime with oil based primer; Foam rollers will give you the look as though your cabinets have been sprayed.
Lightly sand
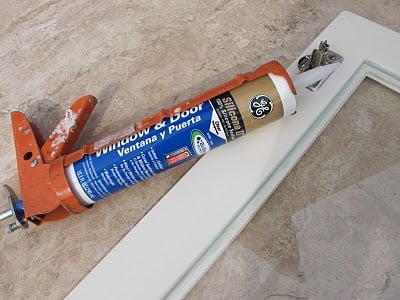
Caulk away. Caulk can be your best friend; hiding all imperfections and watching them magically disappear once the paint is applied.
Here is the exciting part, Paint your desired color using a foam roller or having them sprayed!!!
NOTE: Latex top coat paints will adhere perfectly to oil based primer. Latex primer paint over oil paint will not work at all.
Let it dry, buff out any drips and give it another coat.
Glaze,

Now…I can’t lie. After I had sanded all my bottom cabinets, primed and started to paint, superman came and saved the day! You see, we were doing this all ourselves because the quotes that came in made me gasp and I said who needs a painter I’ll do it myself. Did I mention I have 37 cabinets and 20 or so drawers? Then my hero (painter) who used to work for a large builder was out of a job and needed money came by! He gave me a quote that made me gasp, this time in a good way. I hired him immediately and told him to start, before he changed his mind. I was so excited and he probably thought I was a little crazy getting so giddy about paint. He finished sanding, priming and then sprayed our cabinets; he was done in 2 days. It most likely would have taken me at least 6 more weeks. We were left to reinstall cabinet doors and drawers, replace the hinges, hardware and glaze. This alone took us about 2 months prior to working about 2 months on adding height to the cabinets and rebuilding the island. I know that sounds like a lot of time but we have 3 little ones and only one of them in school full time. So this project was really only done in our spare time without jeopardizing family time.


I really love the look of Staggered cabinets, I just didn’t care for the price tag.
Build a box using pine plywood in a smooth finish.
Anchor the box to the top of your existing cabinets.

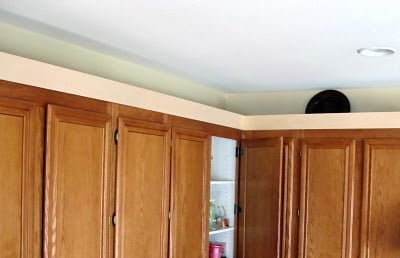
Apply new crown and nail to the top of your boxes.
*We went with a double stacked baseboard on the bottom and crown on the top of the baseboard.

Nail small wood trim to hide the seams between the old cabinet and the new addition.

This project came with lots of trial and error. You definitely need to be on the tolerant side if you are taking this on yourself. When something did not look right we took it down and started over. This is your time to get creative. This is a big project but definitely worth all the elbow grease!
I have to admit I loved not having doors on my cabinets, I loved the open feel, I didn’t like the dust. SO the glass went up. I had painted all the oak doors creamy white prior to this. They get pretty scuffed up in the process so I would have saved the painting for after the cuts were made. Remove the center panel, a router would come in handy here….on our list of things to purchase this year.


Press the pane of glass into the groove, let it dry overnight. I still need to add a simple plastic frame clip just in case but I don’t think that glass is going anywhere!


The final shots:


See more after pictures here.
 This project was contributed by one of our fabulous readers! We love to share your projects with this great blogging community. So, if you have projects from kitchen renovation ideas to small bathroom remodels, overhauled and repurposed furniture, spray paint updates you name it please send it in! Thanks for reading Remodelaholic!


Hey, love what you did!! Looks fantastic! I was just wondering where you got the lights from? They are really pretty, kinda rustic, but classy at the same time. 🙂
I love those light, too!!!
where did the tile floor come from ? I like how it stands out.
I love your kitchen, you should check out Annie Sloan Chalk Paint for repairing kitchens. Just clean the cabinets and paint. It produces a solf velvet feel after the wax is applied and is extremely durable.
Actually, Sloan Chalk Paint does not stick if the surface hasn’t been at least lightly sanded. Sorry.
I used to work for EXPO Design Center and that looks just like some of the kitchen vignettes we had. 😉 Beautifully done!!!!
Hi very nice work!!!
can you please fix the link that explained how you paint your kitchen
Hi tsahi! It’s been a few years since our guest shared this, but I tracked down the link for you (and updated it in the post, too — thanks for pointing it out!) Here’s the link for you: https://myuncommonsliceofsuburbia.com/how-to-paint-oak-cabinets/
Gorgeous! could you tell me the rooms sq footage and the dimensions of the island?
Hi Rose,
This is a guest post from a few years ago, so I’m not sure if Kristin still monitors these comments, but you can go pay her a visit at her site to ask your question (and drool over her newer projects, too! 🙂 https://myuncommonsliceofsuburbia.com/