Pallet Blanket Ladder Tutorial for Quilts or Shoe Storage
Today we wanted to show you this super easy pallet blanket ladder or shoe storage ladder tutorial. We have a great $5 blanket ladder tutorial from a few years ago as well as a fun decorative orchard ladder building plan, but we wanted to try another version for the Pallets Aplenty series.

This DIY blanket ladder is made entirely from pallets (and a couple nails!!) — the side rails are the thicker supports on the pallet and the ladder rungs are ripped down 1×3’s from the pallet slats (though you could use the full slat for a thicker rung if you want).
Be sure to check out all the Pallets Aplenty posts here for all sorts of pallet-y goodness, and subscribe to our weekly newsletter to get regular updates about our newest projects or via RSS to get more project tutorials and inspiration daily!
Love DIY videos? Join nearly 20K other DIYers on our YouTube channel by subscribing here.
How to Build a Pallet Blanket Ladder
This post contains affiliate links for your online shopping convenience. Learn more and read our full disclosure policy here.
Click Here to Get a Free Printable Version of this Building Plan
Want to see more of what we’re building? Click here to be the first to receive our new building plans.
Materials Needed:
Tools Needed:
- Miter Saw
- Table Saw or Circular Saw
- Reciprocating Saw
- Hammer
- Pencil
- Tape Measure
- Orbital Sander
- 100 Grit Sand Paper
- Grinder (for smoothing cut nails)
- (2) 36″ clamps (optional but highly recommended)

Project Dimensions:
 Back View
 Side View
Cut List:
(Width may vary depending on pallet used. Mine was about 1/2″)
Sides
- (2) 48″ x 2″ x 1 1/2″ – Sides
Rungs
Rough length at longest point on the bottom.
- (1) 22 3/4/” x 2″ x 1/2″ Rung “A”
- (1) 24 1/4/” x 2″ x 1/2″ Rung “B”
- (1) 25 3/4″ x 2″ x 1/2″ Rung “C”v
- (1) 27 1/4″ x 2″ x 1/2″ Rung “D”
Approximate finished length.
- (1) 21 3/4/” x 2″ x 1/2″ Rung “A”
- (1) 23 1/4/” x 2″ x 1/2″ Rung “B”
- (1) 24 3/4″ x 2″ x 1/2″ Rung “C”
- (1) 26 1/4″ x 2″ x 1/2″ Rung “D”
Construction Steps
Step 1: Dismantle a pallet
First you need an old pallet. Cut the pallet up if you haven’t already done that. I have a video of how I cut mine up, just check the link to go watch “How to Dismantle A Pallet Easily! Taking Apart a Pallet” or keep watching the instructional video above — it will play next in the playlist!

Now select the wood that you will want to rip in half for your sides and rungs. I picked the thicker wood for the sides and the flat pallet wood for the rungs.

Step 2: Rip the ladder rungs to width
Draw a line at 2” or so down the middle of the boards that you will be ripping in half. You can see in the video how quick a speed square makes this step! Remove any nails that would be in the path of the table saw blade along that line. You could switch your blade if you don’t want to ruin a good one, just in case you cut some hidden nails.


Don’t worry, you don’t have to be too perfect with your cuts or sanding for this project.
Step 3: Cut the rungs to length
Rough cut the rungs to length. This will leave about a 1” overhang on each end. You will cut them to finished length later on.
Step 4: Sand the rungs
Sand down the splinters and sharp edges with 100 grit sandpaper. Don’t over sand, but try to leave some character of the rough wood.

For the front of the sides with all the nails, I used a grinder to smooth down the nails where they got cut off. Then I sanded the rest with sandpaper.

Step 5: Cut spacers
Cut two scrap pieces of wood. One at 18” and one at 24”. These will be temporary spacers, for laying out the ladder, because it is tapered at the top.

Step 6: Measure and mark the rung locations
Lay the ladder sides upside down. I wanted the front to have the character of the cut nails still left in the wood so I put that side in the front.
Mark along the middle of the sides, start from the bottom and mark up 8 Inches. Then make a mark every 12” three more times to the top.


Step 7: Position and affix the rungs
Clamp the spacers in place. 18” on the top and 24” on the bottom in between the sides.

Make it square by measuring diagonally from one corner to the next. If the measurements read the same then it’s square.
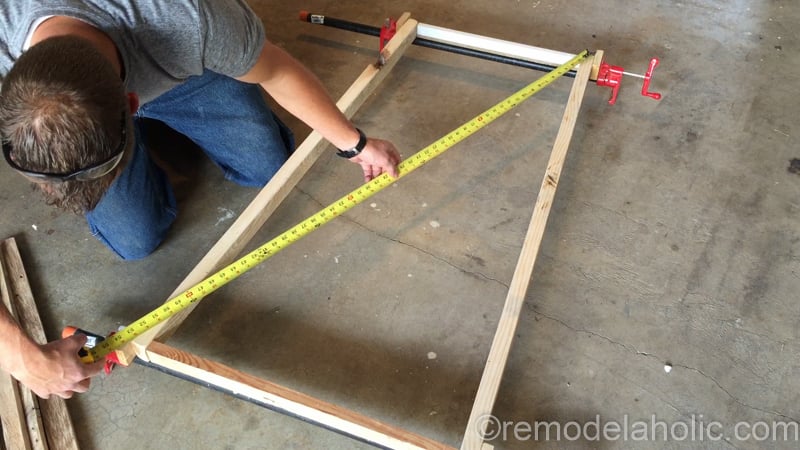

Layout the rungs with the top edge to the markings. Then scribe the tapered angle on the back of each rung where it hangs over the sides.

Cut off the rung ends to match the angle of the sides.

Sand down the sharp cut edges of the cut ends.

Place a small amount of glue between the side piece and the rung. Then nail it in place with two 1 ½” long nails on each end. Let it dry for about 30 min. Before moving it.


I decided to leave mine without a finish, I thought that it looked nice.
You could add stain or a coat to polyurethane to finish it off if you want.


Here is how it looks with shoes on it. Heeled shoes looked very nice and organized to have on display.


What do you think about the project? Tell us in the comments below, what you would build from a pallet. And remember to pin this to save it for the future, and sign up below to receive new ideas via email. (Click here to learn more about each email newsletter option.)

Check out these other easy projects to build from pallet wood:
Build a rustic barnwood style memo board
build an easy pallet wood tray
build a pallet wood box centerpiece


Looks great, and all for free. Just don’t go mistaking it for a step ladder!
I have made 2 trunks, a little stand up cabinet for bathroom,open hang shelves cabinet & wood burned pictures.
I love the blanket ladder good idea for my son who has lots of blankets and very little closet space.
Thanks, Jannie — it really is a great solution for so many things!