DIY Bathroom Remodel on a Budget (and Thoughts on Renovating in Phases)
Before I share my bathroom renovation, let’s get to know each other, shall we?
I’m a mama to 18 month old twins, I love to party, and my awesome hubby and I are working our way through renovations on our new home. Oh, and we’re operating on a budget too. Nice to meet you!

It’s officially been one year since we bought our home- a completely original 60’s split level that needed a lot of work (you can see all the before photos here).
We’ve been renovating since we got the keys and have another couple years to go. Years!?
Yep, we’re working on a budget, so we’re doing everything ourselves. We so enjoy seeing what a bit of elbow grease and paint can accomplish- the transformation is already thrilling.
Since we’re working on a budget (I’m sure you can relate!), we had to prioritize our renovations. Our kitchen wasn’t useable, we needed to upgrade all the un-fun stuff (plumbing, electrics, windows etc.), we needed an income suite from the basement, and we really wanted to refinish the floors before we moved in (because who want’s to live through that!?).
That meant that our ugly but completely functional bathroom would have to wait. We had it on the schedule for NEXT summer.
But the joys of home ownership means that the one room in the house you thought could wait… can’t.
Since we moved in and started using our bathtub it’s been leaking, friends. Not just little leaks, but BIG awful leaks.
We had plumbers in to fix it- then another leak would start. This went on for months (and about 5 fixes) until we were out of options. It was leaking into our basement suite, our wall was rotting from all the water, the tile surround was cracked and we couldn’t figure out where the leaks were coming from.
We had to reconsider our waiting. I should mention that we only have one bathroom in our house (other than our suite), so not using the tub wasn’t an option. Enter renovating in phases.


DIY Bathroom Remodel
Do you remember Young House Love? I loved reading their blog, and they were advocates for renovating in phases.
I had always been of the mindset- fix it once and don’t waste your money covering the ugly. But we totally couldn’t afford to do the whole bathroom the way we wanted right now.
We could have done a ‘meh’ renovation on the whole room… or we could renovate in phases. We chose the latter and I’m SO happy we did!
We knew the bathtub had to go. Our flooring was peeling back and we were pretty sure the subfloor had bad water damage too- so that had to go as well, although we couldn’t afford to lay the tile we want in there permanently.
There was really nothing wrong with the vanity or toilet- so we decided those would have to wait.
This post may contains some affiliate links. Please see our full privacy policy and disclosure here.
Here’s what we did for ‘Phase 1’ of our DIY Bathroom Remodel:
- Painted EVERYTHING to get rid of that awful pink
- New shaker door and textured window (along with all the other doors and windows in the house)
- New farmhouse trim and baseboards (along with all in the house)
- New toilet seat (it was broken)
- New Towel Rack (I made this one out of pallet wood! You can check out the DIY here)
- New Tub, surrounding drywall, tile surround, and trim (faucet/ shower)
- New shower curtain (Another DIY I’ll be sharing on my blog tomorrow! It’s extra-tall and wonderful)
- Added a fan for humidity
- Temporary flooring
- Temporary light fixture
- New hardware for the vanity
Update: See the complete source list at the bottom of the post!

Whew… it was a lot, right!? The basics- paint, door, window, and all trim were completed for the whole house before we moved in. We also added a bathroom fan and switched out the light fixture before we moved in.
The light fixture when we purchased the house was not only broken, but so close to the wall that it had burnt a hole in the drywall! The light fixture we put in is a freebie from my Dad’s bathroom renovation (score!). We plan to get a new one when we finish the remodel (and the one I have my eye on is a beauty!).

We also replaced the dated hardware on the vanity with affordable hardware from Target. The chunky plates for the hardware allowed for a quick switch without patching holes in the vanity.
These changes were done before our bathtub woes and made a huge difference on their own! The pink being gone was the best part (who paints a ceiling pink!?). I guess this part was technically ‘Phase 1’ but we’ll call it ‘Phase 1A’ and bend the rules.

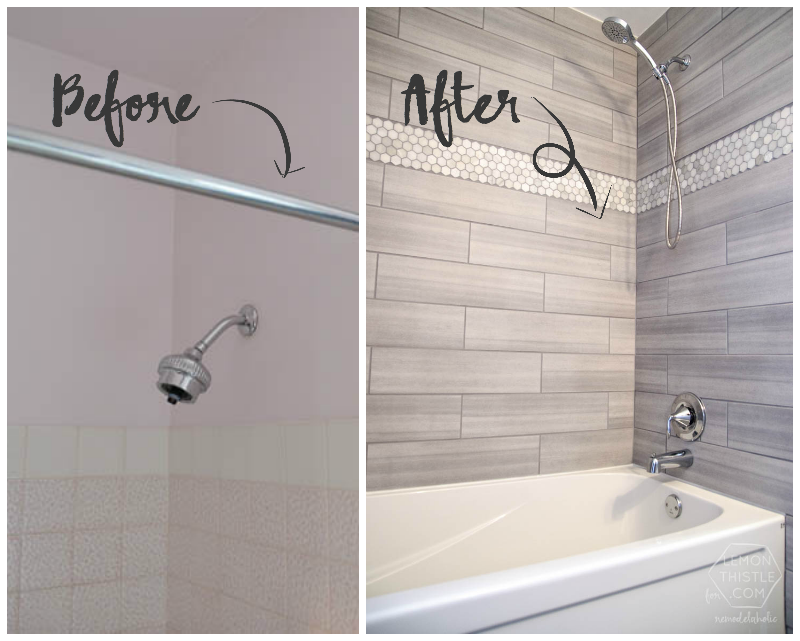
DIY Bathroom Remodel: The Bathtub
When our bathtub came out, so did all the plumbing within reach. Our plumber couldn’t even pin point one specific leak because everything was leaking a bit.
We bought a builder grade tub from the plumbing supply store and chose to tile the surround. We used the same flooring as in our kitchen renovation to tile the majority of the shower (San Marco Viva Linen).

We’d originally bought enough to tile the bathroom floor and our entryway and were storing it in our basement. Using this up means we’ll need to figure out something else for the floors when we get there, but saves some coin in the mean time.
The marble hexagon accent tile is the same tile we used for backsplash in our kitchen (from Home Depot), so we were able to use cut pieces and extra from that to help cut cost as well.
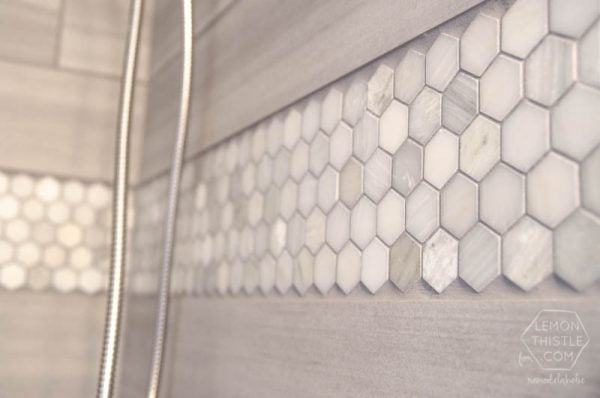
I tiled the shower myself, I learned on our basement suite shower a couple months ago and am so thrilled with how it turned out! (Grout colour is Delorian Grey) I feel like I can tile anything now.
The faucets are Moen (Eva and Iso-we love their lifetime warranty!).

DIY Bathroom Remodel: Flooring
Since we’re waiting to tile our floors when we upgrade our vanity and toilet, we put down a temporary floor. We have 18 month old twins and wanted to be able to let them in the bathroom without worrying about slivers on the sub floor. A year is a really long time to have no flooring!
We could have painted it, but we had a box of this interlocking vinyl tile (Easy Street) in storage. We were holding on to it as extra if we needed to replace any tiles in the basement- it’s what we laid in our suite.

Since we can pull the tiles back up (you don’t use glue) without damaging them, we thought we might as well put those extras to use! If we were buying it new, it runs $1.99 a square foot on sale (Canadian).
DIY Bathroom Remodel: Shower
One of the things that drove us completely crazy with our old shower is that the shower head was SO low. Both my hubby and I are fairly tall, so having to bend down to wash our hair was a pain.
We put our shower head higher than average (such a good decision!) and tiled right to our ceiling (to avoid hiring a drywall finisher). We love the way this looks, but a standard height towel bar and shower curtain looked silly with the change.

I couldn’t find a longer shower curtain anywhere, so I decided to make one. I love the way it turned out- the look of the longer curtain pulls the whole bathroom together. Plus- I wasn’t limited in patterns, I could pick from any fabric because we use a shower curtain liner inside the tub. I’m sharing the whole DIY and tips to make a custom shower curtain here.

Doing the renovation in phases has worked so well for us! I no longer hate using our bathroom- and waiting a year or more to finish it doesn’t stress me out now.
We were able to complete this phase (even with the surprise bathtub) without running up our credit cards, and we aren’t sacrificing the things we love (like a tile floor) for the sake of budget and time constraints. We still have a ways to go though.

Here’s what we have planned for ‘Phase 2’ DIY Bathroom Remodel:
- New light fixture
- Custom vanity (I have big dreams for this one!)
- New toilet
- New sink and faucet
- New mirror (get rid of that medicine cabinet!)
- Tile flooring
- Built in shelving over the toilet

I’m so happy with the changes we’ve made so far. Having a bathroom that I’m no longer ashamed of made me want to decorate it a little bit.
To pull the room together, I created a super-quick watercolour painting. I used a piece of poster board I had (the frame is bigger than standard watercolour paper), and painted squares of watercolour- almost like pixels or paint swatches. It’s honestly so simple, anyone could pull it off! UPDATE: Download it here.

I also hung my ‘Good Morning Sunshine’ wall hanging above our toilet- I originally made this for a Pancake Party and have been wanting to find a permanent home for it.
Lastly, we’re all about functionality- so we have a vintage Medalta for our hamper, and an old tin bucket for our trash can (I love that thing!).

Bathroom Remodel Sources
- cabinet hardware: Endicott Pull, Target
- tub surround tile: San Marco Viva Linen
- tub surround accent tile: Carrara White Hexagon, Home Depot
- tile grout: Delorian Grey
- faucets: Moen Eva and Moen Iso
- flooring: Easy Street interlocking vinyl tile
————————————-
See more beautiful bathroom before and afters:
(click on the photo to see more)


I love this! We are renovating in phases too. This is the second house and we probably have 10 years to go until we love it. Little by little is a great plan and pays off in more ways than financial. What better way to demonstrate to our kids that it’s ok to not have everything we want exactly when we want it? Also, as ours grow (8, 6, 3 and one more on the way!) they are able to gain invaluable DIY skills! 🙂 i wouldn’t trade this for anything (most days)
What a great point Jenny! It’s definitely an exercise in patience some days- it’d be nice to have it all… right now! I hope my babes (18 months) will benefit from this too! Thank you for the sweet comment, I’m so encouraged by this thought- who would have known our budget would mean a great life lesson 🙂
You did such a beautiful job! I’d be happy if your phase 1 was my final! Will be following along on your blog.
Thanks so much Arli! We’re definitely happy with it for now. The toilet still has some issues and our countertop is peeling back (I just didn’t take close up photos of those!) so if those were in good shape, we’d probably leave it too! I’m so glad to have you following along 🙂
I really love the tiling to the ceiling! I am also quite tall and find most shower heads less than accommodating to that – love the way you customized it for function while still looking oh-so stylish!
Thanks Anita! I so appreciate you encouraging us to do it on Facebook 🙂 I totally think that style has to be functional… especially in a family house!
LOVE this tile more than anything!!! I know the hex is from Home Depot, but where can I get the other kind?!? I’m having a hard time finding something neutral like this 🙂
Hi Tara,
I’m so glad you like it! It’s called San Marco Viva Linen and was available from most of the flooring stores in my city when I was looking!
I miss Young House Love 🙁 I am off to check out your blog.
I miss them too! They were the first blog I read to make a ‘project house’ seem fun 🙂
Did you share the DIY for the shower curtain yet? I was interested and can’t seem to find it. Excited to make my own!
I definitely have! You can find it here -> https://lemonthistle.com/diy-extra-long-custom-design-shower-curtain/
I’m so glad you like it!
I really want to redo our bathroom but I am worried about ripping the tiles off and the need for waterproofing. Did you rip the shower tiles off and have the plumber do water proofing before putting the tile over, tile over existing tiles or not re- waterproof?
We considered tiling over existing tiles but they don’t go all the way to the ceiling which is what we would rather have but tiling over and then tiling straight on to wall after that would obviously not be flush. Help?
It looks great by the way!
Thanks so much Erin! We did remove all the tiles and backing drywall. We replaced the drywall with waterproof drywall (which I highly recommend! There’s a few options for waterproofing- You can get a roll of waterproof membrane that is attached with grout (I had troubles installing this- it’s what we used in our basement bath), or you can get a paint (essentially) that dries into a waterproof membrane. If you have to replace drywall anyways, we found this to be most cost effective for us! I have never tried tiling over top of existing tile, but my gut says it’s better to rip out what you have and start fresh- you’ll be much happier with the final product!
Good luck with your update! I’d love to see photos when it’s done 🙂
do you have a cost estimate on this remodel? We just bought a house and are freaking out thinking how much we need to spend to make our bathroom usable. 🙁
Oh, I totally get that! We were able to get all of our plumbing fixtures and labour at a massive discount (blessed by great friends and family!). And we used leftover tile from a kitchen renovation SO I’m really not able to give you a great answer. I wish I was able to help Sommer! Good luck 🙂
I absolutely love what you did with your bathroom! I am in the middle of planning my complete bathroom over-hall. We have no choice but to do the entire bathroom, it is leaking in numerous places, due to the age of the house. Tiles are literally falling out of my shower! I can’t wait to not be showering in a plastic enclosure (to minimize the leaking). I am in love with your shower walls, from the sounds of it, you used floor tiles? Is that correct? I can’t seem to find them here in the states, but I will continue to look. Also, what kind of tub did you settle on? We are currently having a difficult time choosing the tub. We have the vanity and just about everything except the tub and shower figured out. We currently have a cast iron, and love the feel, but cannot decide if dealing with the weight a second time would be worth it. Your blog is totally amazing, and I cannot thank you enough for your inspiration.
We did use floor tiles! I did a bit of research online and they were used as wall tiles in some show homes so I figured they must be fine- and they’ve worked for me! The tub we got is just a standard one from a plumbing supply store but we were looking at the same type at Home Depot for just a few hundred dollars.
These before and after pictures are amazing! The new bathroom look sleek, modern and minimalistic. The old version looks cluttered and hard to use. Thanks for posting something so cool!
Thanks so much Drew! the old version definitely was hard to use.
Hi Colleen, love your shower! Do you remember the exact name/color of the hexagon tile from Home Depot? I’m having a hard time finding it. Thank you!
Hi Amber, thanks so much! I just did a quick search on Home Depot and this is the stuff: https://www.homedepot.ca/product/1-1-4×1-1-4-novecento-white-hexagon-mosaic/824264
It is from the Canadian store, I’m not sure if that would make a difference!
Love the honeycomb tile accent. What’s that tile called and where can I find it, please?
Hi Lisa, thanks so much! I just took a look on Home Depot and this is the tile: https://www.homedepot.ca/product/1-1-4×1-1-4-novecento-white-hexagon-mosaic/824264
It is from the Canadian store, I’m not sure if that would make a difference!
Where did you get the tile for the shower walls?
The grey tile is called San Marco Viva Linen and when I ordered it (almost two years ago now), almost every tile store in town was carrying it- hope that helps!
I’m just starting to renovate my bathroom and I have pulled up your shower/tile picture a hundred times! 🙂 I love it. Are the tiles 6 x 24in? I have found them in 12 x 24 but yours look thinner. I love the look and hesitate cutting all the tiles down because of the chance of them breaking. I would like to be able to find the thin tiles if that’s what you actually used. Thanks in advance!
Hey! I love the renovations you did with your bathroom but especially love the shower tiles!! Where exactly did you get them from? I know the white ones are from Home Depot but I am wondering about the grey ones!
Thanks!
Lindsay 🙂
The grey tile is called San Marco Viva Linen and when I ordered it (almost two years ago now), almost every tile store in town was carrying it- hope that helps!
Hi,
I found your post on Pinterest. I love your shower curtain! I have searched for days for a similar pattern & fabric with no success. Do you have any idea the name of the fabric or where you purchased it? Maybe I can order fabric online? I’m getting ready to update one of my bathrooms & this would be perfect.
Thank you,
Tami
Hi Tami, I love the fabric as well! I wrote a post about the DIY curtain right here: https://www.lemonthistle.com/diy-extra-long-custom-design-shower-curtain/ But unfortunately don’t have the information on the specific fabric.
I’m impressed. I live in a house my great grandparents built in 1945. We bought it from my grandparents in 1975. It’s been a phase renovation since. Lol. I have loved every minute of it. Unfortunately, my husband was the DYI’r,and I was the gofer. I lost my husband in 2013, so I’m trying to gain the courage to attempt some re-no myself. Your blog, which I just discovered, is very encouraging and enlightening. Thanks so much.
I love what you did, in phases…that’s what I’m doing. Since I’m, literally, doing it all by myself (divorced), it’s taking a LOT longer than anticipated. But it’s at least getting done. I chose the same light fixture series, but painted them black, just because I don’t care for the chrome look. They really turned out great too! This weekend project will be the garage, and I am also working on the family room. Once everything in the garage is better organized, I think the family room will move along a lot more quickly (won’t have to hunt for things anymore). LOL
Thanks for the encouraging post!!!
I love your bathroom on this blog and want to do the exact same thing to my daughters bathroom. What I mainly want to see if you can provide me is the tile name and place your used/purchased the grey tile in your bathtub and the hexagon tiles you used for the design??
I love the shower curtain! Where did get the fabric???
Love your bathroom…. especially the wall color. We are currently remodeling our bathroom in almost the same color and style tile. I’m stuck on what color to paint it. Would you happen to remember the name of the paint you used?