Thrifty Little Bathroom Renovation
Kasey from Thrifty Little Blog is a remodeler too. So she sent over this great bathroom renovation and I am excited to share it with you. Not only that, but she has a budget breakdown! Yea! Enjoy!

*Fingers crossed* this will end up costing me thousands less than the average gut reno, but end with equally beautiful results! I’m not going to be able to DIY a big portion of the project (I’m definitely not a plumber!), but I’ve come up with ways to save hundreds on my end of the project. As always, I’ve tried to stretch my dollar as far as I could and I found some great tips for hiring out the project for less.So it is time to work on, the awful/ cramped/ dirty/ dated master bathroom! Why, you ask, would I spend a three day weekend dripping with sweat and exhausted? Well, let’s see if these pictures will make the answer any clearer…
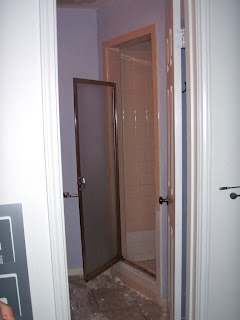
 The view from outside the door. Not exactly inviting!
Painted texture is not as easy to remove as popcorn… I’m not looking forward to this one!
The mirror, the lights, and the cabinet… yeesh! Hey, it’s the boyfriend! I thought he would be the perfect model for the crazy short shower head height :).
The view from outside the door. Not exactly inviting!
Painted texture is not as easy to remove as popcorn… I’m not looking forward to this one!
The mirror, the lights, and the cabinet… yeesh! Hey, it’s the boyfriend! I thought he would be the perfect model for the crazy short shower head height :).
Interested in learning how I did my wallpaper-esque wall treatment?
Well, here’s the breakdown:


 The view from outside the door. Not exactly inviting!
 Painted texture is not as easy to remove as popcorn… I’m not looking forward to this one!
 The mirror, the lights, and the cabinet… yeesh!
 Hey, it’s the boyfriend! I thought he would be the perfect model for the crazy short shower head height :).
Interested in learning how I did my wallpaper-esque wall treatment?
Well, here’s the breakdown:
1. I decided to go with the faux treatment rather than buying and installing real wallpaper because it is cheaper and much easier to change. The supplies are pretty minimal and if you are already on a painting frenzy (as I am), you probably wont need to buy more than one or two items.
Supplies:
-painter’s tape
-paint roller
-level
-stencil (I created my own using a $2 craft store kit and a utility knife)
-mini paint roller (I snagged mine from the dollar store)
-Paint: I took the easy way out with this one and used three paint colors off of the same sample card. In addition, I already had two of the three in other rooms of my home. The most important part of this treatment is using a semi-gloss layered under a flat paint. Really, any color combo will work, but you might have to pay more attention to detail if you go with a high contrast combo like orange and white.
My colors were: Behr’s Irish Mist in semi-gloss, Silver Drop in flat(a color I’m using throughout the downstairs), and Dolphin Fin in flat (another color I’m using in the house).

2. Paint the two base colors.
The top will be the semi-gloss and the bottom will be the darkest flat color. For this step it’s okay to make a messy line where the two meet.

3. Prep the paint surface by leveling off the connecting line.
To do this, I put my level at the height that I wanted the base to come up (roughly 4’6) to and marked that line. *Thrifty tip: a used match can be used to mark lines on walls. The mark will easily rub off instead of needing to be erased and won’t need several coats of paint to cover up.

When the level line is marked, just roll the darker paint up for an even effect.

4. Create or buy a stencil.
I wanted to save the money and time it would take to find a stencil I would like, but feel free to buy one from a craft store or online boutique. To make the stencil pattern, I folded a piece of paper into four and cut out the shape I wanted for the wall. Then, I traced that shape onto the long stencil plastic that I bought from the craft store for $2. After cutting the shapes out with a utility knife, I was ready to paint!


5. Tape your stencil up using the painter’s tape and paint the medium flat color with a mini-roller.
I marked 9 inches between the start of each stencil then went back and added the middle row as the paint dried.


You’ll probably need to go back and do a second coat of paint (unless you go with a really nice paint in the first place) or do some touch-ups, but that’s basically it!

In the end, I’m happy with the outcome and I’ll probably do it again in the guest bathroom. When I do it again, I’ll probably buy some better-coating paint for the stencil portion so that there aren’t as many touch-ups to be done. Also, you probably won’t see me attempting to stencil a room any larger than this one!
After:
The room is much more welcoming and open-feeling thanks to the addition of a 18 inch deep Kohler soaking tub and white subway tiles that reach up to the ceiling.
The room is much more welcoming and open-feeling thanks to the addition of a 18 inch deep Kohler soaking tub and white subway tiles that reach up to the ceiling.

I’m loving this counter-height shelf I had tiled in so that I could store my bath products.


Updates to the walls, fixtures, and vanity create a modern French hotel vibe.


It went over-budget and over the timeline, but now it’s just over! While I’d love to take a bow and embrace the thrill of victory, I think I’ll just go take a bubble bath instead ;). To make it easier for those of you who aren’t up for tearing down walls and moving plumbing, I’m going to break down the redo into the faceliftand renovation portions:
Vanity Area:
-Repaint vanity with glossy black: $8.50 for quart of paint; $5 spray primer (Home Depot)
-New vanity hardware: $3/each x 3= $9 (Restoration Hardware Outlet)
-Glass shelf: $25 (Target)
-Black mirror: $25 (Marshall’s)
-Light Fixture: $25 (Restoration Hardware Outlet)
-Soap dish: $3 (Target)
-Towel ring: $5 (Target)
-Hand towel: $3 (Marshall’s)
-Vase: $1 (thrift store)
-Outlet Covers: free (came with house)
-Painting tools: free (used for home painting project)
Facelift: $109.50
Renovation:$0
-Paint for base and stenciled portion: free (left over from painting other rooms)
-Semi-gloss paint for upper base: $9 (Home Depot)
-Painting tools: free (used for home painting project)
-Stencil for creating faux wallpaper treatment : $2 (JoAnn Fabrics)
-Artwork: $4 (garage sale)
-Coat hook for towel: $3.50 (Target)
-Towel: $6 (Marshall’s)
-Labor to remove old cabinet and mirror: free (diy)
-Wall resurfacing supplies: $48 (HD/ Lowe’s/ local store)
Facelift:$24.50
Renovation: $48
Tub Area:
-Shower fixtures: $150 (Home Depot)
-Shower curtain: free (repurposed IKEA window treatments left in house)
-Trash removal: $90 (Craigslist)
-Tile supplies: $175
-Contractor’s fees associated with turning tiny shower area into space for deep soaking tub: $2,612 (see itemized list for more budget details… I paid in two parts- $2,000 and $612. A $110 fixture credit was given after that invoice.)
Facelift: $150
Renovation: $2,877
Total Facelift Costs: $284
Total Renovation Costs: $2,925
Grand Total: $3,209
Not so bad, right? I had an original budget of $2-3,000 so I’m happy with the final total. It definitely wouldn’t have been possible if I didn’t go diy with the drywall finishing and wall retexturing- that project was estimated at $500.
I love it’s a great bathroom renovation! I love how Kasey broke down the cost and did all that she could DIY to save money! That is very Thrifty of her, don’t ‘cha think?!
I love it’s a great bathroom renovation! I love how Kasey broke down the cost and did all that she could DIY to save money! That is very Thrifty of her, don’t ‘cha think?!


>How did you re-texture the walls to smooth? I want to put paneling up in my house–but bumpy/textured walls are everywhere.
>Thanks for the feature!
@jbr~ I scraped off the plaster using a putty knife then floated the entire wall. When I first floated the wall, there were uneven levels of paper that bubbled and peeled off, but after the extra paper came off, everything dried nicely. I've heard that you can also prime the drywall beneath the texture before floating to prevent bubbling.
Here's a post I wrote during that process: https://www.thriftylittleblog.com/2009/10/it-all-came-crashing-down.html
>That looks very very nice! Great job!
>That is beautiful. I love it.
>Amazing! I think the black mirror makes a great statement.
>very nice!
>It turned out just beautiful! Very inspiring space.
>Love what you did! it turned out so nice on that amount of budget. Now it looks so elegant..
John Taylor
liverpool blinds quick tips on selecting the right shape and styling your room