Updated Bathroom; Single Sink Vanity to Double Sink
If you follow me on Instagram you might have seen a few previews of this project, but I am here to finally show you the results of all the exciting work that has been going on in our bathroom… TA DA!!!

Exciting right… and there is a giveaway you wanna hear about to go with this project!! (giveaway has ended, thanks everyone!)

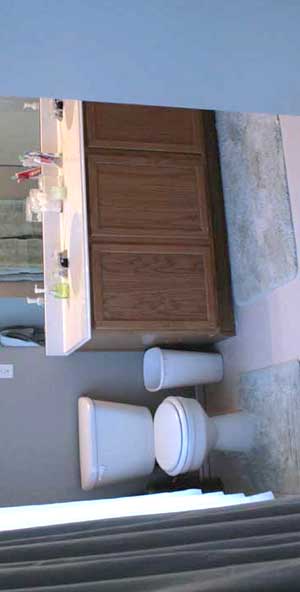
Let me lay the foundation a bit to explain why we chose to update this space. We have one bathroom, yes apparently we live in a cave, but its cozy in here! (at least it isn’t an outhouse!…. things could always be worse!) The bonus of only one bathroom, was that is was updated right before we moved in. So, it hasn’t been on the list to update, besides changing out the faucet when we first moved in.
Before (but after the new faucet!)

While doing an update wasn’t absolutely necessary to my survival, it has been a HUGE blessing. You see, the worst thing about sharing one bathroom is 4 people brushing their teeth at one sink at the same time… well, I guess there are worse things about 1 bathroom for 4 people… good family memories, what can I say?
When the opportunity came to work with VirtuUSA to update the bathroom. I decided that the only thing that would make it worth updating would be adding a second sink! So, I checked out their awesome selection and found EXACTLY what I wanted! And then I was ready to jump in and try it out, and I can say, it wasn’t for the faint of heart! PHEW! I am happy to be done!

We’ve updated bathrooms before, it isn’t a huge deal for remodelaholic’s like us, but this is the first time we have done it to the one and only bathroom with kiddos… Just sayin’ life is TOTALLY different when you throw those darling little ones into the remodeling mix AND the project also took us about 5 weeks longer than we thought it would take because life happened, over and over again! I was doing the 12 days of Christmas tutorials and projects, then there was the actual Christmas festivities… and pretty soon, it hit me, if I have to wash my hands in the tub one more time, I might go totally insane! Weird how those things happen!
Anywho, we started by removing the old vanity, which was actually in great shape and so we saved it for my sister’s house.
(Sidebar: Can I tell you that I CRINGE every time I see those design shows take a sledge hammer to perfectly good cabinets… donate them people!!! Put them in your garage or storage room, give them to your neighbors… why be so wasteful? Okay, stepping off my soap box now.)

After we removed the vanity, we had to cut into the wall to change the plumbing. I didn’t want to have to do any strange to my new vanity by cutting throughit to make the plumbing work, so we made all the plumbing changes in the wall. We could have skipped this step, and done the plumbing in vanity, but I wanted it to look nice and clean in the cabinet itself. If you are not sure how to do this, consult a plumber (and btw, next bathroom remodel, to save time and money, I am TOTALLY hiring this step out!!)
Oh and fun surprise there are TWO layers of drywall in the bathroom!!! (only remodelers can understand those funny things we find when dismantling a house that make life so much … uh, easier… not)


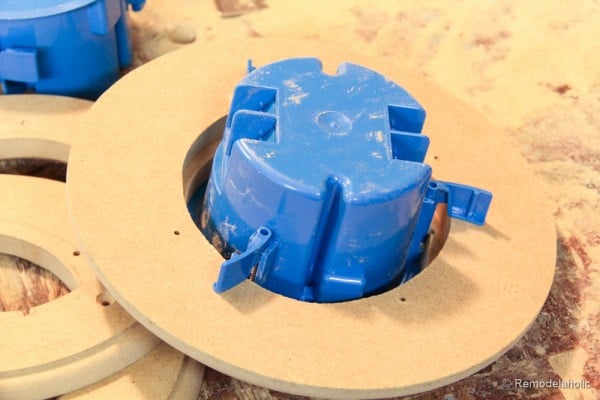
Once the plumbing was done, we had to move the lighting to work with 2 sinks instead of one. We decided to have ceiling mount lights as a change… (warning: it is not quite as bright as your normal lighting, so keep that in mind if you are considering it).
I love the way it looks! We did run into a couple more problems. Just our luck! When we cut into the ceiling to add the new boxes, there was a plumbing pipe that ran right there, so we had to put the light on a medallion of sorts to bring down the electrical box, so that it would fit with the pipes in the way! Anyway, once all was said and done, after painting it 85 times (MDF drinks paint for I swear!), I think it turned out just great.


We drywalled, sanded and painted. The color of the walls is now Sherwin Williams Emerald line paint in High definition white, satin. I felt like white was the best way to bring everything together in the space. And I sort f love white walls right now… who am I anyway?


**TIP when dry walling shine a light across the surface of the wall in one direction (like shown in the picture above, if there are a ton of shadows keep smoothing those babies out with a little more plaster) You can move the light around a bit to make sure it is nice and smooth! Helps every time!
Once all the hard, never seen stuff like plumbing and electrical was done, dry walled, plastered and painted, getting the vanity installed the sink and faucets in place was a snap!
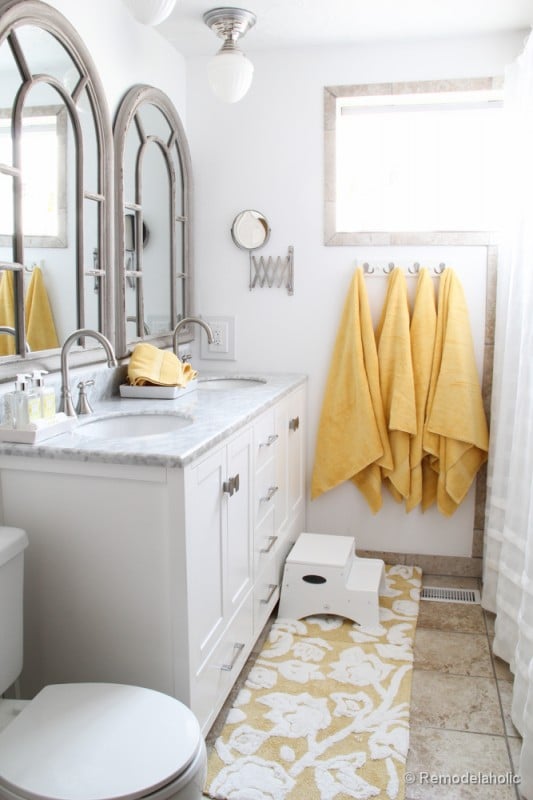
The vanity itself is SUCH a nice upgrade!!! I LOVE IT! The vanity I chose is called the Caroline Avenue 60″ size. I chose to go with the MOST storage space I could fit in my space. Instead of faux drawers up top, we have usable draers below the cabinet and they are wonderful! It has been a huge step in getting the bathroom organized, to have all the organizable storage space!
We decided to make one change to the vanity, because I didn’t want to have to tile under the old vanity’s foot print #iamlazy! We cut a kick plate and attached it under the vanity. I know that it is not the cool table style vanity with pretty feet now, but I am happy not to have to clean under the vanity and that I didn’t have to tile!!
First we cut, sanded, primed and painted the kickplate. Then, we attached the front piece by screwing it into the back of the front feet and through the upper face frame directly into the kick plate. No visible screws or holes to patch! Best way!!


On the side, we attached a block to the back leg, level with the front kickplate and screwed the side piece through the cleats into the back of the wood.


And the faucets and sinks came soon after! My faucet is also from Virtu USA, Talie PS 12-01.


Because the vanity top is a white and grey marble and our existing tiles were tan and grey, I needed to find something to unite these two colors. Serendipitously, I found the perfectly colored SET of mirrors! I bought them at Home Goods I think they were about $129.00 a piece. They are less traditional for a bathroom, but I like the personality it gives the space.
Also because of the awkward placement of the window(half in the shower half out) it is wrapped with tile from the shower and the room also has a tile baseboard, and it made me think farmhouse instead than sleek modern bath. So, to tone down the sleekness of the vanity the mirrors work perfectly, I had to buy them! I love the look!

Instead of a towel bar we bought a pre-made hook bar from Target! It made our lives SO MUCH easier (It would have been easy to make but time consuming to paint and dry and put together, it was worth the $15.00ish buck investment!) While we were there we grabbed a couple rugs, towels, step stool and a little ceramic tray for the counter.
Lastly, we have a new little magnifying swing mirror from Ikea, a whopping $3.99! Maybe for once I will start caring what the back of my hair looks like… cuz ya know, maybe I should have been worried about that all along?
You ready for the mother load of GORGEOUS AFTER pictures???? Me too!
UPDATED BATHROOM:
Sources: Vanity: Caroline Avenue (60″) * Faucet: Talia PS-1201
Lights: Home Depot, Mirrors: Home Goods, Towels, Rugs, Step Stool, Hook Bar: Target Swing Arm Mirror: Ikea


Okay so I mentioned an AWESOME giveaway before,
DO YOU WANNA UPDATE YOUR BATHROOM WITH VIRTU USA???
ENTER HERE!!!!
GIVEAWAY HAS ENDED
** Comments left on this post do not count as entry!!
Please follow the link to Virtu USA’s contest and follow the instructions there to enter!
There are several other great bathroom reveals also using these fabulous vanities, check them out for sure!
My Blessed Life | Sawdust Girl | The Shabby Creek Cottage
Just A Girl | Funky Junk Interiors |The DIY Show Off | Decorchick!
*Special Thanks To Virtu USA for making this remodel possible! All opinions are my own.


Wow, seriously amazing, Cassity! The beauty shots of the vanity are absolutely stunning! You made the very best use for your space with the two sink idea, great call for a one bathroom house!
Thanks for the nice comment!
Wow, beautiful transformation Cassity!!!
WOW–the bathroom looks stunning! Amazing job guys. I love the mirrors!!!
Thanks Katie! That means a lot!
My oh My! I was so surprised to see your make-over! Amazingly it is soo… close to what we did in our parent’s home. We used the exact same faucets on double sink vanity and the same shaped mirrors. we also put a kickplate on bottom but then we redirected the heating vent so it came out the kickplate. So nice on cold mornings to have the heat blowing on your feet while at the sink and makes the floor warmer. Same folding mirror too! The cabinet is white with white marble with tan & beige instead of grey. Interesting!
Cynthia, thanks for the comment! We like our kick plate as well. It keeps little things from getting trapped under there since we have kids.
It looks gorgeous…love the double sink and those mirrors! We have seven of us that share a bathroom so I totally get the whole all brushing teeth at once thing. We are hoping to turn our single sink bathroom into a double sink bathroom as well. 🙂 Pinning!
~Sarah
Hello! Great remodel! I’m curious how long your vanity is. I have a one sink vanity that I’m considering to turning into two sinks – would like to have some perspective knowing your dimensions. Thanks so much!
Meridith, the vanity is 60 inches or 5 Feet. Glad you liked it!
It is STUNNING!!! WOW. I absolutely love every little detail 🙂
Thanks Stacy!
that looks so fabulous !!!!!!!!
Thanks!
I love love love the vanity your chose and the end result. What a gorgeous bathroom and vanity. I really love the way you blocked it from being open underneath! Great idea!
Thanks Roeshel! I LOVE your makeover too! AMAZING!
WOW! I love it! The countertop…to die for! The mirror’s are perfect. Yep. I love it.
I totally agree with the bashing of cabinets. 🙁 I watched the Kitchen Cousins on HGTV last week and they destroyed a good set of cabinets that could have been donated. Shameful and wasteful.
Great minds think alike!!!
Holy cow!!!! That is so darling! I am I’m love with it. You are the best!
Cassity, I am 100% in love with your bathroom! The classic white and marble coupled with the pops of yellow is to die for. THOSE MIRRORS! I can’t believe you found those at HomeGoods. I really need to go there more often. Bless you for having to deal with two layers of drywall–I have not encountered that before. Such a beautiful job!!!! Pinning!
Thanks a bunch Tasha!
This turned out great! We got ours done by America’s Best Bath a few months ago and used yellow as an accent color too! We’re hoping they feature ours in their gallery (https://americasbestbath.com/gallery/) haha 🙂
I have been searching everywhere for your mirrors! I found some online. They are called “Sheffield homes shabby white window pane mirrors” https://www.findnsave.com/offer/Sheffield-Home-Shabby-White-Windowpane-Mirror/34939934/
Are these the same ones??!? I love them! Yours look more grey in the pictures. Thank you for your inspiration!
Kelli, they look like they are the same ones. Ours are light gray not white though. Glad you liked them.
Great remodel!! I especially like the distressed look of the frames around the mirrors. Clean and crisp with that touch of rustic. Nice.
Thanks for the nice comment, Josh!
What a beautiful Bathroom Remodel! I like how you kept everything light and made your towels the pop of color. I’m also a big fan of your mirrors. Where did you get them? If you don’t mind saying:). Great Blog by the way.
Anne, thanks for the kind comment. We bought our mirrors at Home Goods, in Salt Lake City, Ut. We did have a reader find a place online, of where to buy them as well. See the comment by Kelli D.
Tip: When using MDF its always best to put a first coat of oil based paint on all to-be-painted surfaces. I keep a spray can of oil based kilz primer around for just this so i dont ruin brushes…
You mentioned that you had to paint the medallions a lot, which is the case because MDF is so porous to water. You will also notice that water based paint raises the ‘grain’ of mdf, requiring you to sand between coats a lot. A single coat of oil based paint will eliminate this also.
Thank you for the tip, Greg!
Here’s to one bathroom houses! We also are redoing our single bathroom and are going to convert plumbing so we can install a two-sink vanity. That Caroline vanity is the exact one I’ve been eyeballing. All that storage is very tempting. So a year later – how is the vanity holding up? Are you happy with it? Would you use it again?
Hi Dana,
It is holding up really well. The cabinet looks great. It is easy to clean because of the finish they use too.
My only complaint has more to do with hard water (Utah’s water is really hard) on the marble counter is hard to keep under control…
Otherwise the vanity is great.
You painted the walls WHITE???! With kids around??! You brave, brave woman.
I am personally leaning toward a friend’s idea which is to have the paint store color-match to dried Colgate Kids blue. 😉
Seriously, though, it looks awesome. I wish to enlarge our main bathroom sink space – we’ve got a ridiculously huge vanity for the single sink. However, we just had to redo the downstairs bathroom because of leaks, so my husband may rebel against more non-emergency DIY for the foreseeable future.
HaHA! Dried Colgate Kids blue paint could be the next big thing in kid-friendly bathroom style! Thanks for the comment, Katie, and good luck with your renovation wishes!
I know this is an older post, but I happened on to it while looking for vanity ideas. Noticed you mentioned that you had two layers of drywall. Just wanted to let you know that that’s a common practice when trying to soundproof a room. Adding the second layer of drywall serves to decouple the wall from the studs, and helps to attenuate any sounds that may come from the room. Sounds are merely vibrations moving through space, decoupling the wall helps prevent the vibrations from travelling into the next room. Based on the drywall on the other side of the studwall that your vanity and toilet sit against; I’d say the previous owner was attempting to reduce toilet/bathroom noise in the adjoining interior room.
I like the vanity and top combo. Those mirrors really tie it together!