Build a Budget-Friendly Industrial Shelf Using PVC Pipe

How does the price compare? A 10-foot length of pipe costs between $4 and $20 (for electrical conduit up to copper, black, and steel pipe) and each flange/fitting will set you back around $2. Compare that to around $2 for 10 feet of PVC pipe and 50 cents for each joint (or less if you buy in bulk), and the savings add up substantially! (The prices may vary a bit geographically, but across the board, PVC is nicer to your budget than metal pipe, and the savings more than offset the cost of the spray paint!) Here’s Corey to show you how to create an awesome, custom industrial shelf without using up your kids college fund:
DIY Industrial Shelf Using PVC Pipe
by Corey of Sawdust 2 Stitches
Hey all, this is Corey visiting from “Sawdust 2 Stitches”. I am quite certain I have a problem… You see, I will look at a space and start to brainstorm ideas. Innocent enough, right? Well, the only problem with an innocent brainstorm is that it typically turns into a full scale, category 5, hurricane. Undoubtedly, I will be up to my elbows in paint at 3 a.m. (If you are nodding your head in agreement, take comfort in the fact that you are not alone.)
I was sitting on the floor, staring at this wall. Not exaggerating. (If something bugs me, I will sit and stare at it until I figure out what is “off” and then come up with a solution.)

Granted, this space wasn’t that bad, but it wasn’t great, it was just, blah. It lacked the “wow factor”.

Gorgeous right ? Well, for $5,998.04 at “Nuevo Living” it better be gorgeous! (Can you believe that is the “Special Price”?) Since I don’t just have that chunk of change collecting dust, I needed to find an alternative solution.
At that particular point in time I had been on a little bit of a P.V.C. pipe kick and had some leftover material from my “Light Fixture” and “Bed Canopy”. So, I marched downstairs to the garage and returned with my bucket of PVC. After playing with a few different possibilities, I was able to create some dimensions I liked. The rest is history. Right around 3 a.m. I was crawling into bed with this awesome shelf sitting in my upstairs hallway.

So if you have a “problem area” this may be just what you need, and here is what you will need to do it:
- Rubber Mallet
- Sand Paper
- Saw (I would suggest a Miter Saw)
- Drill
- 1″ Paddle Bit
- Sander (Suggested)
- Spray Primer
- Metallic Spray Paint
- Stain
- 2×10 wood planks (Amount varies by project size)
- 3/4″ PVC pipe (Amount varies by project size)
- “T” PVC Joints (Amount varies by project size)
P.V.C. pipe is AWESOME. Why?
- It’s cheap!
- Adaptable to nearly any space or design.
- Again, it’s cheap! (In my book that should count twice.)
Overall this is a fairly inexpensive, easy do-it-yourself project!
Bad news? You will need to create your own personal blueprint to accommodate your space.
This project is about 75% prep work…
Step 1: Think it through
Take the time to map out your dimensions! Unfortunately the whole “measure twice, cut once” logic applies. Once dimensions are established you can get started!
Step 2: Sand
Using a piece of “fine” grit sand paper scuff up the entire exterior of the PVC pipes, joints, and elbows.
Step 3: Cut
Using a miter saw cut the PVC down to predetermined measurements.

Step 4: Prime
I began by putting together my brackets. (It’s easier to spray them this way.) When priming I HIGHLY suggest using a gray spray primer. It quickly and evenly coats the pipe. Added bonus: Since it is already primed a darker color, it will make top coating much easier.

Step 5: Paint
I used Rustoleum’s Oil Rubbed Bronze. (Remember several light coats, as opposed to one heavy coat. This way you avoid drips!) Next, exercise patience and let it dry COMPLETELY.

Step 6: Prep Wood Planks
While the PVC pipes are drying, get started on the wood plank shelves.
For the shelves I used 2×10’s, in varying lengths. (You will need to adjust the length of the shelves to fit your own needs.)
I used a 1″ paddle bit to drill holes that would allow the PVC to fit through it.

Step 7: Sand and Stain Wood Planks
Sand the boards and then stain them. (I used Jacobean by Minwax.)

Step 8: Assemble!
This was my favorite part, assembling the puzzle! This is when your blueprint will come in handy.
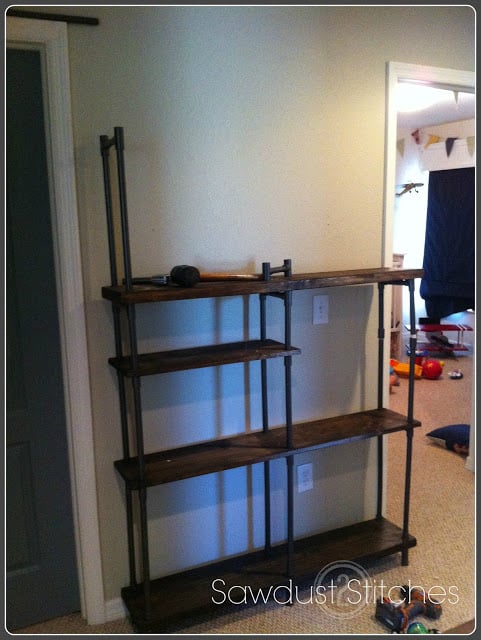
Slowly but surely it started to come together. Might I suggest using a rubber mallet? Sometimes making the pieces fit together required a little “finesse.”
Final step:
Breathe easy, you’re done! I love that it is totally and completely customized! It creates that old-meets-modern feel of the industrial pipe shelving for a fraction of the cost!


So step back, open a can of cold Diet Coke and admire your new shelf!
Take luck, Corey
———————————————
Amazing, Corey! Such a great way to get the look while saving some cash.
Head over to Sawdust 2 Stitches to check out Corey’s other projects, such as her industrial-style suspended shelves, $4 faux metal industrial signs, crib mattress porch swing, or the awesome indoor fort she built for her boys! And you Remodelaholics will love the space she calls her “craft room” — go pay her a visit!
READER FEATURE: Uncookie Cutter was inspired by Corey and built an industrial PVC shelf to work as a mantel on her brick fireplace wall — and it hides her TV cords, too!

Looking for more ways to create the industrial look on a budget?
Pallets and reclaimed wood are a good place to start:


And Just A Girl teaches you how to get that Restoration Hardware wood finish!

Browse around the hardware store (or craft store) for supplies like L angles

chain


diamond plate panels

electrical conduit (the cheapest metal pipe material)

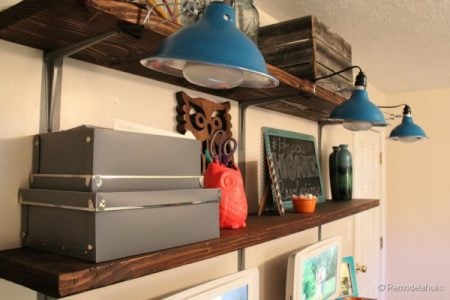
or industrial style lights like we attached to our rustic wall shelves in our office organization makeover.
And don’t forget to watch for a good upcycle candidate, like this music stand tripod lamp!


Very excited to be here. Love the whole site, so many awesome ideas!
Oh wow, I love it, it is perfect and it looks amazing. Great tutorial too. I would love for you to link up to my Inspire Me Party that is ongoing. https://www.astrollthrulife.net/2014/04/212th-inspire-me-tuesday.html Hope to see you there. Hugs, Marty
Thanks Marty, I will definitely head over and check it out!
I LOVE that! I love how it was placed over the doors. I love industrial! I would love to live in a great big industrial lofty space with an elevator big enough for a car. 😉
In our closets we used this pipe instead of the usual wood hanging rods. Holds tons of weight
without having to worry about drooping or breaking. Spray painted white which I have to admit didn’t hold up too well on top with the sliding hangers and all. But I would use it again and with the shelving above you can’t see the scratches.
Even after 15-years this June…I’ve still not added the end caps. eek.
Thank you so much! Half of the reason I went with this option is because I wanted it to go over the doors! I love the way it turned out. I am like you though, haha I will get down to the last finishing touches and just … stop… I have curtain rods that didn’t have end caps on them for years. This only changed because I had family coming into town… That’s when all the finishing touches get done! Ha.
Since when do you NEED end caps for a steel pipe closet rod?
if you & the family are happy with it, who gives a rat’s posterior?
you live with this….they do not.
You have to look at it……they do not.
If they is ever a problem with it, YOU have to fix that problem….they do not.
So as I stated earlier, who says you NEED these end caps?
The way I see things about these end caps, is that you should not mind, because the end caps do not matter.
This rod works just fine w/o them. : )
I’m so excited to see how great PVC works! We’re planning to do a whole bedroom like this for my teenage son (he wants a “Fallout” style room – video game), and though the room he will have is small, I still cringe at the price of metal pipe! I’ve wondered about PVC, and it looks wonderful!
PVC is a great option! I had considered many other options and this was definitely the cheapest. Another great perk with pvc is you can easily cut it to fit your space. So regardless of the size of the space it is totally doable! Good luck!
What size PVC pipe did you use? I love this idea and love that it is so much cheaper than black or galvanized pipe, but I’m afraid to build myself a desk. I would hate to build something so beautiful only to have it collapse from the weight!
I love the look of this and it solves a problem I’ve had as well with the cost of actual pipe and fittings for a large scale shelf like this! My question is, how sturdy is the unit? I’d be concerned that it would be able to be pulled over by the kids. Is it attached to the wall somehow?
Ann Marie,
Good questions! If you are looking for something a little more sturdy, I think I might consider using a larger diameter PVC pipe!? It would increase the stability considerably. I have 2 and 4 year old little boys, and they have never pulled it down. BUT, I did purchase these:
https://www.homedepot.com/p/Halex-3-8-in-1-2-in-Conduit-and-Pipe-Hangers-5-Pack-26780/100130865
I had intended to install these to the wall as a form of a shelf support, because I had the same concerns as you.
Hopefully that helps!
I build these shelves and I agree they need to be attached to the wall. I use 2 L brackets that I attached to the underside of a shelf and to the wall.
Love it! I would like to do this as bookshelves. Do you think the PVC could hold a whole shelf of books? I have a lot of books (took a whole day to move them). So a cheaper option to shelve them would be great.
Another great feature of PVC pipe is that is comes in a variety of sizes. I think using it as a bookshelf is a totally feasible! I might suggest using a 1 1/2″ possibly 2′ pipe, and securing the pieces together using pvc primer and glue. (You can find it in any hardware supply store.) I think this is a very doable option!
Thanks for your questions!
Corey
I love this! It’s so simple and is a definite money saver 🙂 We’re building a new house and I will definitely use this for my office.
Thanks Dusty, building a new house is so much fun! I have always wanted to use this on a full wall… Think Beauty and the Beast… Ah… Someday!
Thanks for your feedback, and good luck!
Corey
Love this! I’m totally going to make a buffet/console sized version to line one wall in my dining room.
Thanks for the comment, Megan! We’d love to see a pic when you build it!
How did you attach it to the ceiling? It looks great and I want to do this for a closet organizer but I haven’t figured out the ceiling piece yet.
That is a GREAT question, one that I never did answer. You see, it is not actually “attached” to the ceiling. I needed a little bit of clearance to install the top pvc pipe, so there was an unsightly gap. To fix the eye sore, I used a pvc flange/adapter. Basically slid this flange onto the pvc pipe prior to installation. Then once the pvc pipe was in place I slid the flange up, so that it rested on the ceiling. (They are tightly fitted, so it stayed put just fine.) Making it appear as though it is mounted into the ceiling, and bridging the gap.
The planks that run over the door frames are in fact secured to the door frame with screws.
Hopefully that helps!
This is what the flange looks like:
https://www.pchemlabs.com/product.asp?pid=1387
Hi, can you tell me what the wood shelves are actually resting on in the structure? Sometime it seems as if they are not really resting on the cross beam, but atop the joints. Is that correct?
Zed,
You nailed it! They are resting on the tops of the joints. The “cross beam” is in many ways for looks and added stability. The wholes that are drilled through the wood shelves are only wide enough to allow the PVC pole to fit, not the diameter of the PVC joint.
Although… if you wanted to go the extra mile you could use a wider paddle bit and drill part way through the board , allowing the joint to sit partially in the bottom side of the wood plank.
Thanks for the comment, and good luck!
LOVE LOVE LOVE this! I do have a question. I want to do this on a wall that is cathedral so we CANNOT do the piping all the way up. Do you have a suggestion on how to finish off the top?
Lee Ann,
That sounds like it will be beautiful! I would probably extend the pvc up past the top shelf by a few inches, and then use a 90 degree elbow and then use a straight piece and make it long enough that it will touch the wall . You could use a floor flange to connect it to the wall … it would look like the top of this https://www.pinterest.com/pin/10485011607869458/
( I haven’t been able to find a functional plastic flange, I can only find galvanized metal ones…) Thanks for reading!
I love this! I’ve been looking to make some pipe shelves for our office and have been astounded by how much even a small version using metal pipes would cost. Can you tell me about how much this project cost? Thanks!
Can you tell me how it is attached to the ceiling?
Dawn,
Someone had the same question as you. This is what I did :
“…it is not actually “attached” to the ceiling. I needed a little bit of clearance to install the top pvc pipe, so there was an unsightly gap. To fix the eye sore, I used a pvc flange/adapter. Basically slid this flange onto the pvc pipe prior to installation. Then once the pvc pipe was in place I slid the flange up, so that it rested on the ceiling. (They are tightly fitted, so it stayed put just fine.) Making it appear as though it is mounted into the ceiling, and bridging the gap.
The planks that run over the door frames are in fact secured to the door frame with screws.
This is what the flange looks like:
https://www.pchemlabs.com/product.asp?pid=1387”
Hopefully that helps a little, thanks for reading Dawn!
Corey
Hey Corey, are you still paying attention to this comment section? I have a few important questions I’d like to ask, I love this shelf!
Sorry about the delay! Fire away.
How well does the PVC Piping hold up to weight? I’d love to make bookshelves and have a ton (figuratively) of them.
So sorry for the delayed response, if you are going to be putting a lot of weight on them, I would consider using 2×10″s and opt for a larger pipe, like a 1-1.5″ pipe.
How much did the entire project cost? Mainly the pvc pipe and boards. How did you draw it out? Etc.
I honestly do not remember, I used a lot of boards that I had leftover from various projects, which was a huge part of the costs. Most of the PVC joints you can purchase in “contractor packs’ and are relatively in expensive.
Loving this shelf! Do you happen to know about how far apart you spaced the shelves?? Thanks!
Hi! We want to do this in our son’s room but have a couple questions. How sturdy is it? In other words can it withstand a growing boy or is it more for decorative purposes only. Also how can you or did you secure it to your wall?
I think it is definitely doable. I would use a 2×10″ boards and opt for thicker pipe like a 1-1.5″ pipe. You can use “pipe hangers” to secure them to the wall. Just make sure to hit studs!