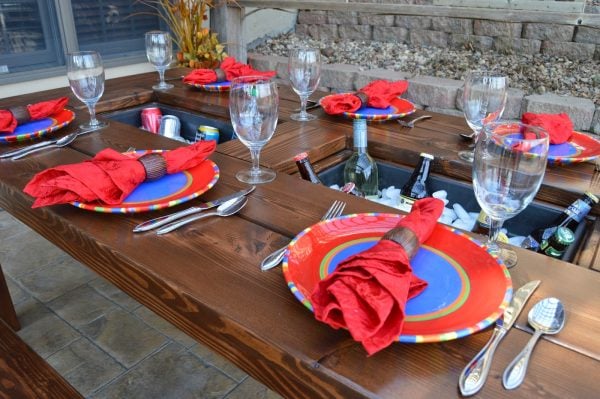
Build a Patio Cooler Table with Built-In Ice Boxes


This DIY patio table is the COOLEST, thanks to the built-in ice box drink coolers in the center! Follow the woodworking plans to build this picnic table with cooler and matching benches to make your outdoor dining area the place to be this summer.
You’ll also want to build this simple DIY modern pergola and indoor-outdoor farmhouse coffee table.

DIY Patio Table with Built-In Ice Boxes
designed by Heidi of Kruse’s Workshop
The very talented Heidi and Brent from Kruse’s Workshop designed and built this DIY outdoor table and benches to turn their patio into a dining area for BBQs and summer parties.
We teamed up with Amy from HerToolbelt to draw up the woodworking plans, so you can build your very own ice chest table and matching easy outdoor benches .
Get the printable patio table plans
Building A Patio Cooler Table
Howdy from South Dakota! I’m Heidi, and along with my trusty husband, Brent, we’ve been busy remodeling and building everything from picture frames to doll houses in our upcycled garage aptly nicknamed, Kruse’s Workshop. We are excited to share our detailed plans outlining our process for building an ice chest patio table, which we fondly refer to as “The Patio Party Table.”

Visit Kruse’s Workshop to see Heidi and Brent’s industrial iron pipe photo display and the amazing Barbie house they built!
This post contains affiliate links. Learn more and read our full disclosure policy here.
Dimensions
The finished patio table measures 76 1/8”L x 40 1/2″D x 30”H and features 2 drink coolers with lids.
The finished dining bench measures 64”L x 15”W x 17 1/2″H.

Materials:
- Printable Woodworking Plan (includes both cooler table and benches)
- 5 – 2×8 8′ length (table top)
- 2 – 2×6 8′ length (ice box lids)
- 5 – 2×4 8′ length (framing/skirting)
- 2 – 4×4 8′ length (table legs)
- 3 – 1×4 8′ length (ice box supports)
- 2 – 10″x20″ plastic planter boxes – see photo below
- 2 1/2″ Kreg pocket screws
- 1 1/2″ Kreg pocket screws
- 1 3/4″ Deck screws
- 8 – 5/16″ x 3″ bolts
- 8 – 5/16″ washers
- 8 – 5/16″ wood anchors
- 120 grit sandpaper
- 80 grit sandpaper
To build the matching bench, you’ll also need (per bench):
- 2 – 2″ x 6″ x 8′ boards
- 3 – 2″ x 4″ x 8′ boards
- 1 – 4″ x 4″ x 8′ boards
For finishing the patio table & benches:
- Pre-conditioner
- stain
- exterior spar varnish
- foam brushes
- fine sanding block

Tools:
- Miter saw or circular saw
- Table saw (optional but very helpful)
- Measuring tape
- Pencil
- Drill
- Orbital sander
- Kreg Jig pocket hole jig
- Clamps
- 2 1/8″ hole saw
- 1/2 inch drill bit
- T square or L square (optional but helpful)
- face clamps like these


How do you add a drink cooler to a picnic table?
The table design is centered around these specific planter boxes, available in the outdoor/plant department at Home Depot or on their website.
At 20″ x 10″, they are the perfect size for a drink trough to hold plenty of summer time drinks while clocking in at less than $10 each! (It wouldn’t be a bad idea to pick up a few spares, in case you need a replacement down the road.)
If you can’t find these ice boxes or don’t have a Home Depot nearby, you can pick up similar inexpensive planters here or here on Amazon — you’ll just need to plan ahead and adjust the holes and supports to fit the slightly different length and width, so be sure to thoroughly review the sketched woodworking plans before beginning to build.
(And scroll down to see how one clever reader fitted the table to hold chafing dishes for serving food, too!)
Can I add an umbrella to the patio table?
There’s plenty of room in the very center of the table to add a hole to accommodate an umbrella, such as this.
See the reader-built photos here to see how one reader added an umbrella to the patio table with ice boxes.
How long does it take to build? How much does it cost?
With a few tools and plenty of patience, this project can be completed in a weekend, for as little as $150!
What is the best wood for an outdoor table?
Depending on the type of wood species used, materials will run anywhere from $150 – $350.
Cedar, a wonderful choice for outdoor furniture, will cost significantly more than Douglas fir, which is what we’ve chosen for the table you are about to see.
The Home Depot in our region carries Douglas fir, but only in the 2×8 and 2×6 material, so for the 4×4 legs we used Cedar.
How do you weatherproof a wood table?
No matter what type of wood you choose, several coats of a quality sealer are crucial to protecting the table and matching benches, not only from Mother Nature but also from our children, who are bound to spill dinner and dessert on it.
We chose to stain our table in American Walnut and then finish with several coats of water-based spar urethane in semigloss. (Read below for more details).
How to Build an Outdoor Table with Drink Coolers
Get the full instructions and dimensions to build the table and matching benches here in the printable woodworking plan.
Tip #1: Cut As You Go
We had seen similar ideas, but we felt we could improve the design to create a more durable, solid product that could withstand our brutal weather cycles.
For this reason, we do not recommend cutting your lumber to length in advance. We feel it’s best to make the cuts as you work through the plans, which will give you the freedom to make small adjustments as needed, ensuring a durable table.
As with any woodworking plan, be sure to read over all the construction steps in the Cooler Patio Table and Benches Plan before making cuts and beginning to build.
Tip #2: First Cuts
For each material and step, begin by cutting a half inch off one end of the board. Always take this first step when cutting a new board, as it will give you a clean, straight end to measure off of.
Tip #3: Sanding
As you build, sand each section of the patio table, smoothing all of the edges, rough corners and sides. It will be much easier if you sand the individual parts before the table is assembled.
Most of the sanding can be done with an orbital sander loaded with 120 grit sand paper. Rough spots may need 80 grit sandpaper.
Tip #4: Staining
After you’ve sanded each section, we recommend staining that section. It’s much easier to stain in portions than after the entire patio table is assembled.
Staining at intermediate assembly intervals (as noted in the woodworking plans) also helps ensure that the stain does its job to protect and waterproof the wood so your table will be durable in the elements.
Tip #5: Clamping
As you build, pay close attention to your pocket holes and screws. Place a clamp like this over your first hole to hold the boards level with one another. Drive your Kreg screw into place.
Keep moving your clamp with each screw that you put in to ensure the pieces remain flush with one another. This is especially important when building the table top, to keep pieces flush and even for a smooth and level tabletop.
Want a drink cooler table, but smaller? Build this outdoor coffee table!

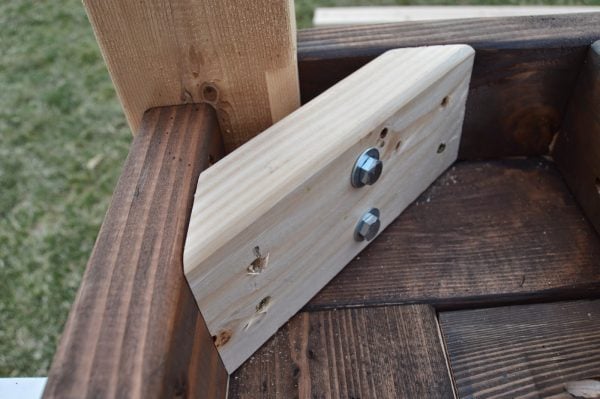
How to Make Your Own Table Legs from 4×4 Posts
It’s fairly simple to create your own legs using 4×4 posts, a table saw, and wood anchors. Full details are included in the woodworking plans, but we’ve included an overview here because this is a favorite woodworking tip to save money on table legs.
Create the leg, then attach it to the table using a diagonal support and bolts. This system makes it very simple to remove the legs for storage or transport.
To create the flat surface, angle your table saw blade to 45 degrees. Make a pencil mark so you know how far to cut. Set the table saw fence at 2 3/4″.
On the new flat face, measure and mark the locations of the wood anchors. (These should match up with the support brackets built in the next step.) Using a 7/16″ drill bit, drill the holes about 1 1/2″ deep.Insert wood anchors and tighten with a 3/8 allen wrench.
To attach the legs, build diagonal supports that attach to the skirting, cut from 2×4 with 45-degree angles at each end.
In the center of the diagonal piece, mark the same locations as the wood anchors in the legs and drill holes using a 1/2″ drill bit. Attach the support to the skirting using deck screws, then attach the legs to the diagonal support using bolts and washers.
How to Finish and Weatherproof an Outdoor Dining Table
Once everything is assembled, sand once more with 120 grit sandpaper.
Since we were using Douglas fir, which is a softer wood, we chose to use a wood conditioner so that our stain coat would come out more evenly.
About 15 minutes after I applied the wood conditioner and wiped off any excess, I applied a coat of basic interior oil based wood stain with a foam brush.
After the stain was dry, I applied three coats of this water based spar urethane, sanding VERY LIGHTLY with a fine sanding sponge in between coats.
And the finished patio cooler table looks like this:


Reader Photos and Alterations
We love seeing what you’ve built using Remodelaholic plans! Tag us @remodelaholic or #imaremodelaholic or submit a brag post here to show off your work.
Michael’s outdoor table with ice chests in the center
Michael writes: “This was my first-ever wood working project. I started with the benches and then moved on to the table. The benches worked great. I’m glad you mentioned not cutting everything for the table ahead of time. There were a lot of pieces that needed specific measuring towards the end (ice box lids).
“I used pressure treated pine. It made the table insanely heavy but will hopefully be good for a long time. Because of the weight of the table, I added heavy-duty locking casters to the bottom. This allows me to move it without getting the neighbors.

“I had a little bending in the long boards on the top. I added pocket screws going from the ice box frames across to the outside skirting and it pulled everything into alignment. Also, with the weight, I figured adding some screws would help over time.”
Doug’s Patio Table with Serving Dishes
Doug writes: “I was looking for a project I could build to donate to an auction being held by the PTO of my daughter’s elementary school. I decided on this table, but instead of using the planter boxes as ice chests, I made the holes in the table the same size as the opening for steam table trays. The trays come in about 24 different sizes, and they come in stainless steel as well as two types of plastic. They also come with lids and tons of accessories. Beware though, the trays can get expensive if you’re not careful.
“In addition to the rectangular trays, they have adapters so you can drop in different sizes of round buckets. The buckets are great for soups, sauces, chili, and the like, but they are also good for filling with ice and holding a few bottles of wine or a 12-pack of beer.

“I’m currently in the process of using some parts from an old gas bbq grill to create a small fire pit for the table. I am using one of the full size trays and putting the burner tube inside, covered with either broken glass or lava rocks. a small propane bottle will screw into the bottom of the tray and hang securely from the try while in use. I’m not sure how that is going to work out yet, but I think it will be really neat. The kids could roast hot dogs and marshmallows right in the center of the table.”

So very cool! What a great project, and to donate, nonetheless! A great project for a great cause. Thanks, Doug!
Allan’s Cedar Patio Table with Drink Coolers

Allan says: “Everything was according to the plans, except I made my table from cedar. The flower boxes I used were slightly more narrow and longer than the ones in the plans, so my table ended up being about a foot longer, all told. It’s the envy of our neighbourhood and a welcome place to sit down after a long day at work.”
Anita’s Recycled Wood Patio Table with Coolers
Anita says:”Saw the table and had to have one, but built it in my usual style, from recycled wood. You can make old look good again.”

Marielle’s COOL Table
Inspired by this patio table and our patio coffee table with drink trough, Marielle shared with us her “cool” table, as she called it. 🙂 She writes that they used one large board for the table top and cut out a perfectly-sized section to fit the serving tray so that it hangs by the 4 edges. And see the unique legs? Brilliant! Thank you for the photo!

If you’ve built anything following our plans or inspired by something we’ve posted, we’d love to see! Submit a brag post here.
Get the printable drink cooler patio table plans here.
More outdoor patio furniture builds:
- indoor/outdoor farmhouse coffee table
- DIY wedding arch garden arbor
- vegetable garden arbor and trellis (with raised garden beds)
- space-saving DIY deck benches
plus don’t miss the viral DIY fire pit pergola!

First published 04.24.14 // Last updated 02.07/20


What is the spacing between the table top boards?
Love this table, but would like to make it a little smaller with one opening in middle where I can swap between the drink cooler, and a drop in propane firepit kit. Any special preparation for the wood for use with the firepit kit?
This is a wonderful table. The directions look spot on. We’re looking to start building ours this weekend! We’d like to modify the design a bit and make a square table (59″x59″x29″). As we’re making this modification, what things (i.e size of the ice boxes, wood cuts) would you recommend we keep in mind?
Currently in the process of building this beast. Luckily our Home Depot has all of the lumber in stock. After lumber (Includes lumber for benches as well), screws, kreg jig, square, planter boxes, and stain and sealer, i walked out just under $300. I did have pencils, sand paper, sander, circular saw, cordless drill, and wood screws.
Some advice.
Get the Kreg Jig for 39.99 at Home Depot if you can’t fork out the money for the bigger one: https://www.homedepot.com/p/Kreg-Jig-Pocket-Hole-System-R3/202269070. And a regular Locking Torque C Clamp – https://www.homedepot.com/p/Milwaukee-11-in-Torque-Lock-Locking-C-Clamp-with-Swivel-Jaws-48-22-3521/205017708. Must have for ensuring the table top is all even, and clamping down the Kreg Jig.
I was able to use the 1 1/2″ screws, but had to do a couple of test runs to ensure a proper drill depth. If you place your drill bit in the jig, and place a screw next to where it drills into, you can get a pretty good idea of how deep you need to drill. This should prevent any second guessing. Also ensure the torque setting on your drill is set appropriately. I’ve stripped a couple of holes as the Pine is super soft.
If you can’t find those wood nuts at your store, check these hanger bolts out: https://www.homedepot.com/p/Unbranded-5-16-in-18-x-4-in-Stainless-Hanger-Bolt-48578/203537722
Just drill a pilot hole and screw them in using 2 or three nuts on the threaded end. I also Kreged the legs into the table, just in case.
Also, don’t skimp on sanding. I’m using a palm sander with 100, then fining it out with 150. Can’t wait to see how this beast turns out.
Always remember to dispose of your rags and paint brushes properly. I’ve seen these rags erupt in flames many times, you don’t want it to happen to you.
Thanks for the great tutorial!
Thanks for the tips and info, Matt! We’re excited to see how it looks! You can send us a pic here when you’re done: https://www.remodelaholic.com/share-brag-post/
I love this so so much! I even featured it on my blog’s Link Love this week 🙂
https://www.greenpalatelife.com/blogging/link-love-ser-5/
Thanks for the feature, Melissa!
Wow! We love this table! We decided to built it and are so happy that we did (our first project)!
Now that the table is done we are thinking about seating opportunities. We would like to build only 1 bench and the rest should be “normal” chairs.
Do you know where we could find a good tutroial for fitting chairs?
Cheers and thanks again for this awesome project!
Katharina
Hi Katharina,
How exciting, and for your first project, too! We’d love to have you send us some pictures here: https://www.remodelaholic.com/share-brag-post/
And now, for your question — Heidi may have some better answers, but I’m not sure how often she’s able to check the comments here, so it might be worth asking over on the bench tutorial on Kruse’s Workshop, too. But when it comes to looking for tutorials, I look to my girl Ana over at Ana-White.com and the gals over at Shanty-2-Chic.com — they have so many plans! I’m sure one of them would have something that would work for you. Hopefully that helps! Thanks!
Built this table and benches in 13 hrs. Went very well. I used 2.5″ screws on everything. I think the wood anchors in legs could be recessed in about 1″ if using Doug. Fir and 4″ bolts.
Also liked the idea of using kreg screws to anchor legs to table. Strengthens it up.
Gave tis to my father inlaw for Father’s Day!
Thanks for the comment, Mike — what a great Father’s Day gift! We’d love to see pictures if you have them. You can email us or fill out the form here: https://www.remodelaholic.com/share-brag-post. Thanks!
I built 4 of these so far, 1 out of for and 3 out of cedar, spent about $390.00 total for table and Benches in Cedar. I also recessed wood inserts and drilled 2-1/2″ deep to receive a 4 ” hex bolt. It seems to make legs stronger when moving around. Everyone loves them..
Thanks for the comment, Mike, we’re glad you love the table! We’d love to see some pictures if you have them.
Made the table during my vacation. Directions were great. Table looks great. Very solid. There are two things I would like to comment on. When attaching the ice box frame to the table using the 1 1/2 inch kreg screws I found it didn’t bite well so I used 2 inch screws and it made a difference.(There is room for it, will not go thru to the top.) When using the deck screws to attach the lid, PRE-DRILL. Otherwise the 1×4 splits. One other thing. I Had a 2×8 leftover. Bought five like the directions said, but didn’t need it. Otherwise good table!
how can we get instructions for this project?
Karen — all the instructions are there in the post, just scroll down a bit 🙂
headed to Home Depot to buy supplies and get building. so excited!
have showed friends see the post and want me to build them one too.
ill send pictures when done. thanks for the detailed post
We can’t wait to see! Thanks for the comment, Jake.
Where do you find the wood anchors? I tried HomeDepot and they didn’t have any..Thanks!
Can’t wait to give this a try, thanks for sharing with such great detail!
Hey Stacy,
You can use these from home depot: https://www.homedepot.com/p/Crown-Bolt-5-16-in-18-x-4-in-Stainless-Hanger-Bolt-48578/203537722
Essentially similar, except you screw in the threaded piece into the leg instead of throwing an anchor in it. These are fairly common amongst DIY furniture. Keep in mind, that you need to drill your counter holes perfectly, or they’ll screw in kind of funny. More difficult to install this way.
The ones in this post i had to go to a local Ace Hardware as the big box stores didn’t carry them. Make sure that you also have a hex key the size of the anchor opening and drill deeper than you will screw the anchor into.
Thanks for the help, Matt!
Hi there! We are almost done building this table and LOVE it! We have run into a problem though. We followed the instructions for the legs exactly and for some reason 1) our support holes aren’t lining up with the anchors in the leg on most and 2) the ones that are, when we tighten with the ratchet, the anchor starts coming out of the leg. Any ideas on what we could do to fix this without restarting the legs entirely? Thank you for the help!!
Hey Nina,
Congrats on getting this far!
1.)Are they too low or too high? Maybe not centered? I know I had an issue once where I didn’t measure the center of the block to draw my line.
2.)This seems like the pilot holes you drilled were maybe too large? If you’re using the coarse thread 5/16″ anchors, a 7/16″ drill bit should be used. If you use a drill bit larger than that, than you risk the chance of the thread to not properly grasp the wood. They should be pretty hard to screw in using the allen wrench.
Or that section of the wood could have been rotten? That would reduce the integrity of the fibers and allow the anchor to be stripped out.
To fix this and salvage the leg. Try drilling a pilot hole slightly deeper and smaller than the original one. Then thread the anchor in it and use a longer bolt to attach the leg to the table.
Or flip the leg upside down and face the 45* cut inside and start over. You might have little notches on the inside corners of your legs, but you’ll save yourself from buying, cutting, and sanding a 4×4.
let us know what you find out!
Thanks for helping, Matt! 🙂
Hi!!
I love this!!
I was just wondering with normal icebuckets (metal ones) water condenses and drips everywhere. Does this do the same thing with the planter boxes or do they some how prevent this?
I wouldnt want to have water dripping down on our feet.
Thanks!!
Where the heck can you find the wood inserts for the legs??! Can’t find them anywhere.. Also, would someone mind calling me and explaining how to make sure the bolt through the 8 inch brace piece lines up perfectly with the hole in the leg? I’m getting frustrated because I’m almost done!
I guess the technical name for those inserts is “threaded inserts”. Good luck finding them at a big box Home Improvement Store. I went to a local ACE Hardware and was able to find them quite easily.
Your best bet with 8″ braces is to make sure that they are perfectly centered. Use a larger hole, then use a washer if your bolt head is too small. This gives you plenty of wiggle room when aligning the legs to the 8″ anchor points.
Before you screw in the 8″ pieces, attach the legs to them first. Once they’re almost set, screw in the diagonal pieces to the table.
Good luck man.
How many people would you say this table fits? And what is the height, ground to table? I’m not a fan of benches, so I would want to find chairs to go with it. Thanks!
Hey Cat,
You’d be lucky to fit 4 chairs wide on the side. Comfortably it could easily accommodate 3 chairs on each side and 1 chair on each end for a total of 8.
It gets cozy with 4 people sitting on the bench.
What a beautiful table! Looking forward to this project but have a couple of general questions regarding the Kreg jig and pocket screws. Has anyone built this table using the Kreg Jig HD and the corresponding HD Pocket Hole Screws vs Kreg standard jig and the 2.5″ Blue Kote screws?
The pocket holes and screws are beefier but they are designed for use with 2x’s (1.5″ thick) so they shouldn’t present a problem, right? …., and along those lines I’m a little confused why you wouldn’t use the same 2.5″ screws when connecting the icebox frame to the table top if they are designed for use with 1.5″ thick stock.
Thanks for any thoughts and feedback!
I built it with the HD jig and screws and they worked out just fine. I wanted the extra support on the screws as I built my table larger than this one with another border of 2x8s. I wanted something I could fit my entire family at my siblings come over with their kids, which at 13 people is still a bit of a squeeze but can be managed.
Thanks for the feedback, Justin! We’d love to see pictures! You can share them on our Facebook page (https://www.facebook.com/Remodelaholic) or here, if you want to share: https://www.remodelaholic.com/share-brag-post/
Justin – that’s great! Did you also use the 2.5″ HD screws when you attached the icebox frame to the table top?
Thanks again for your response!
Can anyone comment on how much conditioner, stain, and spar varnish is necessary? 1 gallon of each? The varnish is $46/gallon, so I’d rather not get more than I need. Thanks otherwise for detailing this project, I’m really looking forward to using it when I finish building.
This looks awesome! I want to build it! We just remodeled our entire backyard and I was going to buy an expensive teak table until I saw this. Way better! I don’t see the version with a chafing dish. Was it removed?
Apparently it went missing — it’s back now! Sorry about that, Paul, but thanks for bringing it to our attention.
Thanks Cass! I just finished my table! What a fun project! I ended up staying with the ice boxes but the warming dish idea is awesome!
Yours looks AMAZING, Paul! We’ll get it added to the post here, so thank you for sending in pictures and your feedback about building it!