How to Build Space-Saving Deck Benches for a Small Deck

Krista had a small deck at the back of her home that just wasn’t living up to its potential to be an asset to the outdoor space. When she couldn’t find anything online (gasp!) that would give her exactly the seating she wanted without taking up precious deck footage, she hit the drawing board and came up with these brilliantly clever space-saving deck benches for a small deck, including built-in end tables! Check out the building plan and video tutorial.
See more projects like this in the #2x4andMore series, like our wedding arch garden arbor and patio table with drink coolers.

Keep reading for all the details from Krista so you can build your own space-saving deck benches that won’t take up the surface space of your deck! And don’t forget to check out the other 2x4andMore posts here, and be sure to subscribe by email or RSS and follow along over on Facebook and Instagram with #2x4andMore to see even more and get updates!
DIY Deck Bench Design

This is what my deck has looked like for the entire three years I have lived in my home. So sad. I wanted to try having a deck with no railing. (Partly to save some cash!) What I found was:
A. You need a bigger deck for it to look really good! like this large multi-level deck I spied on Houzz:

B. I worried about patio furniture sliding off the edge!
C. I hated that my kids used it like a diving board into the yard
D. I never used my deck. It was a giant landing.
So I brainstormed space saving seating ideas and searched the good old world wide web, and came across a few ideas. Unfortunately none of them really matched my criteria!
- Seats could not take up square footage from the deck (it’s only 10′ x 12′)
- They needed to have plenty of strength and support
- They needed a back rest
- I wanted integrated tables to also save space
- A wide seat so they would be comfy with cushions and pillows
I took some ideas from what I found on the internet, added a dash of my own creativity, and designed these!

Now, I understand everyone’s decks are going to be different sizes. So I will explain how to build the supports, tables, and benches, but MY cut list probably wouldn’t help this time. I’ll show how to size these seats to YOUR deck so you can enjoy these Space Saving Deck Benches too!
Building safety note: I did add additional support to the original framing of the deck before filming. This design was not engineered, and should not be used for applications higher than mine without doing so.
These instructions are provided for entertainment purposes only. Please consult a professional if you are attempting any projects of which you are unsure. Take all safety precautions when using power tools or other dangerous objects and read the instruction manuals before using any device of which you are unsure. Remodelaholic is not responsible for any injury or damage sustained while attempting to duplicate projects or tutorials. All projects are done at your own risk.
How to Build Space-Saving Deck Benches
Watch the video tutorial over on our YouTube channel, and subscribe for new videos each week!
This post contains affiliate links. Learn more and read our full disclosure policy here.
Deck Bench Planning: Hardware & Lumber Counts
The deck benches are built of 4×4 deck posts, 2×4 boards, and 2×6 boards. I prefer building with redwood lumber, but you can choose whatever type of lumber you prefer.

The printable deck bench building plan includes a worksheet for taking notes on how many of each type of lumber you’ll need for each section of the deck benches.
Step #1 : Measure the perimeter of your deck.

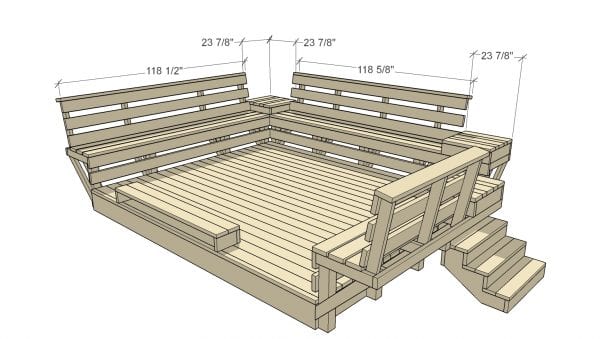
I wanted three benches. One along each side. The side tables are 23 7/8″ x 23 7/8″. 
You will subtract the width of the side table from the length of each side of the deck you want to look like this.
If you want a table in the corner like this. The lengths are reduced to allow for the table to rest on the supports for the seat of the bench.
If you are able to make your cuts perfectly than you are a better craftsman than I! I ended up having to make minor adjustments as I built, but taking the time to plan out using these measurements will ensure you have enough lumber to finish your project.
Using the image above, and your measurements for your deck make a list of how many 2 x 6s you will need for the bench fronts, seats, backs, and top plate. Make sure you do this for each bench you plan to build!
For example:
I would need (9) 2″ x 6″ x 120″ for the bench shown above. I always buy lumber longer than the cut to allow for changes!
I also added (2) 2×4 pieces to the bench fronts and backs when I was building. (see pictures shown during build instructions) It broke up the monotony of the 2x6s, and decreased the spacing between slats. It kind of looked like a fence before I added the 2x4s.
Continue to count for each bench you are building.
Step 2: Calculate Bench Supports: Use 4″ x 4″ x 8′ posts
The spacing for supports will vary based on the length of your benches. For table locations you will want your posts 22″ on center from each other, and I used a 30″ spacing for the bench. I wouldn’t go much farther than 36″ for strength, but you can average the remaining distance after the table to space your post evenly.

The apron of my deck was made from 2x10s, and the deck is 2x6s. Knowing that lumber isn’t truly the size we are told it is, I measured the actual width of the apron plus the deck. Mine was 10 1/2″. I wanted the height of my bench to be 18″. So my math looked like this:
Finished Bench Height (18″) – Bench slats (1 1/2″) = 16 1/2″ + Apron (10 1/2″) = 27″ posts
At this length (27″) you can get 3 supports from each post.
Using these guidelines determine how many support posts you will need, and what length they need to be.
Step #3: Calculate Angled Supports: 2″ x 4″ x 28 5/16″ ends cut @ 45 degrees

For each post (with 4 exceptions see below) you will have 2 angled supports cut on 45 degree angles @ 28 5/16″. At this length you can get 3 angled supports per 2x4x8. ÷
There is always an exception, and here it is! Where the posts were close to the house, or there was already metal framing straps where I needed to attach the supports I adjusted the location and length of those supports.
Rather that attaching them to the side of the posts like the others, I attached these to the face of the posts like this.

I had 4 locations that needed this support configuration. Take a minute to look at where you are planning to place your support posts and plan accordingly.
Step #4: Calculate Horizontal Supports: 2″ x 4″ x 20 7/8″

For each post you will have 2 2″ x 4″ x 20 7/8″ horizontal supports (no exceptions!)
You should be able to get 4 per 2x4x8
Step #5: Calculate Outside Skirts: 2″ x 4″ x ?

For the skirt pieces you will need 2″ x 4″ x (length of bench) for each bench. If you will have a corner table, you will need to add length to support that as well. I couldn’t get a 2″ x 4″ x 16″ without going to two home improvement stores, so I used (2) 2″ x 4″ x 8″s.
Step #6: Calculate Back Supports: 2″ x 4″ x 27 9/16″ (ends cut @ 10 degree angle)
 You will want 1 back support for each post that is not an outside post for a table, as shown above.

Cut @ 27 9/16″ with the tops and bottoms cut at 10 degree angles. This angle will allow for a comfortable recline when you are sitting on your newly built benches!
You can get 3 back supports per 2x4x8
Step #7: Calculate Side Table(s)

You will need (5) 2″ x 6″ x 23 7/8″

You will need (2) 2″ x 4″ x 23 7/8″

You will need (3) 2″ x 6″ x 20 7/8″
These quantities will make one table. Multiply these counts by however many tables you are building.
Phew! Lumber counting complete! Now go spend some money.
Add the following to your list when you head out to the store:
- Deck Tie Brackets: 2 per post
- SD Screws (#9 x 1-1/2″): 10 per post
- 3/8″ x 2 1/2″ Lag Screws: 4 per post
- 3 3/8″ 18 gauge adjustable L-angle: 2 per post
- 10d common nails: 12 per post
- 3″ #9 Coated Screws: 3+ 5 lb boxes
- Stain and sealer to match your existing deck: 2+ gallons
|
|
|
|
|
|
|
|


Building the Deck Benches
Lumber Cuts
Set up jigs to help your cuts stay uniform, and cut all pieces needed for support posts. Per post this should include:
- 1 – 4×4 post
- 2 – 45 degree angle supports
- 2 – horizontal supports
Support Assembly
Attach Deck Tie Brackets to each post using screws as specified by manufacturer.

I set my first bracket flush with the bottom of the post, and the bottom of the other 7 1/2″ from the bottom of the post.
I had to adjust these on one corner of my deck because of existing framing plates. You may or may not need to do this.

Next attach horizontal pieces using 3 deck screws drilled through the horizontal support into the post, making sure they are square. These are not, and they caused me problems later!

See how wonky they were! I had to redo these so my bench was level.

For the posts close to the house, attach the angle supports that are secured on the face during this step.

Using 3 deck screws, attach the top of angle support into the horizontal support. Then predrill through the bottom into the face of the post for 2 deck screws. Attach to the face of the post.

Then attach the other horizontal support.
Using lag bolts, attach posts to deck apron. A helper or clamp is needed to hold these in place as you attach them. I clamped them in place, predrilled holes. Make sure they are much smaller than your lag bolts so the lags have plenty to grab on to. Then using a 3/8″ socket in your drill, drill lags into apron, and secure each post in place. Remember 22″ on center for table locations, and then the distance you predetermined during the planning stage!

Repeat, repeat, repeat. Until all posts are attached.

Next, attach the 45 degree angle supports. 
I used three screws to attach each angle support to the side of the post.

Then, pre-drill for your screws so you don’t split your supports. I used two screws drilled up at an angle into the horizontal support pieces. Again, a helper or clamp is great for this step. It will ensure your supports are flush with each other. Make sure to use a level during this step. Keep horizontal supports level, and flush with their neighbors!
After you have secured it to the side of the post, and to the horizontal support, use the L-angles at the base of each 45 degree support to tie the support and the apron together.
Repeat, repeat, repeat.
Attach Skirt and Bench Fronts
You will want to measure for exact lengths, as these can vary a little as you build.

Using two screws per horizontal support, drill screws through skirt into supports along the back length of each bench. Use a level as you attach skirt so your bench will be level when you are finished.
When you are finished your benches should look like this!
Now attach the bench fronts by drilling screws into support posts. Again, verify measurements before you cut, and use a level to ensure a beautiful finished product. These pieces should extend the full length of the framing.

Repeat for each bench front.
Attach Angled Back Supports

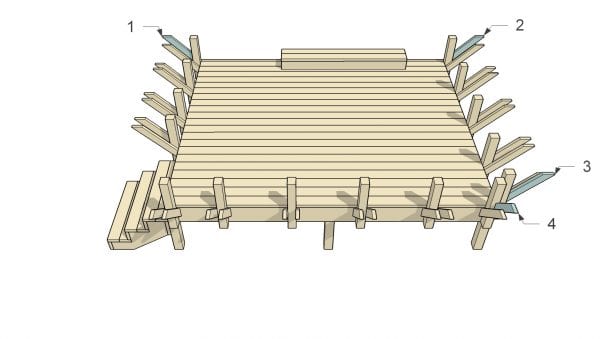
Clamp each support in place, and drill 3 deck screws through back support into horizontal support. Making sure the bottom is flush with the bottom of the horizontal support. Then drill 2 deck screws through the outside skirt into each back support piece.
Repeat, repeat, repeat! Until your deck looks like an upside down spider!
Assemble Tables
I found installing the tables before the benches was way better. This way your bench slats butt right up to the tables.
Cut all pieces for each table:
- 5 – 2″ x 6″ x 23 7/8″
- 2 – 2″ x 4″ x 23 7/8″
- 3 – 2″ x 6″ x 20 7/8″
I built one table, and then attached it to the deck, and then I built one while attaching it to the deck. I prefer the second method.

I used scrap pieces for this step. Attach (1) 2″ x 6″ x 23 7/8″ piece from the inside using 4 deck screws and a scrap piece of 2×6. Attach scrap piece to skirt making sure it doesn’t go below the skirt. Then place the cut 2×6 against the piece you just attached, flush the end of the 2×6 with the end of the framing, and attach the two pieces with deck screws.

Next attach the (3) 2″ x 6″ x 20 7/8″ pieces using 2 deck screws for each piece. Attaching from the outside through the 2″ x 6″ x 20 7/8″ pieces. I tried to not use extra tools on this project, so that people wouldn’t be put off if I used a Kreg Jig. If you want to hide these screws use a pocket holes to assemble your table.

Next attach the front of your table using deck screws into the cross pieces, and using another scrap of 2×6 attach the table front to the bench front from the inside.

Place a 23 7/8″ piece across the back, and attach by drilling screws down into the cross pieces.
Repeat, alternating 2×4 and 2×6 pieces.

Your finished table should look like this!

Repeat these steps for all of your tables.
Assemble Benches
Measure from end to end the length of your bench slats. If one end terminates near your home I recommend you leave 2″ or so (no more than 3″) between your bench and house. Cut all your bench slats. Remember, I added a 2×4 slat to the back support and bench front here.

Using deck screws, attach the first bench slat flush with the bench front drilling screws into the horizontal supports. Then place a couple scrap pieces of lumber cut into 1/2″ pieces between the first slat and the next. Attach to horizontal supports.

Repeat for the third slat.
Then starting at the top of the back of the bench, attach one slat. Making sure the front slat is level with the back support.

Using deck screw attach with 2 screws in each back support piece.
Using your 1/2″ spacers, clamp the next piece in place if adding a 2×4 slat. If not place the bottom slat 1/2″ from bench seat using spacers. Attach with 2 deck screws in each back support piece.

If you added the 2×4 slat, repeat this process for two more 2×6 pieces.
If you didn’t, mark the center of the space between the top and bottom slats. Then mark the center on the back of your 3rd slat for the back support. Line up both center markings, clamp in place, and attach using 2 deck screws per back support.

Finally add the top plate 2×6, by drilling deck screws down into the back supports. Making sure the top plate is flush with the front, and on the ends.

Repeat for each bench, and they should look like this at this point!

Next attach the another 2×4 & 2×6 to the bench front, using the 1/2″ spacers, and drilling 2 deck screws into each support post.

Do you see how the bench front pieces are longer than the actual bench because of the table? If you build the tables make sure you don’t cut the bench front slats to the same measurement of the bench. You will be sad if you do.
Attach all bench fronts, until your benches are completely assembled!
If only the next part was as easy and simple as it sounds!
Sand, stain, and enjoy!
If you’re looking to refinish your deck, see how Justin and Cassity refinished and restored their wood deck using oil here.

Add some colorful throw pillows and invite a few friends over to enjoy the fruits of your hard work!


Click here to get a printable version of these deck bench plans
Check out all the other outdoor 2x4andMore posts here!
- Build a portable garden wedding arbor
- Build a one-board hexagon planter
- Build a farmhouse bench from 2 boards
Pin this to save it for later!

 Published 08 July 2017 // Last updated 23 April 2020


Thanks for a great series! This is IMHO the best one yet. I see these decorated with some cushions and succulents.
Thanks for the kind words, Eric — these are my favorite project of the series, too! Krista did an amazing job.
This is awesome! Is there anyway you can give a price range to the project’s total? I’m wondering if this is in our budget… thanks 🙂
Looked everywhere for an in-depth guide on a deck bench project, thanks Cassity. The quality and thoroughness of the article is beyond incredible!
This looks like a great efficient build. It looks like it has been complete for a couple years now, have there been any problems with strength or durability?
Your math didn’t add up at all for the angle supports… there is no way at your length at a 45 degree angles it would work. we tried over 15 times, called a professional and they said that its impossible. these directions should be much more clearer unless you are wanting people to fail or hurt themselves…
I like this project, i wishYou could mention the height of the seat, or length of those short 4x4s.
I’m just curious why you used 2×6 boards for the bench fronts, seats and backs?
Couldn’t you use 1×6’s and 1×4’s instead? Where I live, the difference in price from 1×6 to 2×6 is about $10-$15 per board.
I’d also be interested in any input on this question, especially as lumber is super expensive right now! Would 1x boards be structurally sound?
Only for the sest and back surface not for the structure.
I built this bench per your design and I think it turned out great! Great design for incorporating a bench without taking away from the deck square footage.
Thanks for the comment, Mark! Glad to hear it worked out well for you!
As Ray commented, your directions for the angled supports are incorrect. They needed to be several inches longer in order to work. Unfortunately, I cut all of the posts and support pieces before I began building. As such, I didn’t recognize your error until I attempted to install the angled supports. In my case that was 14 supports. With the current high price of lumber, that is an expensive mistake.
Terence, I am sorry to here about the issues with the plan I am reviewing the plans right now to better understand what is happening. Could you send me a photo of the issue you are having so I can better visualize what is happening. In know that we have two different sizes for the angled support brackets depending on the location of the 4×4 bench support. Email a photo to hello@remodelaholic.com Thank you for reaching out to us about this – Justin