Check Mate! Painted Checkered Kitchen Floor: Guest
Erin at Perfect Sentiment has created a beautiful floor with paint. Can you believe it?
The kitchen floor is done.
D-O-N-E.
Take a look:

Well, okay. Here’s the whole truth… We still haven’t moved the refrigerator back into the kitchen, so the make-shift kitchenette in the breakfast room still remains. We have a few touch-up areas, and we’re still deliberating on a protective coat. (The paint peeps say we don’t need one with the floor paint enamel, but it just seems like we should. Thoughts?) We haven’t put back on the molding around the baseboards yet. Butconsidering my kitchen floor isn’t in it’s original state any longer, or in some unfinished limbo stage in between, I’m calling it a successful (almost) completed project! I’m sure if you’ve hung out with me here for more than a few days, you’ve figured out that I don’t move all too quickly in the big-decision department. I have what I’ve learned is called analysis paralysis. (Thanks, Ruth, for that great term!) I tend to think and rethink and consider and research and talk about and weigh my options and… Nothing ever gets done, speaking about my kitchen at least. So I am thrilled! As is my ever-so-patient husband.
Take a look at our process (pretty much followed This Old House’s step-by-step, except the measuring part: we started in the middle of the floor.):
2. Paint first color over entire floor. Our choice: Sherwin Williams Porch and Floor Enamel in Van Dyke Brown.
3. Deliberate on pattern, other color, and hem-ha over the tough decisions. Cutting out poster board squares in varying sizes helped me to visualize. We decided to go with 16 inch squares laid on a diagonal in a checkerboard pattern.

4. Measure, draw, and tape off the checker board pattern. This step took quite a bit of time and math skills. Yes, that is a glass of wine in the picture because, yes, that is a head lamp and straight-edge I had to use. It took some t-i-m-e, and hey, it was a Saturday night.
5. Paint second color of Sherwin Williams Macademia. We used the method of painting over the tape, starting on the tape and dragging the brush onto the square. Then using a small roller over it all. I will say that Frog Tape is so great! (And that bright green is such a delicious color, don’t you think?) We only had a few spots seep under and I think that was due to the tape job, not the tape itself.
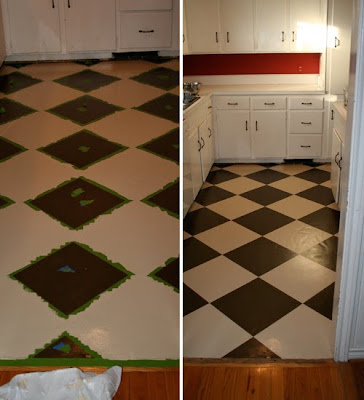
6. Peel off the tape before the paint has dried, and I chose to pray the whole time too. It worked!
7. Brush on 2-3 coats of water-based polyurethane. We deliberated on whether or not we needed to do this step. It made a world of difference in the ease of cleaning and durability.

I really do love the way it turned out. I think if I were to redo it(which I’m not) I would choose less of a contrast between the colors, but really I’m not disappointed at all. I’m on the hunt for a fun rug to put down in front of the sink.

And now it’s on to cabinets and countertops and all kinds of fun stuff. Maybe, just maybe, we’ll step up the pace. We’ll see… Don’t hold your breath.
I love the painted look! It looks so good!
What a great option for flooring.
Do you like the checkered look?


>UAU!!! I love it.
Congratulations.
>Love that floor! I've seen and heard of a lot of people painting sub floor and thought it was genius! Glad to see the finished product!
>love it! i've got that analysis paralysis thing too. 🙂 but look at your great work!
>wonderfull.. good work!!
>That's awesome!!! Would love to do that in my laundry room!
>haha – love the headlamp + wine. sometimes wine helps me clean the house too… =) wow! such hard work! it looks so great – good job!
>I wish I would have seen this before we bought our flooring – I was so close to doing this, and then chickened out!
>I could look at these all day! She did such a great job.
>I love Erin's floors and they look so great in person too!
>I love it! We have checkered floors in my office and I think I'm keeping them. I was going to do a wall-to-wall sisal carpet, but I bought these great 6' round jute rugs and the tile popping out from around them looks kinda of cool. Glad you're bring b&w tile back in style 🙂
>Thanks for featuring my floors over here!!
>Love these floors. I am considering doing the same thing in a home we are building. Now that you have lived on the floors for 6 months…is there anything you would say to think about before doing the floor? I would do it in my kitchen and I have three very active kids. Looking for something that is not high maintenance and doesn't look grungy easily. Would love your thoughts. Thanks!!
*really* stupid question . . . In doing a floor, was peeling the tape whilst wet a harder chore than on a wall? Seems like you’ve got to balance on the dry squares, and be ever so careful not to drop wet tape onto the finished squares, or even on the wet ones & mar them.