DIY Bookcase Hutch Hack
Hi everyone, Ursula from Home Made by Carmona here. I’m so glad to be back again at one of my favorite places to be, Remodelaholic! Last time I showed you how to make a chic set of DIY Gold Leaf Candleholders...out of shot glasses no less! Since then I’ve hosted several dinners to enjoy that great centerpiece.
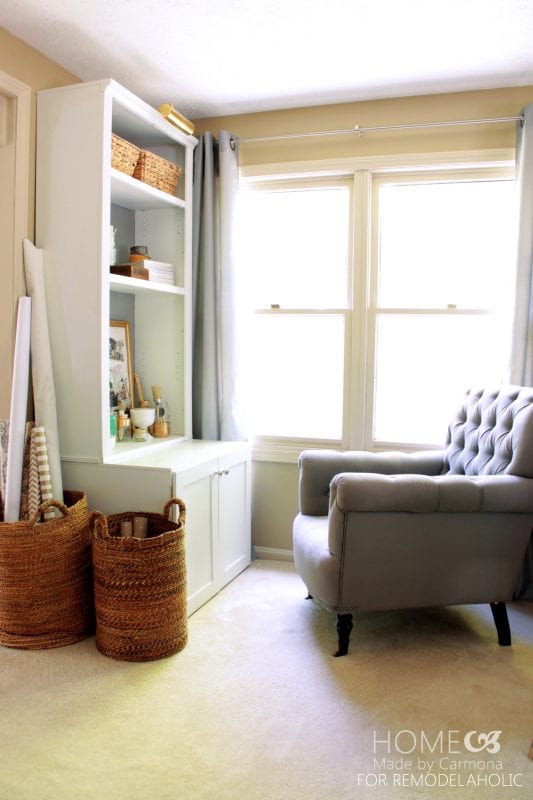
Today we’re moving from my dinning room to the living room for one of my favorite projects. I’m excited to share a great DIY method to hack your way to this stunning and storage friendly bookcase hutch.
Having custom made bookcases or hutches would cost an arm and a leg, and I need my arms and legs right where they are. So I was jumping all over the place with eagerness when this idea hit me…I mean, I’ve been dreaming of having two lovely bookcase hutches forever! Now, with two ugly old bookcases I found on the side of the road I would make two perfect storage hutches for my living room!
Yep, that is the before. That and some leftover wood from previous projects. Impressive right? Well let’s talk about how to make this bookcase hutch. Besides a bookcase, you could look for a kitchen cabinet base from a thrift shop and simply bolt the bookcase to it, but if you are looking for a custom size, here is how you build your own hutch as a base. Oh and by the way, I built mine to fit the width and height of my bookcases, so as long as your bookcase measures 31 inches across this is the plan for you! Otherwise, simply tweak the sizes to fit your own bookcase.
Material Dimensions
- Side Panels: 2 – 24 x 24″ sheets of Bleached wood
- Middle Panel: 1 – 24 x 21.5″ sheet of plywood (or bleach wood)
- Bottom Panel/Base: 31.5 x 24″ sheet of plywood (or bleach wood)
- Base Supports: 1 – 2 x 2″
- Top Panel: 34 x 24″ sheet of bleach wood
- Backing: thin bead board or project board, 1 – 32 x 24″
- Wood screws
- Wood filler
Step 1 – Build The Base
Start with the 31.5 x 24″ sheet of plywood (the bleach wood is a smoother finish used for the sides and top), and two – 2 x 2″ (or 2 x 4″ will work too) cut to the same 31.5″ length.
One 2 x 2″ will sit flush with the back of the wood panel like in the plans found above (this is the rear of the hutch), and the other 2 x 2″ will be recessed by 1 1/2″ (this will become the front). First use wood glue to adhere the 2×2’s, then flip the panel over and screw the pieces down. For this first part of the project you don’t’t need to countersink your screw heads, but this point moving forward you should countersink any screws that will show.
Steps 2 & 3 – Add Side & Middle Panels
Start with your 24 x 24″ panels, they will be attached to the two sides of the base.
But first let’s talk drilling guide holes, you need to do this so the wood doesn’t split. Here is an easy trick to know where to drill. From this point forward, you will line up a each wood piece and make sure it is square (I use my T-square to do that), then simply draw a line across where the pieces of wood meet, flip the wood around, and now you can see where the pieces meet so you’ll know where to drill and where not to!
Turn the entire unit on it’s back (back end on the floor) in order to attach the two side panels (from the outside) and middle panel (from underneath). The photo shows two screws for the side panel, but actually there are four screws…the point is to make it sturdy. One screw goes directly into each of the 2 x 2’s, and the other two screws attach the side panels into the base panel.
Step 4 – Attach Top & Back
Once you have the side panels and middle panel up, it is time to attach the 34 x 24″ top panel. You will need to set the bookcase hutch upright again and carefully center your top panel (you want the top to have an overhang lip at the right and left sides, but it should be flush at the back and front)…it is pretty sturdy at this point, but attach one side panel at a time making sure it is square and perfectly level with each one you do.
Just a quick overview of what you have accomplished so far (minus the backing, which you should also go ahead and attach). And in case you think you’d like to try two different versions of the hutch base, it is the same basic rundown, with one extra added piece.
Step 5 – Fill Holes & Paint
This is a good time to stop and fill all the holes and countersunk screw heads with wood filler. Let that dry, and begin your prime and paint job. Of course, painting will not be complete until you have assembled the entire unit… but the first coat can dry on the unit’s hutch while you work on it’s bookcase top.
Step 6 – Prepare The Bookcase
Before you place the bookcase atop the hutch, you will need to cut off the extra footer at the base of the bookcase. You want it to be flush with the bottom shelf. As you can see here I simply laid the bookcase on it’s side, removed the front trim, marked it with a straight edge, and used my jig saw to cut off the excess piece.
When you are done, place the bookcase where you want it to sit on top of the hutch. You will be drilling at least two holes from the inside of the bookcase, one on the far right and on the far left. Drill straight through the bottom bookshelf into the hutch unit so it goes through-and-through. This is where you will anchor the bookcase to the hutch using heavy duty bolts to lock the two together. If you would like to fill those holes in, you can do so with silicone, but if you are planning to move one day and taking them with you, leave the bolts exposed (just paint them instead so they aren’t as noticeable) so you can unbolt when needed.
So far, this is what you have accomplished, and this is what you have left:
An Amazing Storage Solution!
This part is optional of course, but what a great storage solution! I used scrap wood salvaged from old pieces of furniture and previous projects. In the end they will be painted white, and white vinyl cabinet finishing strips will be added to the front, so no one will be the wiser!
 |
 |
My husband and I store all of our games here, out of sight. I share an entire video tour of both bookcase hutches and what I store inside of each.
Making Doors
I used super thin project wood for the cabinet doors, the doors measure 23 x 16″. We’re talking 1/4″ press board as a base for my cabinet doors, and glued on 1/4″ project wood strips as paneling. Then prime and paint it, add a hinge and knob, and presto…closed storage! Doors are another item you can salvage if you prefer not to go DIY.
One final project after adding the doors; you will want to add trim to the connection between the bookcase and the hutch. Also optional would be to add trim along the sides of the bookcase to the wall for a built-in look. I didn’t opt to do that because I want to be able to bring my bookcase hutch along with me when I move, but I will probably make it a “built-in” in my next home. Then you finish your final coats of paint…it will look like they were meant for each other!
This entire build from start to finish is fairly straightforward and simple, but it requires a lot of time and patience. I can’t say how long this project will take, because I started during the winter months and could only work outdoors when the weather allowed, so this project took me a couple weeks of “a little bit of this” and “a little bit of that”. Don’t worry, yours shouldn’t take as long!
I love the final product, it makes an ideal storage space, work space, and both of my bookcase hutches look lovely on either side of my living room entrance!
If you like this project, you’ll love a few of the DIY projects I created especially for my bookcase hutch:
 |
 |
 |
———————————–
More ways to use existing furniture to build something awesome:
Turn an outdated wall unit into a kitchen hutch with plenty of storage (by The Learner Observer)
Turn kitchen cabinets into a great built-in desk (from Home is Where My Heart Is)
Use IKEA pieces to make a built-in closet
Hi, I'm Ursula from Home Made by Carmona, and I'm thrilled to be here at Remodelaholic! I'm on a mission to create big style on a teeny budget, and I'm sharing every secret I discover along the way!


Love it,so nice to make something pretty and purposeful out of a discarded find! I call them rescued treasures.
Love this project! The combination is stunning.