Lace DIY Window Film


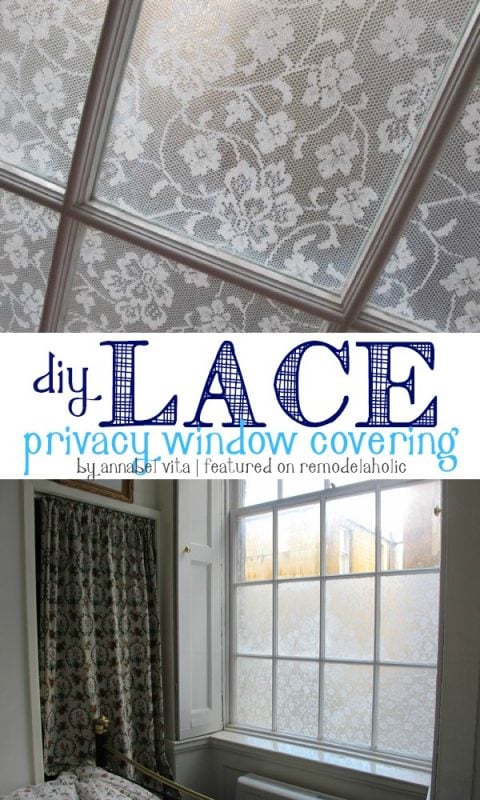
Add privacy but keep natural light with this lace DIY window film. Simple and inexpensive, you can totally get great results!
See all we have on windows, including: A New-Sew Magnetic Window Covering – How to Make and Install a Roman Blind – DIY Interior Window Shutters

How to DIY Window Film using Lace
by Annabel Vita

One day, with the help of this post from Manhattan Nest, I had a brainwave and added lace to the window with a pantry staple and some £1.50 lace from Ikea. Here’s how you can do the same.
DIY Window Film, Step 1: Prepare your lace.
I made a template of my window panes, but for a larger surface you could just measure it. Iron your lace if you can and trim it to size.

DIY Window Film, Step 2: Make up a starch jelly
First, mix two tablespoons cornflour (also known as cornstarch) and two tablespoons cold water until it forms a paste, then dissolve this in about a cup and a half of boiling water. You should end up with a nice gloopy liquid.
DIY Window Film, Step 3: Apply the jelly to the window
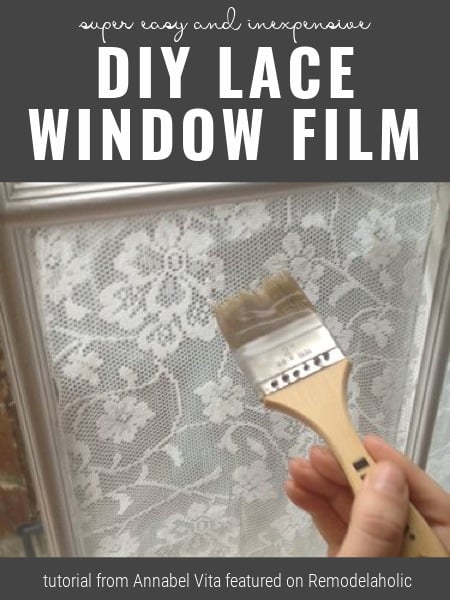
Use a brush to paint a thick layer of the gloopy jelly on to the window pane.

DIY Window Film, Step 4: Put lace in the window
Lay your fabric onto the pre-applied cornflour jelly.

DIY Window Film, Step 5: Brush on more jelly
Brush another layer of the jelly on top of the lace. Brush from the center to the corners but make your strokes slightly random. That way they won’t show too much when the jelly dries.
If your lace moves a bit, don’t worry! It’s easy to reposition at this point.
The best thing about using lace (with holes in) is that there are naturally no air pockets so you don’t have to bother with maneuvering bubbles to the edges to get them out.
DIY Window Film, Step 6: Let it dry
The starch jelly will take a while to fully dry out and it won’t be clear until it’s fully dry, so don’t panic if it looks a little white to begin with!

Q: Why did you need lace DIY Window Film?
A: Our old flat in a stately 1745 townhouse was packed with period features. The bedroom had delectable shutters, which I adored, but they made window treatments kind of hard. You either had to hang curtains in front of the whole alcove (we can tell by the holes in the trim that this is what our predecessors did) or not at all. For the last year and a bit, we’ve opted for nothing at all, except for a light-blocking curtain above the shutters. The shutters are great at blocking all natural light, which was great when we wanted it dark. But, the room got crazy beautiful morning light and it always seemed a shame to be getting dressed in artificial light just for the sake of privacy.

Q: Just how opaque is the lace DIY window film? I am curious how much privacy this actually offers.
A: I t totally depends on your fabric. If you’d be happy with getting changed behind the fabric as curtains then the fabric will be opaque enough for this window treatment too. I actually have lace curtains in this same fabric, and in both instances I feel happy getting changed behind them if it’s light outside. If it was dark outside and I had the light on, I wouldn’t be hanging out without my clothes. If privacy is really important for you, pick a lace that is more opaque than sheer.
Here’s a picture of my hand on the window…

…and held out as far away as it could go.

Q: What about mod podge? Would that work instead of cornflour?
A: We don’t really have modge podge here so I don’t know! It would be a bit more permanent I imagine. If it’s anything like PVA glue (I think it is) then I wouldn’t want to use it on wooden painted windows like we have, but it could work great on more modern windows. It would also be much more expensive. (The “glue” made out of cornstarch is essentially free!)
Q: If I used colored lace would the cornstarch show?
A: No, it dries totally clear (but goes on gloopy and white-ish, don’t panic!) It will probably go clear overnight.
Q: How do I clean it?
I would say it’s probably not great for a window that would get dirty a lot because you can dust or brush it but can’t wipe it down. I’d probably remove all the sheets of lace and run them through the machine in a lingerie bag every now and again and then put them back up. It’s that easy to apply.
Q: How do I remove the lace?
When it came to be time to move out, I sprayed the lace down with water and just pulled it away. There was a lot of residue on the window, but it soon came off with a scrubby sponge and VERY HOT water.

Thanks for reading! If you have any questions I will try and pop in to the comments here to answer them, or you may find the answer in the comments to this post.

More DIY window film ideas for privacy:
- DIY Window Privacy Film using Contact Paper
- Adding Privacy to Sidelights: Faux Stained Glass DIY
- How to DIY Faux Leaded Glass Windows
Please pin this for later! Also find more from Remodelaholic on Pinterest, YouTube, and Instagram.
Originally published 09.30.2014 // Updated 06.22.2021


I’d love to try this on shower doors, but I’m afraid it would not hold up to the steam/humidity; has anyone tried this with success?
You’d have to use something stronger gripping than white glue or modge podge. If permanent, any lacquer would do. It’d take a straight razor to get it off, and possibly mar the glass, doing so.
Hi Wanda! I am sure if you apply the lace on the outside of the shower doors it would be fine!
I live in Manitoba Canada, and our winters are ridiculously frigid (currently-45c with windchill????).
If I applied this cornstarch & lace treatment to the interior side of my window, any opinion on whether it would hold up with the outside being exposed to such cold and in the summer, to +30c?
Brrr, that is so cold! Since I haven’t tried this in my home (this is from a guest) I can’t say for sure how it holds up, but I imagine that the starch would be more durable to the changes in temperature than something like a windo film. If you try it, we’d love to hear how it works for you!
I’ve used this on my bathroom window and a kitchen door window for years; both are outside windows. We live in New England, and have some brutal winters and one or two hot, humid months in summers. I’ve never seen weather or temperature affect this recipe, and I’ve had my original bathroom window application on for three years now, and it’s still perfect.
This is the BEST recipe – thank you, Cass!
PS: My bathroom is tiny, and my husband rarely uses the fan when showering. Even the bathroom humidity in a tiny bathroom hasn’t affected this a bit.
This project saved me money and aggravation! We moved back into an old Victorian that we had rented for 8 years. One of our large picture windows had an argon leak that left the window foggy and dirty looking ???? I covered the window with curtains and kept them closed so I wouldn’t have to look at it. Then I came across this project! Hallelujah! I bought a lace panel from amazon for $5.99 and got to work! Just finished and the cornstarch is drying as we speak! Brilliant! I can have light and you can’t tell that the window is foggy. Before I covered this window I tried this on a cabinet in our upstairs hallway that holds towels and toiletries. That also bothered me that I could see that mess through the glass doors. Voila! It looks beautiful! Next I’ll be covering the bottom portion of windows on the third floor where my daughter lives. If I can figure out how to post pictures, I will later. Thanks so much for posting this project!
Just made the mixture. Super disappointed. It is not a gooey paste. It is thinner than milk and runs all down the glass. I will need to adjust your measurements.
Mine came out super thin also and I added more cornstarch.
Did you ever get it to work? How much water and cornstarch did you end up using?
Thanks
I’m wondering if this would work in very cold temps or would it freeze as I am applying it?
That idea could be also good for the shower’s dior od that could hołd up to the Stefan or humidity.
Probably asking for mold in a shower room. There are window clings- and all kind of them- that you could use for that purpose.
Just did a glass sliding door, I had sheer curtains, but they were constantly blowing through the door and getting snagged, decided to try this, just finished it and when it dries I’ll take some photos. Looks great at the moment. Next job, the Spa room sliding door.
We’d love to see, Sandra! You can message us on Facebook or email us at hello@remodelaholic.com.
This is a fantastic idea that I`m going to use when I move. It looks lovely. Where did you get your curtains(the floral printed ones)? I love them!
Awesome, thanks for this cool window treatment. I’m going to put it in to practice right now!
Hi
Can I do this process in my pop up camper on the vinyl window coverings?
Is it pliable ?
Great question! I imagine this could work if you can get the initial bond to the vinyl window with the starched lace — but I’m not certain on that.
You might have better luck with a contact paper privacy window or, if you have metal or can install magnets, this quick no-sew magnetic window cover might work, too.
If you need some lace but don’t want to pay the high prices on Amazon or eBay you can find it on Temu and Aliexpress. I discovered a few months back that just about anything that is from China and sold on Amazon is also available on one or both of those sites. The best thing is that the price is anywhere between from 50% and 75% cheaper. I wish I had known this before, and it is sure worth the wait for it to arrive. I have also found that of the two, Temu seems to be faster and easier to navigate when checking out. Regardless, the savings alone make it worth it. Since this stuff is all made in China anyway, why pay Amazon to rip you off?