DIY Tutorial: Modern Dining Table with Lattice-Style Square Motif


DIY Modern Dining Table with Square Motif
by Yvonne of Sunnyside Upstairs

Aloha! I’m Yvonne of Sunnyside Up-stairs. I type from the west coastline of O’ahu, Hawai’i about hand-making the furniture and finishes in my family’s once-empty 600 square foot home. Since I learned I could build furniture for little cost, I determined I would custom build what we needed for our small space. The 8″ deep herringbone console table I made for our mini entryway is one of my husband’s favorite pieces. I personally love the reclaimed wood coffee table I made for $5, and I am continually grateful that I was able to hand-build our entry door. It gives me a quiet smile every time I climb up-stairs to our little home.
I recently tackled a huge project for our kitchen, a table that I call our Squared2 Dining Table, inspired by the Squared2 Dining Chairs I built from Ana White’s plans. Since our dining table is so close to our entry door, we wanted something slight of frame, with a small visual footprint. We created our solution for under $90.
I usually build things based on what wood I find or have available, but for our dining table, I created my first set of building plans in PowerPoint, my go-to basic graphic and layout creator. I’m something of a web-Neanderthal. =D
The table frame itself was a simple design. I cut 8 – 1x3s @ 30″ to make the square legs and 2 – 1x3s @ 43″ for the table apron.

I attached the 30″ 1x3s using pocket hole screws that would show on the inside of the table and under the table legs.

Then I used pocket holes to connect the table apron to the square legs until the table frame was complete.

I spent an entire afternoon designing three different versions for a table top, but my husband ultimately wanted the first one, of course, which echos the back support pattern on our chairs.

I still used pocket hole screws and Titebond III wood glue to make the above pattern, first assembling the yellow and orange coded 2x2s to make U and L shapes.

I positioned the large U and L shapes, and then assembled the smaller Ls, which will create squares when attached in the right angles of the large Ls and Us. It’s a lot simpler than it sounds, I promise! 🙂
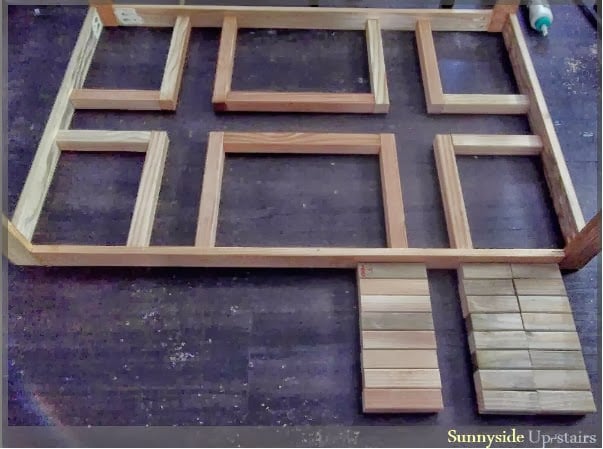
Once the smaller Ls and 4″ spacers were attached, I had this pattern:

Originally, I planned to purchase 3/8″ annealed or tempered glass, but my husband and I couldn’t afford the $300 price tag we were quoted locally. So, we listened to good advice, and purchased and cut plexiglass instead, hoping it would be a safer option for our 3 year old daughter, too. I scored the plexiglass repeatedly, and then applied pressure to the end to snap on the score line. I used pliers to clip off any excess pieces of acrylic that did not cut cleanly.


If you’ve ever been on the fence about your ability to make something yourself, I encourage you to give it a try! You may never know what could come of it otherwise. 🙂
Thanks for sharing, Yvonne! And I agree — it just takes a few DIY projects to catch the bug and then you’ll be building and remodeling everything! 🙂
Be sure to head over to Sunnyside Upstairs to see what else Yvonne has been designing and DIYing.


Love this!
I’m glad you like it, Korrie! 🙂
I am so glad you like it, Korrie!
Thank you so much for featuring my dining table today! 🙂 I hope it will be a help or inspiration to someone!
You are very welcome! Very cool!
I love the square motif design!!! Table is amazing!!! Great job!!
Thank you for your kindness, Crystal. 🙂
That is one fabulous dining table!!!
Thank you so much, Brittany!