Grey and White Kitchen Makeover
If you’re looking to give your kitchen a facelift and some style, grey and white are the colors to choose! They’re clean and contemporary and take well to whatever other colors you love to decorate with. Our guest today shared her breakfast nook with us awhile back, and now she’s here to share the rest of her gorgeous grey and white kitchen makeover:

Scroll down to learn more about Deme’s kitchen.
When you’re choosing a grey for the kitchen, just about anything goes! You choose what you love, based on your style and the lighting and design of your space.
You can go lighter like Mom and Her Drill shared here:

Or a little bit darker like Shanty 2 Chic’s gorgeous kitchen:
Or even to charcoal like this gorgeous kitchen (Style At Home via DecorPad).
But no matter what shade you choose, the updates can take your kitchen from blah to BEAUTIFUL! See how Deme painted and updated her kitchen to end up with a gorgeous grey and white kitchen.
Grey and White Kitchen Makeover
by Deme of House For Five
Hey there! I’m Deme and I’m so excited to be hanging out at Remodelaholic today! I blog over at House For Five where we share bits of our life as a family of five, and our learn-as-we-go adventures in DIY home improvement. After renting 5 homes in 6 years, we’re so thankful for a place we can get our hands dirty and make our own! Our 1968 house has great bones, was well maintained and is wrapped in wallpaper from every decade. We’re slowly peeling the wallpaper off the walls (and out of our hair) as we make it home.
Today, I am beyond thrilled that I even have a completed kitchen to share with you because there were moments of this makeover that I thought we might be living with primed cabinets, no cabinets doors, and a corroded sink for the rest of our days. This summer we made the push to finish the job that has lingered in various stages for almost a year. We could not be happier with our like-new grey and white kitchen!

We were lucky ducks to have our breakfast nook featured here at Remodelaholic last year.

It was all happy and bright and fresh and done. Until you panned out and turned around to see the rest of the kitchen…

-Replace the back splash
This kitchen was completely redone in the early 80’s, so the cabinets were a high quality oak and still in great shape. I knew without a doubt, the best way to freshen up the kitchen on our tiny budget was by painting the cabinets.
I’ve always loved a fresh white kitchen, and started painting the upper cabinets first in a semi-gloss Swiss Coffee by Valspar. I googled several how-to’s and stuck with the same basic steps that I follow when spray painting wood furniture.


Remodelaholic note: You can find this brush at your local hardware store or here on Amazon.
By the time I finished the uppers, the desert summer hit and it was too hot to paint. Which gave me a couple of months to think about doing something different with the lower cabinets. Dang Pinterest. I really loved the two-tone look with light uppers and dark lowers, but was too chicken. I was so close to playing it safe and going all white, but finally showed the hubs some pics of two-toned cabinets. “Tell me your honest opinion….”.

This time I was sure to get a paint with built in primer. I skipped the primer and all it took was 2 coats of paint and another round of touch-ups. Win!
I don’t even know how to describe how happy I am with the grey choice. It completely makes the kitchen, and is perfect for our family with 3 kids under 6 years old. The dirt and fingerprints are much less noticeable.

We also painted that small strip of wall below the ceiling the same Swiss Coffee white as the upper cabinets (but in an eggshell finish). Taking the white on the cabinets all the way up to the ceiling, visually extended the cabinets giving the room some extra visual height.

Swap out the Hardware
Having both dark and light cabinets to consider made the hardware choice a little more difficult. The appliances are stainless and the faucet a darker slate, so I wanted something that would relate to both. I brought home all sorts of samples….nickel, brass, iron, bronze, polished, brushed….and in the end landed on the very first one I picked up from Lowe’s in a polished pewter.

Since the old hardware on the doors was a pull with two holes, we simply put the knobs in the top hole and filled the bottom one with wood putty. Once it was dry, and after a little sanding and paint, the hole disappeared. You can also glue a wood dowel in the hole to limit the amount of putty you need to use and the shrinking that can happen when it dries. If you find the putty receded further into the hole when it dried, then just apply a little more and sand it down to level with the door surface once it’s dry.

The hardware reads lighter on the grey cabinets and darker on the white, and changes in different light throughout the day. It wasn’t too modern for the traditional roots of this kitchen but unique enough to feel updated and fresh.

Replace the Backsplash
We saw these tiles at Costco about 8 months ago. We knew we weren’t ready to install them yet, but at $18 for 5 square feet in a color we couldn’t resist, they came home with us.
We ended up having to shift gears to finish our master bedroom update to meet a deadline and out of town guests were on their way with our kitchen very much in mid-reno.

I knew we couldn’t finish the floors in our master and the tile work in time, so we enlisted the help of a friend-of-a-friend contractor. After seeing Tim work his magic, I realized that was one DIY task I was glad to have in the hands of a professional. With all those intricate cuts, it would have taken me weeks…months….maybe years to finish.

And man, were they a game changer! They completely lightened up the room.

Replace the Range Hood
You can see the old bone colored range hood in the pic above. There was grease. A lot of it. And we’ll just leave it at that. Fortunately, the hood was a standard size, so my husband swapped it out while I was out running errands one day (no pics!). Once it was installed, we had this empty space behind the stove…

We thought we had just enough tile to do this area, but it was all the scrap bits and pieces. We feared we might be short (or die a slow death of piecing together the tile jigsaw puzzle) and with Costco all sold out, we decided to do something different…

A coat of primer followed by three coats of chalkboard paint and we had ourselves a perfect spot to jot down recipes, cooking reminders (start the crockpot at 1pm!), or even leave notes for each other. It’s so nice to be able to read the ingredients from across the kitchen instead of squinting and fumbling with a recipe card.

Address the Sink/Faucet
Gross and frustrating. That was our sink. The old faucet handles were starting to corrode even under the plastic handles. The shallow sink/standard low-arc faucet combo was the bane of my large dish washing existence. Every pot and pan was just a pain to wash, and water inevitably ended up all over the counter.

I’m certain I heard cheering when this baby finally came out…
We scraped all the old caulk off the counter top with a knife and razor blade, made sure the surface was clean and dry, then used new caulk to seal and set the new deep white sink in place.

So. much. better.
Figuring out the plumbing was like a puzzle of pipe pieces that required multiple trips to the hardware store, and my 6’4″ husband to squeeze himself into a comically small space. I’m pretty sure he’s still traumatized from it. Thankfully, when it came time to install the faucet, it was smooth sailing!

This Pasadena faucet by Pfister came with a handy install tool that made it easy to tighten those parts in hard to reach places.

The faucet is in a slate finish, which we ADORE. It’s darker than stainless and slightly more matte. The faucet has a high arc and pull down sprayer with different stream/spray modes, two of the most important features to us. Vanna here, will demonstrate.

And more importantly it has a smudge-resistant finish that has lived up to it’s name! All I have to do is wipe off any drops of water and she looks as good as new. Washing dishes is a whole lot more enjoyable!

We also used a couple of deep coffee mugs to make a portable herb garden. We just filled the bottom with a layer of small pebbles and transferred some small potted herbs to them. They’re perfect for starting seeds too!


Organize a Coffee Station
Throughout most of this kitchen makeover, the space looked very mid-construction zone. We lived without cabinet doors for a long time while I procrasti-painted, and it gave us the chance to experiment with open shelving. I love the look of open shelves, but I don’t love the dust. But one open shelf in the right spot, I could handle.

We ended up leaving off three doors – the two small ones above the microwave and the large cabinet door next to it – and we painted the insets the same dark grey as the lower cabinets.
The gold striped baskets (spray painted over their original orange and green) hold our tea. The large coffee jar houses our grounds and the bowl next to it has our filters and scoop. Mugs and yummy goodness live on the bottom shelf.

Having all our coffee making/drinking necessities in one accessible spot makes things so easy and that much more enjoyable. It’s also right between the sink and the fridge so we don’t have to run all over the kitchen for water to start the pot and creamer to fill our cups.


How about a final before and after?
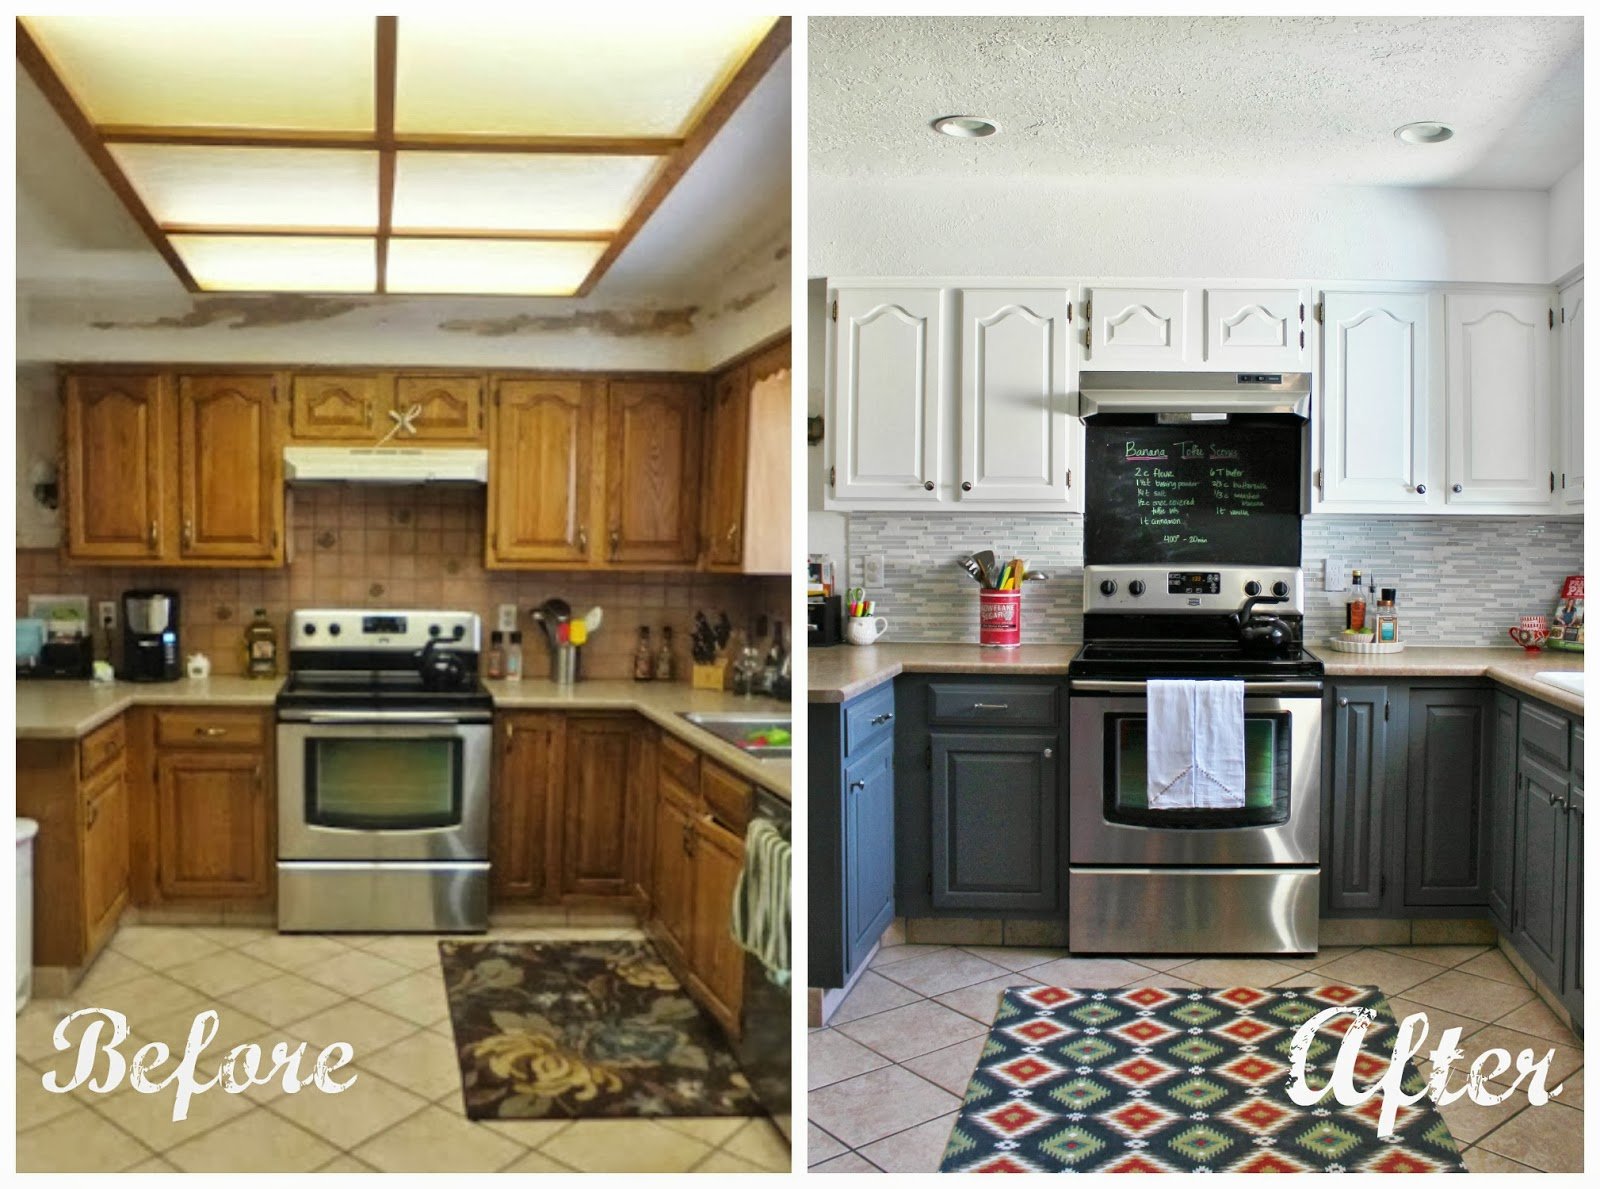

As an added bonus, the breakfast nook no longer looks out of place.
The cost breakdown for this kitchen update looks like this (with the exception of the back splash tile everything home improvement related came from Lowe’s – with an extra 10% off with our military discount)…
Total: $663
Shortly after we finished this phase of our kitchen reno, we got news that we would be relocating to Ohio for my husband’s work. I had just recently been able to let go of that crippling “what if a buyer doesn’t like this someday” fear, and actually did what I really wanted in this space. Hopefully, there’s a buyer out there that loves it as much as we do! In between now and then, we’re going to soak up every minute we have in this happy space.
*The 3rd phase of this kitchen reno was supposed to address counter tops and flooring, but we’ll just have to leave that for the new home owners 🙂
P.S. Is it wrong to rip out a faucet and take it with you when you move? How about a back splash?
Deme, we love it! And we can’t wait to see what you do in a new home with a blank slate 🙂
Visit Deme over at House For Five to see all of her creative ideas and her cute family.
Wanting more gray and white kitchen inspiration? Check out 25 more gray and white kitchens over at Tipsaholic.


Thanks to your remodel…I now know what to do in my kitchen! I loved it all but the chalkboard. 🙁
I’m so glad I ran across your remodel. I have been planning for a while to do white uppers and grey lowers, and just decided to see what was on the internet, mostly to decide what to do with the countertops and backsplash, and can you believe I even have the same exact Valspar grey color picked out, and our cabinets are the same general design? The original backspash I was looking at is pretty much the same and my floor (which I don’t plan on changing) is very similar. So, in short, you showed me what the idea in my heard will actually look like! Thanks!
Love all of it! Where on earth did you find that beautiful rug?! ????