Painted Subway Tile Backsplash
An eye-catching backsplash is one of my favorite things to add to a simple kitchen to take it to a WOW kitchen.

Our subway tile backsplash is still one of my favorite kitchen projects, but when I saw that Nicki replicated the look using just PAINT, my jaw dropped.


Here are four more great cost-effective and eye-catching WOW kitchen backsplashes to inspire you:
 Burlap and Tack Backsplash | Will Craft 4 Food
 Custom Glass Backsplash using Ikea Glass Shelves | Preciously Me on Ikea Hackers

Beadboard Backsplash with Corbels | Love of Family and Home
 Faux Tin Tile Backsplash | The Gathering Place Design
And now, Nicki from Sweet Parrish Place will show you how she achieved the subway tile look for just a few bucks and some elbow grease:
Faux Painted Subway Tile Backsplash

My blog is very new, I started it in October of 2012. We recently moved into a new home that is in need of much tender loving care, and many updates. At the time, I was an avid reader of home decorating and DIY blogs, and I had been dreaming of having a blog of my own, so with so many projects that we were going to be working on in our home, I decided that the timing was perfect for me! I have years worth of projects to do in my house, and I plan on documenting these projects every step of the way!
In addition to blogging, I am also a wife, mother, and a school counselor. I am working on a tight budget, so I do most everything myself, with help from my husband. I love to shop at thrift stores, and to repurpose things. Sweet Parrish Place is a space for me to share things I love and things that matter to me: the renovation of our house, decorating, design, DIY projects, fashion, travel, my family, the subject of addiction, or anything I find beautiful, pretty, or interesting. Some of my favorite and most popular projects have been my painted kitchen cabinets, my no sew café curtains, and my painted deck.
Today, I am showing you the backsplash that I painted to look like subway tile! This project has been my most popular project so far, and I am going to share my tutorial, and show you lots of pictures of both the before and the after! I want to give a huge thank you to Cassity for having me today, and I hope you will come back and visit me at Sweet Parrish Place really soon!

This project was very cheap! I bought a quart of paint, which I used on the tiles, and the trim in the kitchen and dining area, and I still have plenty left over. For the grout lines I used the same paint I used on the walls in the kitchen and dining room. All in all, I spent less than $50. I will tell you right up front that this took me a lot of time. It was very tedious and took a lot of patience and a steady hand. I spent way more time on this than I did money. I am estimating that I spent at least 20 hours on this, working on it in my spare time, and LC helped me with 4 of the 5 sections. And I used at least 2-3 rolls of painter’s tape. So to simplify, you will need:
- 2-3 rolls of painter’s tape
- high gloss paint for the actual tiles ( I used Behr Premium plus in crisp linen white- high gloss)
- eggshell paint for the grout lines ( I used Behr Premium Plus in garden wall- eggshell)
- A long level
- A yardstick
- A pencil
- Something to use as a spacer ( I swiped used one spacer that people use on actual tile, come on, it is just a tiny little piece of rubber, and they come in bags of hundreds or so, don’t judge me!)
- An actual subway tile ( I just purchased one from Home Depot)
 The very first step is to paint the entire backsplash area in the color that you want your tiles to be. We went with Behr Premium Plus crisp linen white in a high gloss. Next, you will do the horizontal lines. I divided up my backsplash into 5 sections, and completed one section at a time. It made it seem a little less daunting.
The first thing you will do is choose what pattern you want to use. I just used a traditional pattern. I started from the bottom left. I held my actual subway tile up on the wall and marked it off with a pencil by drawing a short line above the tile. Then I used a yardstick and a level to draw a long line going across the entire section. After I had my line drawn, I taped directly under that line all the way across. Once that line was taped off, I used my tiny spacer and held it up on the wall right above that line of tape, and made a small line, then repeated the same process with the yard stick and the level. I then taped directly above the second line I had just drawn.
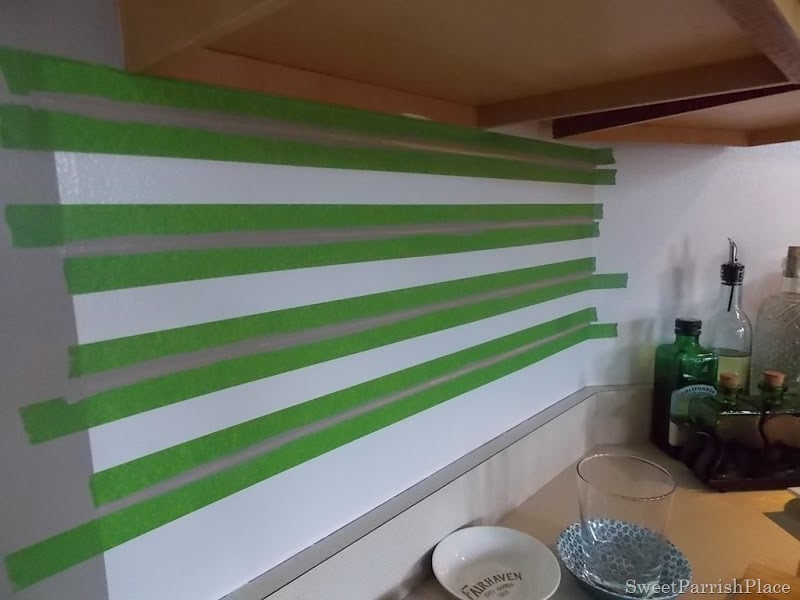
Once I got the hang of this, I found that I was able to get away with using the level and yardstick only on the bottom line, and I could eyeball where the top line needed to be. It sped the process up a bit. After I had all of the horizontal lines taped off, I painted. See the picture below. This will give you a good idea of what it should look like when you are starting. Be sure to peel the tape off immediately after you paint those horizontal lines.
Now, I want to point out a mistake that I made that made things a whole lot more difficult for me. Look carefully at the picture below. Do you see that bottom horizontal line? I had intentions to sit the actual subway tile directly on top of the backsplash, so there would only be a grout line right above the tile. I messed up somehow, so there ended up being an inch under that bottom grout line. That made my job way way more difficult, because I had to repeat it clear across the entire wall. Anyhoo, you can now see in the picture below that my horizontal grout lines are finished. I gave them time to dry, and started on the vertical lines.
 Using your actual subway tile as a guide, hold it up on the wall in between the top two grout lines, and trace a vertical line along the side of the subway tile, all the way from one line to the other, and tape a piece of tape to the direct left of the line you just drew. Next, hold your spacer up and make another line from the top line to the line below it, and tape to the direct right of that line. Once you have your first two pieces of tape for the vertical lines, hold your piece of subway tile up on the wall, covering the right hand piece of tape, and draw another line, tracing down the side of the tile just like you did for the first vertical line you drew. After that, you will just repeat that over and over until you are finished with that line.
See the picture below at what my first line looked like. It was all taped and painted in this picture. I peeled the paint off as soon as I took this picture, and began on the next line.
After you have your first row of vertical lines complete, you can use this as a base for your pattern. Start on the next line right below the one you just completed, and look above at the furthest vertical line to the left. Hold up your subway tile to the wall, with the middle of the tile being right in the middle of the vertical line above, and draw two vertical lines, one down each side of the subway tiles. I quickly figured out that it was quicker and easier for me to just go down one row at a time. So you can do whatever works best for you, but I recommend starting on the top row and working yourself down row by row.
 When I completed that very first section I was in a learning curve because I had not done this before. I taped off each vertical line in a row and then painted them, one row at a time. Once I had the hang of things, I started taping off all vertical lines in the entire section before painting. This made things go quicker. You can see in the picture above what one of the sections looked like before I began painting it. This was all vertical lines taped off, not yet painted.
Please note that you need to take your finger nail and run it down firmly at the edge of each and every piece of tape. If you get lazy and skip that step you will be sorry, because the lines will not be nearly as crisp. I used three different kinds of painters tape for this job, Frog Tape and regular blue painter’s tape, and blue painter’s tape with edge lock. I highly recommend the Frog tape. It gives a much more crisp line. When I ran out of Frog tape, I resorted to using regular blue painter’s tape on some of it, and I was sorry. The lines were not as crisp and I had several touch ups to do. I then used the blue painter’s tape with edge lock, because when I ran to Lowe’s to get more Frog tape, they were out of the size I needed. I had much better results with the tape with edge lock, but I still found that my very best result was with the Frog tape.
This is the exact same section as above, after I had painted in between all of the tape. I immediately began peeling off the tape.
 You can see here if you look to the left of this picture that I had the horizontal lines finished, the vertical lines taped off, and the horizontal lines on the next section over taped off. I painted the vertical lines in the section to the left and the horizontal lines in the section to the right at the same time. This was when I had the hang of the way it worked, and felt much more comfortable with the whole process.


 Here are a couple of shots of the kitchen after I painted the cabinets and before I painted the backsplash.


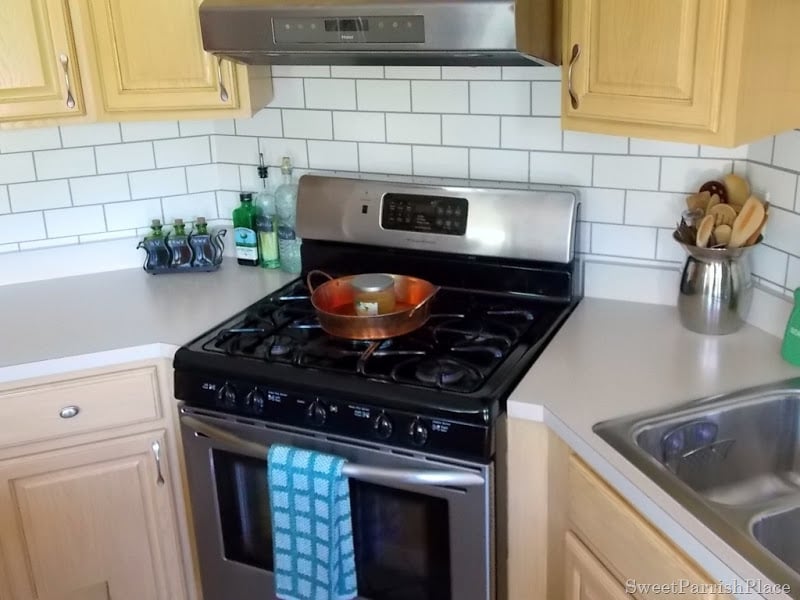 Our microwave normally sits here. I removed it so that you could also see this part of the backsplash.


 Slowly but surely, LC and I are turning this 1996 house into a home for our family. With every project that I complete, this old house feels more and more like home. We love the way our kitchen is turning out. It is so much brighter and more modern looking. So much more “us”. I would absolutely love for you to come back and visit me at Sweet Parrish place and keep up to date on our journey! Being featured here at Remodelaholic has been like a dream come true for a little blogger like me! Thanks Cassity, it has been such a blast!


Love the backsplash. I want to do this in my kitchen. It needs an update. What would you suggest on an open floor plan though where the last wall I’d be putting backsplash under the cabinets on opens up into a larger wall with no divider of any kind in my living room?
Tara, it’s hard to say without seeing it. Typically you would terminate it at the counter and upper cabinets.
Hi Tara! This is Nicki, and this is my kitchen that is featured. If you look at my pictures, you can see an example of how I ended my painted backsplash when the wall kept on going. I just ended it at the normal spot even with the lower counter. Look up and see the picture with the EAT letters over the door to see what I mean. Thanks for your question!
Thank you so much Cassity for the feature of my backplash today! I am super excited to be featured. Have a great day!
You are welcome Nicki.
Oh my goodness! This painted subway tile backsplash is ah-mazing! What a wonderful job! I am definitely pinning this for future reference! I also love the faux tin tile backsplash! What great ideas!
Cheers,
Julia
It’s Always Ruetten
Glad that you liked it Julia!
WoW!!! My jaw dropped too when I saw the pictures! I couldn’t believe that was just paint on a wall and not tile! Great job!! A stencil might have been nice to have, although you probably wouldn’t have gotten the clean lines you need for it to look authentic. Makes me wish my walls didn’t have so much texture on them!!!
Beautiful job! There is such a thing as “grout tape” available at Michaels which would have made it easier to visualize . (Approx. 1/4 inch masking tape)..I did a faux tile splash to match my fireplace tile…painted whole area with leftover grey paint then taped off design. Even added shadows with glaze, and sponged glaze onto “grout lines” afterward as it looked too flat. Fools everyone (husband was actually upset when he got home from business trip because he thought I had bought tile and hired it done!)
Laurie, that is great to know about the tape. I am glad it turned out so well for you.
Laurie,
I have seen that tape on other websites. Unfortunately, I do not live near a Michaels and I could not find it anywhere. So I was forced to do what I did. Grout tape would have made things so much easier. But I guess all’s well that ends well, right? Thanks for commenting!
Awesome “faux” backsplash! Job very well done. Pinning this!
Wow I love your kitchen. We are purchasing a new home next week and I believe I will have to tackle this in the near future. This could even be done in the bathroom. May I ask what your paint colors actually are. I love the yellow, one of my favorite colors but can never find the right shade.
Awesome job! Love faux subway tile that is as simple as painting 🙂 I did this in my kitchen as well (the house has since sold), I actually painted the entire surface in the color of grout lines-flat paint. Then used automotive pinstripING tape in smallest size and applied over paint and then painted my tile color. Worked great! I didnt keep a log of time, I was at the time 8 months preggo hahaha. Keep up the awesome work!
I too, painted a faux subway tile in my kitchen using this technique. I really like the clean lines. This was a super quick project giving it a completely different look. Make sure to apply frog tape firmly and keep checking your level. My tile is white with espresso brown lines,the cabinets are white, and above the tile, the paint is a light blue.
Thanks for the feedback, Donna!
I wish to do the same in my kitchen. Your kitchen
turned out beautifully!
I am in an apt. and at my own expense, invested more money, than I should. Even the peel and stick backsplash tiles are $20 for a 9×9 !
Even though, I have a sort or small galley kitchen, the rehab wall stickies would cost at least $150 or more. I love your idea. It make the kitchen pop! Very beautiful! ????