Get organized! See our favorites in the shop

Remodelaholic

DIY tutorials, Woodworking plans and more.

FREE BONUS: Kitchen Organization Boot Camp
  • Home
  • About Us
    • About US
    • Contributors
    • Facebook
    • Pinterest
    • YouTube
    • Instagram
    • Disclosure and Advertising
    • Contact Us
  • Shop
  • Project Ideas
    • Our Houses
      • Birch House (current projects)
      • Canyon House
      • Park House
      • Downing House
      • Logan House
    • DIY Project Plans
    • All projects
    • Barn Door Baby Gate
    • Dutch Door
    • Framing A Wall Mounted TV
    • Indoor Playhouse
    • Beach Themed Living Room Design
    • Chicken Coop Building!
    • Computer Desk
    • Computer Desk Plans
    • Custom Newel Posts and Stair Remodel
    • Family Room Sneak Peek
    • Headboard Tutorial
    • Living Room Progress
    • Mood Boards
    • Scrabbled Family Names
    • Pets
  • Design By Room
    • Bathrooms
    • Landscape
    • Kids Bedrooms
    • Kitchen
    • Living Rooms
    • Laundry Rooms
    • Master Bedrooms
    • Mood Boards
    • Office
  • Holiday
    • Christmas
    • Halloween
    • Patriotic
    • Easter
    • Fall
    • Saint Patrick’s Day
    • Thanksgiving
    • Spring
    • Valentines Day
    • Winter
  • Crafts
    • Printable
    • Art
    • Paper Crafts
    • Kids
    • Fabric Crafts
    • Decorate
  • Recipes
    • Appetizers
    • Beef
    • Beverages
    • Breakfast
    • Chicken
    • Desserts
    • Dinner
    • Fruit
    • Healthy
    • Holiday
    • Lunch
    • Main Dishes
    • Salads
    • Sandwiches
    • Sauces
    • Seafood
    • Side Dishes
    • Soup
    • Vegetables
  • Videos

Paper Christmas Decorations; Day 5

Written by Cassity

  • Facebook
  • Twitter
…. on the 5th day of Christmas my blog friend gave to me….
5 GOLDEN RINGS
Origami Wreath
I have to admit, I was super excited when I realized I could actually give you five golden rings. 
Sing with me now…
“5 Golden Riiiiiiiiings…”
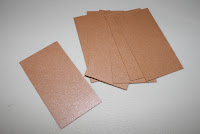
First you need 8 pieces of card stock paper in a 2:1 ratio. 
For example 4″ x 2″ inches.  Fold all pieces in half length wise (it will now measure 4″ x 1″ inch) .
(keep pattern on the outside if you are using a patterned paper)
 Now fold the pieces in half length wise so it now measures 2″ x 1″. 
Then take the 4 corners (2 on each side) and fold down into the center, to meet at the bottom edge.
See picture above.

 
Now take one of the folded pieces with the pockets up, and stick the points of the next piece into the pockets of the first piece.  (see images above, although it will be flat not in a v shape)   Then, just continue adding pieces into the wreath until you get them all in.  At that point if it is not the proper shape just push it into shape.  Done!
 

Source of oragami instructions Domesticali.
Check out our previous posts:  Day 1, Day 2, Day 3, Day 4
  • Facebook
  • Twitter
Remodelaholic is a participant in the Amazon Services LLC Associates Program, an affiliate advertising program designed to provide a means for sites to earn advertising fees by advertising and linking to amazon.com. Please see our full disclosure here.

Published: December 7, 2009Filed Under: Holiday Tagged: 12 Days of Paper Christmas Decorations, Christmas, Crafts, Holidays

About Cassity

Cassity started Remodelaholic with her husband, Justin, to share their love for knocking out walls together. She is an interior designer, wife, and mother of two. She and Justin have remodeled three homes from top to bottom and are working on their fourth. Making a house a home is her favorite hobby.


free email bonus

Kitchen Organization Boot Camp

Is your kitchen a zen paradise? It can be. I'll show you how.

Previous Post
The Stats, Month 4
Next Post
Paper Christmas Decorations; Day 6

Comments

  1. Matthew says

    December 7, 2009 at 12:31 pm

    >Nice rings! I like the "Peace on Earth" block…where did you get it:) j/k

    Are those branches real?

    Reply
  2. .eliza. says

    December 10, 2009 at 7:40 pm

    >um can i come live with you? :))))

    Reply
  3. Anonymous says

    December 17, 2009 at 5:52 pm

    >i stumbled across your blog, and i love it!
    i am a daisy girl scout leader, and we had our "homemade ornament swap" today, my daughter chose the day 2 ornament (not the daisy one that i thought!) and it came out so cute.
    thank you!
    Melanie :0)
    Danvers, MA

    Reply
  4. Edi says

    July 5, 2010 at 12:57 am

    >Parabéns pela postagem.
    As guirlandas ficaram bem bonitas.
    Até logo 🙂

    Reply

Leave a Reply Cancel reply

We love hearing from fellow Remodelaholics, so let us know what you like about this and leave any questions below in the comments. If you have followed a tutorial or been inspired by something you have seen here, we would love to see pictures! Submit pictures here or by messaging us over on Facebook.
Recipe Rating


Hey there, I am Cassity! Nice to virtually meet you!

This blog is about DIY at its finest. We are obsessed with it and so are you, so while we're working and have nothing to show you of our own projects we show off yours. So submit your projects! More About Us…

Categories

  • Facebook
  • Instagram
  • Pinterest
  • RSS
  • Twitter
  • YouTube

Meet The Team

Privacy Policy

Remodelaholic is a participant in the Amazon Services LLC Associates Program, an affiliate advertising program designed to provide a means for sites to earn advertising fees by advertising and linking to amazon.com. Please see our full disclosure here.

© 2005-2016 Remodelaholic LLC, All Rights Reserved

  • Facebook
  • Instagram
  • Pinterest
  • RSS
  • Twitter
  • YouTube

Copyright © 2021 · Remodelaholic

  • Pinterest
  • Facebook
  • Twitter