Play Kitchen From Microwave Stand

This lovely play kitchen is made from an inexpensive microwave stand and is very easy to try it!
Submitted By Dans le Townhouse

Drumroll please . . . because the play kitchen is done! But you have to keep this reveal a secret until the end of May, when I can finally hand deliver this present to my little cousin, Camilla, who lives in Toronto.
We started with a $6.99 microwave stand from Value Village. I had actually scored a free kitchen cupboard from kijiji.ca but this was cuter. Plus, these things are everywhere (sometimes for free), so this is an easily adaptable DIY project for anyone who wants to make one for themselves kids they know.

Before
Here’s a nearly identical one in use (I snagged this photo from the classifieds). These things sure are ubiquitous. And, a little fugly.

We removed the top shelf and added a piece of wood for support, which was screwed into the existing side panels. There’s still enough room for a little storage up there, but it’s easier to access the sink and element this way.

The Hubs traced the hole for the sink (making it slightly smaller than the actual sink) and then cut the hole. He started the hole with a spade bit and then cut it with a jigsaw. Tip: make sure your sink, and sink hole, won’t get in the way of, or damage, any magnetic catches for the doors, etc., that may be underneath.


Hubs also cut the holes for the faucet and taps at the same time, using a spade bit for the faucet and a hole saw for the taps:

I removed the handles and hardware and gave the whole thing a coat of primer. I lightly sanded and primed the wood handles that came with the unit, too.

Then I applied three coats of paint – the same paint I’m using in the basement. Try the mis-tint section of your paint store for great deals on small quantities of paint if you don’t have leftovers kicking around. I painted the counter top white (oooo, “marble”!) so the black “element,” which is just a dollar store cork trivet painted black (using leftover paint again), would pop. Here’s a sneak peak:

Late in the game, I decided Camilla needed more counter space (who doesn’t?). Using the shelf we removed and some wood, plus a dowel, we made her a little shelf to the right of the unit. Hubby just cut two triangles from the new wood then drilled an indentation with a spade bit for a dowel. He slipped the dowel into the little dents he made, glued in place then screwed the whole thing onto the unit. Finally, he screwed on the shelf. Now there’s a place for the tea towels!

I primed and painted some more.

Using silicon, we attached the sink and “element,” then Hubby installed the faucet. It actually moves!

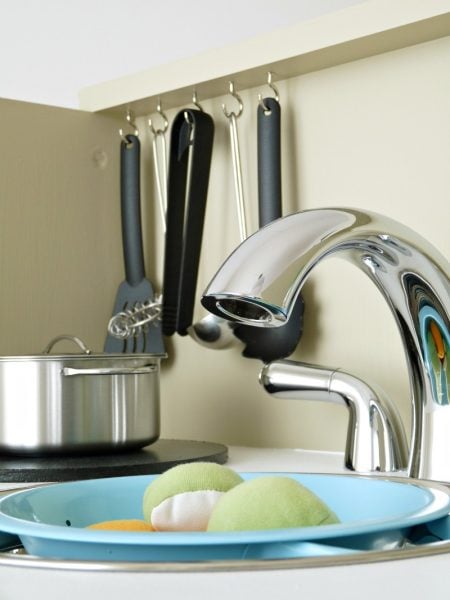
Small cup hooks from Lee Valley were perfect for hanging teeny utensils from Ikea, and the little hooks from my Ikea Expedit Hack were just the right size for the mini pot holders!


We lucked out because my mom had spare Ikea legs, so we are able to replace the existing wheels with adjustable grey legs.

And that’s it! We went from this . . .

Before

After
I’ve been busy accessorizing, and trying to refrain from playing with it (I’ve been unsuccessful). The accessories I DIY’d, plus the vintage Melmac, look so sweet. And check it out: I scored a mini detergent bottle from a hotel:


I am so smitten with this kitchen.


There are quite a few lacy pink accessories. But, check this out, if we swap out the pink for more blue, it’s a toy that Camilla’s baby bro, Jack, might want to play with too. This was no accident. I intentionally kept the color of the cupboards, even the pulls, “gender neutral” (I hate that term):

AND we even sewed little Jack his own cowboy print pot holders, with tea towels to come (I sure love this print). Once I buy Camilla her muscle car, I’ll buy Jack some knitting lessons to counteract this manliness.

This photo helps illustrate the scale. It’s so wee:

Cost breakdown (not including applicable taxes):
- Microwave stand: $6.99 (included cute, wooden handles that I painted)
- Faucet: $15.00 (with a bit of negotiating, bought from kijiji.ca)
- “Sink”: $3.99 (it’s actually a stainless mixing bowl from the thrift store)
- “Element”: $1.25 (a cork trivet from dollarama)
- Wood for shelf brackets + dowel: $5.00
- Primer & paint: leftovers
- Legs: Free! (Mom had them lying around)
Total kitchen cost, having paid the tax man (but minus accessories): $34.65
I figured vintage and DIY accessories were the only way to go. In case you missed them, here’s a summary of previous play kitchen posts:
- Vintage Melmac dishes are a fun, unbreakable, kid-sized dishware option
- Hand sewn tea towels in just the right size
- Teeny tiny matching pot holders
- Spray painted accessories for some colour
- More play kitchen inspiration
We also bought some utensils, pots, pans and play food from Ikea. I’m hoping I have time to make some felted cupcakes before delivery day, so stay tuned.
I am the husband of the amazing Cassity of Remodelaholic. I love to problem solve and to design and build things inside and outside the house to make life better. I am a professional Landscape Architect by trade and love the outdoors.


how utterly fantastic! you could really go into buisness with this! i love the color scheme!
xoxomb
That is just adorable. I love the colour you painted it – serene and lets the dishes and food be the focus. I love the little ice cream tea towels and pot holders. I would be playing with it too if I had half a chance.
This is amazing! Well done!
How I wish I had your talent and creativity! I really, really want this for my own two daughters. I think I can come up with something similar…in concept but not in beauty and quality, alas. Great job!
Thanks, everyone, for your complimentary comments about my little DIY play kitchen! I promise anyone could achieve a kitchen that looks like this – it’s just some paint, coupled with some cute, vintage accessories. I think the fact that it is so SMALL makes anything look cute! And the fabric is from a quilting shop!
I love love love it! I love that it is gender neutral! The colors are beautiful!!
This turned out sooo good! I can’t wait for my daughter to get old enough to appreciate this type of thing 🙂
This is so cute! I love everything about it, expecially the ice cream printed accessories!
I have a few little kitchen ideas saved but this is by far my favorite. Great job taking something so terrible and turning it into something incredible!! My three year old son would love this.
I’m a big fan of anything that encourages creative play. I really love love it and want this for my daughter. Thanks for sharing.