Pottery Barn Holiday Tablescape for Dollar Tree Price


Happy Holidays Everyone! This is Corey from Sawdust2Stitches and I am excited to be back with some MORE awesome tips and tricks for the Holiday Season. (If you recall last month I showed you how to decorate a designer tree with a Dollar Tree price tag; you can read all about it here. ) If you are entertaining over the Holidays, and really want to impress your guests, then this is a must read! I can show you how to make a Pottery Barn Inspired tablescape with purchases mainly from the Dollar Tree!
How to Create a Beautiful Holiday Tablescape on a Budget
Step 1: Table Runner
I started with a table runner. It breaks up the space and creates a visual weight to the centerpiece.

If you don’t already have one, then here is what I would suggest. I purchased a $5.00 twin size flat sheet from Walmart! ( Obviously, I purchased red.) This requires a “beginner level” of sewing. I made my table runner 16″ wide. The length of your table runner will be determined by the size of your table. It is a simple turn over hem. If you need more instructions, there are basic hem instructions here.
 While you have your sewing machine out…. I had plenty of extra fabric leftover; with the excess fabric I made all of my napkins as well! I made six standard size napkins (16″x16″). There was still leftover fabric to make additional napkins if needed.
Step 2: Focal Point (of the centerpiece).
For the centerpieces I found berry garland at the Dollar Tree ( it was QUITE UGLY, I wish I had take a “before” picture). With the help of white spray paint I fixed that. Once DRY , I lined vases with the garland.
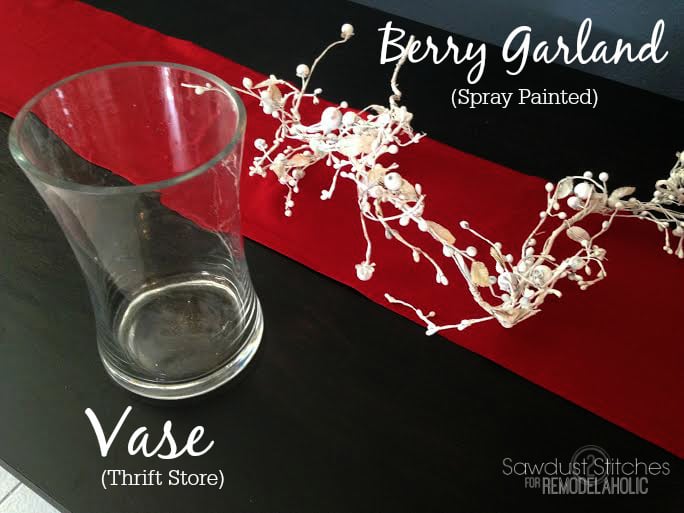 I did this with three different size vases. I purchased the smallest vase at Dollar Tree, and the other larger two at garage sales . For less than $2!

Step 3: Add Garland
In order to beef up the centerpiece I used $1.98 pine garland from Walmart. For only $2.00 I was able to fill a lot of space.
 I simply ran the garland through and around the three vases.

Step 4: Dimension and Variation
I wanted to incorporate a little more white to the base. You can do this by either using canned spray snow, or making these “Frosted Branches”. There are a lot of different approaches to making these. I used the cheapest option, which consisted of sticks/or fake branches, white spray paint, hot glue gun , and epsom salt!

It is a little time consuming, and they really don’t last for more than one season, but for CHEAP/free I will take it!
Step 5: Fill the Vases
I wanted to add vertical lines to the centerpiece. I opted for sticks. Yup, sticks. I just went in the back yard and used some from the yard.
 I then dusted them with white spray paint. I wanted them to look like frosted branches.

For the finishing touch, I used two stems of decorative berries, and ripped them apart so I could use the individual berries. I then wired each berry to different sticks, to add a pop of color to the branches. I LOVE the look it created.

Step 6 : Place Mats
To keep this cheap, I used brown packaging paper from Dollar Tree. You will typically find it in rolls (like wrapping paper). I cut the pieces up to create place mats. I cut mine about 12″x16″. Easy Peasy!

Step 7: Napkin Holder/Name Cards
As you recall, we already made all the napkins up in Step 1. Next, we need to make them pretty, and add some personal touches. I purchased the chalkboard name tags from the Dollar section at Target, it included 8 for $1.00. I then purchased a 10 pack of snowflakes from the Dollar Tree for $1.oo, along with a roll of jute/twine, for also $1.00.

 In theory you can make 8 napkins/napkin holders, AND place cards for about $5.oo. Look how pretty !

Step 8: Finishing Touches
I meant it when I said I purchased EVERYTHING but the silver ware. I was able to buy the plates and the glasses from the Dollar Tree. I also picked up a 6 pack of pine cones, and two $1.00 packs of ornaments from the Dollar Tree, that I placed in the glasses, and then added some of the ornaments to the center garland.


Grand Total
- Table Runner/ 6 Napkins = $5.00 ( Walmart)
- 3 strands of garland = $3.00 (Dollar Tree)
- 3 vases = $3.00 ( Dollar Tree & Garage Sale)
- cheap spray paint = $ 1.00 (Walmart)
- Garland = $2.00 (Walmart)
- Epson Salt = $1.00 ( Dollar Tree)
- Twine = $1.00 (Dollar Tree
- Snowflakes = $1.00 (Dollar Tree)
- Name Tags = $1.00 (Target)
- 2 packages of Ornaments = $2.00 (Dollar Tree)
- 6 plates = $6.00 (Dollar Tree)
- 6 glasses = $6.00 ( Dollar Tree)
- 6 pack Pine Cones = $1.00 (Dollar Tree)
- Packaging Paper = $1.00 (Dollar Tree)
$34.00 for EVERYTHING except the silverware.
If you are using your own plates and glasses it is only $22.00!


 |
 |
 |
 |
 |
 |


Your end result creates such a striking contrast of colors. The combination is so rich and appealing. It truly looks inviting.
Thank you! Haha confession: I created this tablescape just for the sake of a tutorial. I don’t really enjoy hosting, but this actually made me want too! Ha. Thank you for reading, and your comment! Happy Holidays!
Oh… wow! I loved seeing this come together piece by piece… spectacular look for so little $ for sure! Love the colours!
Thanks Donna. I love the neutrals/naturals paired with red. Absolutely, loved your cranberry and wood wreath, it’s already on next years “holiday to-do” list! Thanks Lady!
How fun and clever is this. I did my table from the goodwill and dollar tree too. So fun.
Exactly! It is amazing what you can find at thrift and dollar stores! Thanks so much for reading.
Beautiful! It’s amazing the look that can be achieved with products from the dollar store!
Thank you Amy! It is amazing what a little bit of spray paint can do!
Love this! I’m going to have to try the Epsom salt trick. Genius! I can definitely do $22, thanks for the great ideas!
this was about the best toto rial I have ever seen for decorating on a budget and keeping it beautiful.good details. Ty.
While the tablescape is gorgeous and I learned from the tutorial, I am having a difficult time understanding the purpose of the ornaments in the glasses.
Haha, no point. I was just taking pictures, and it needed a pop of red… Thus the ornaments. haha.
Great ideas… I love the “twigs”!
I was surprised how much I liked them too! I ended up using them as around the house decor, when not using them as a centerpiece! New favorite.
Thanks for reading!
Beautiful tablescape. Thanks for the ideas! I was wondering where you purchased your table. Thanks!
Like Jerry I too wondered about the balls in the glasses and Tablesetting 101 ALWAYS places the glass above and to the right of the plate. LOL. Loved it anyway and looking ahead to next year to try this.