Pottery Barn Media Center Building Plans
You. Guys. I’m so excited for today’s guest. She’s got some mad skills, and she’s here to show you how to build an awesome Pottery Barn-inspired media center that looks great *and* hides all the toy clutter very effectively. Check it out!

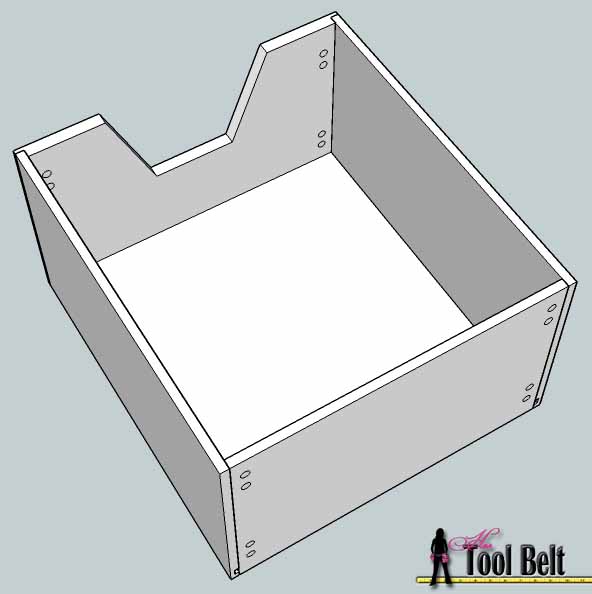
And the super hideaway toy drawers:

We’ll get right to Amy’s fabulous building plans and tutorial, but if you’re interested in a different style of entertainment center, look at these other media centers we’ve featured in the past:

B: Glamorous Life on Remodelaholic
C: Uffda Projects on Remodelaholic
D: Designed to Dwell on Remodelaholic
Build a Pottery Barn Logan Media Center
by Amy from Her Toolbelt
Click Here to Get a Free Printable Version of this Building Plan
A big Hello to my fellow Remodelaholic fans! I am so honored to be sharing my Media Center with all of you. My name is Amy and I share DIY/handyman tutorials and plans at Hertoolbelt. I am a farm grown girl turned mechanical engineer turned SAHM, but always and forever a DIY’er. My first love is woodworking, but I enjoy fixing stuff and learning new skills. I’ll try anything, some favorites include: silver travertine herringbone floors for my sister to a Nate Berkus inspired map dresser for my little boys room.

Once I started having kids, I realized that I had a major toy storage issue (toys seem to multiply!) I love Pottery Barn design, so I designed a media center + toy storage based on the PB Logan Media Center. I love it, and my kids LOVE to play in the toy drawers.

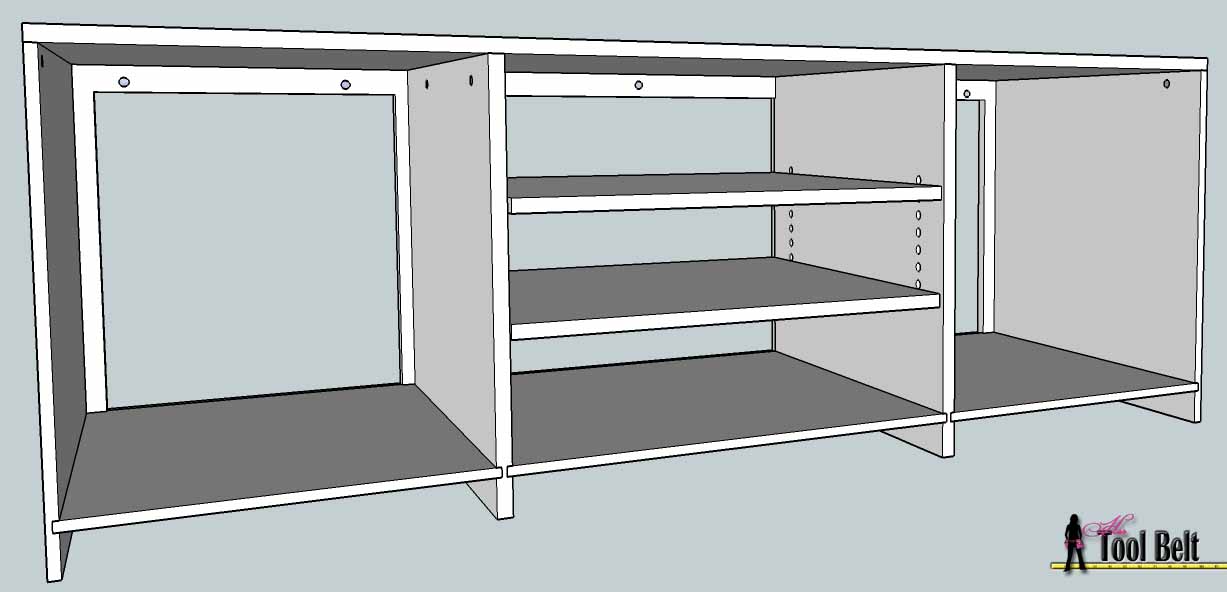
The overall dimensions of the media center are about 111″ wide and 76″ tall, and up to a 70″ TV should fit as designed. The media center is built in 6 separate components, so moving it around is a breeze.
Media Center: Choosing Building Material and Finish
The media center is built using solid wood boards and plywood. Since I planned on painting the media center, I used pine boards as the solid wood because it’s cheap. Overtime, the extra sap in the pine around the knots and such have turned the white paint yellowish. I suggest spending a little extra and using poplar boards instead (available at Home Depot).
The media center will also be gorgeous stained. If you plan on staining, choose a more stainable wood like alder, oak, maple or cherry for your face frame. I used birch veneer plywood (available at Home Depot) for the plywood portion, it is a good pick for both painting and staining.
The cost of the media center will depend on the materials you choose to build it. Using pine wood and birch plywood the cost ran me about $300 and about 30 hours to complete.
Media Center: TV Console
Let’s start building! Here is the cut list of wood to build the TV Console.
| Quantity | Length | Width | Thickness | Material | Description |
| 2 | 22″ | 1 1/2″ | 3/4″ | pine (solid) | face frame |
| 2 | 18″ | 1 1/2″ | 3/4″ | pine (solid) | face frame |
| 1 | 59″ | 1 1/2″ | 3/4″ | pine (solid) | face frame |
| 1 | 59″ | 2 1/2″ | 3/4″ | pine (solid) | face frame |
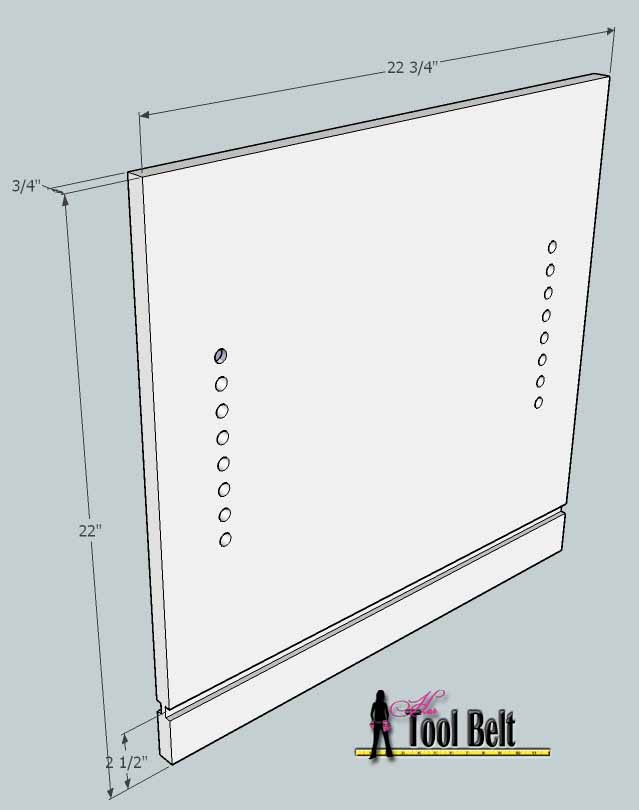
| 2 | 22 3/4″ | 22″ | 1/2″ | plywood (1/2″) | outer sides |
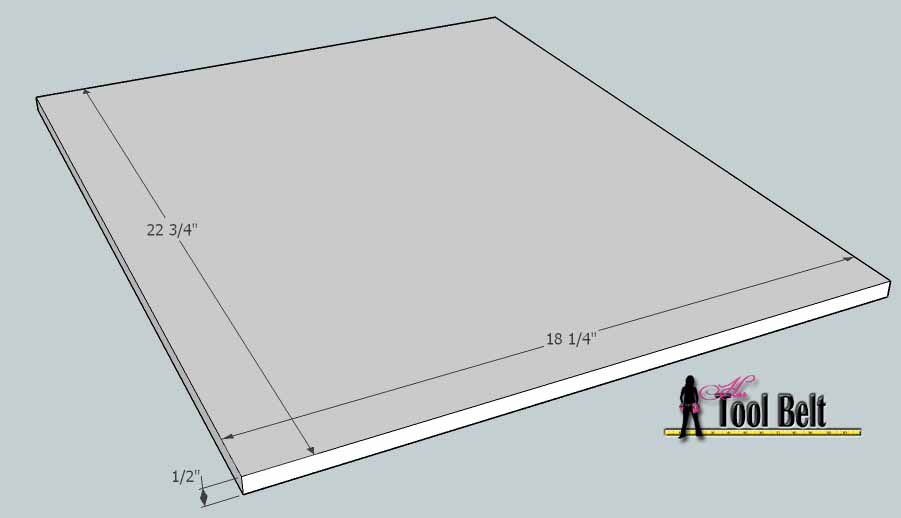
| 1 | 24 1/2″ | 22 3/4″ | 1/2″ | plywood (1/2″) | bottom ( inner) |
| 2 | 18 1/4″ | 22 3/4″ | 1/2″ | plywood (1/2″) | bottom (outer) |
| 2 | 22″ | 22 3/4″ | 3/4″ | plywood (3/4″) | shelf sides |
| 2 | 22 1/2″ | 23 3/4″ | 3/4″ | plywood (3/4″) + thin molding on front | shelf |
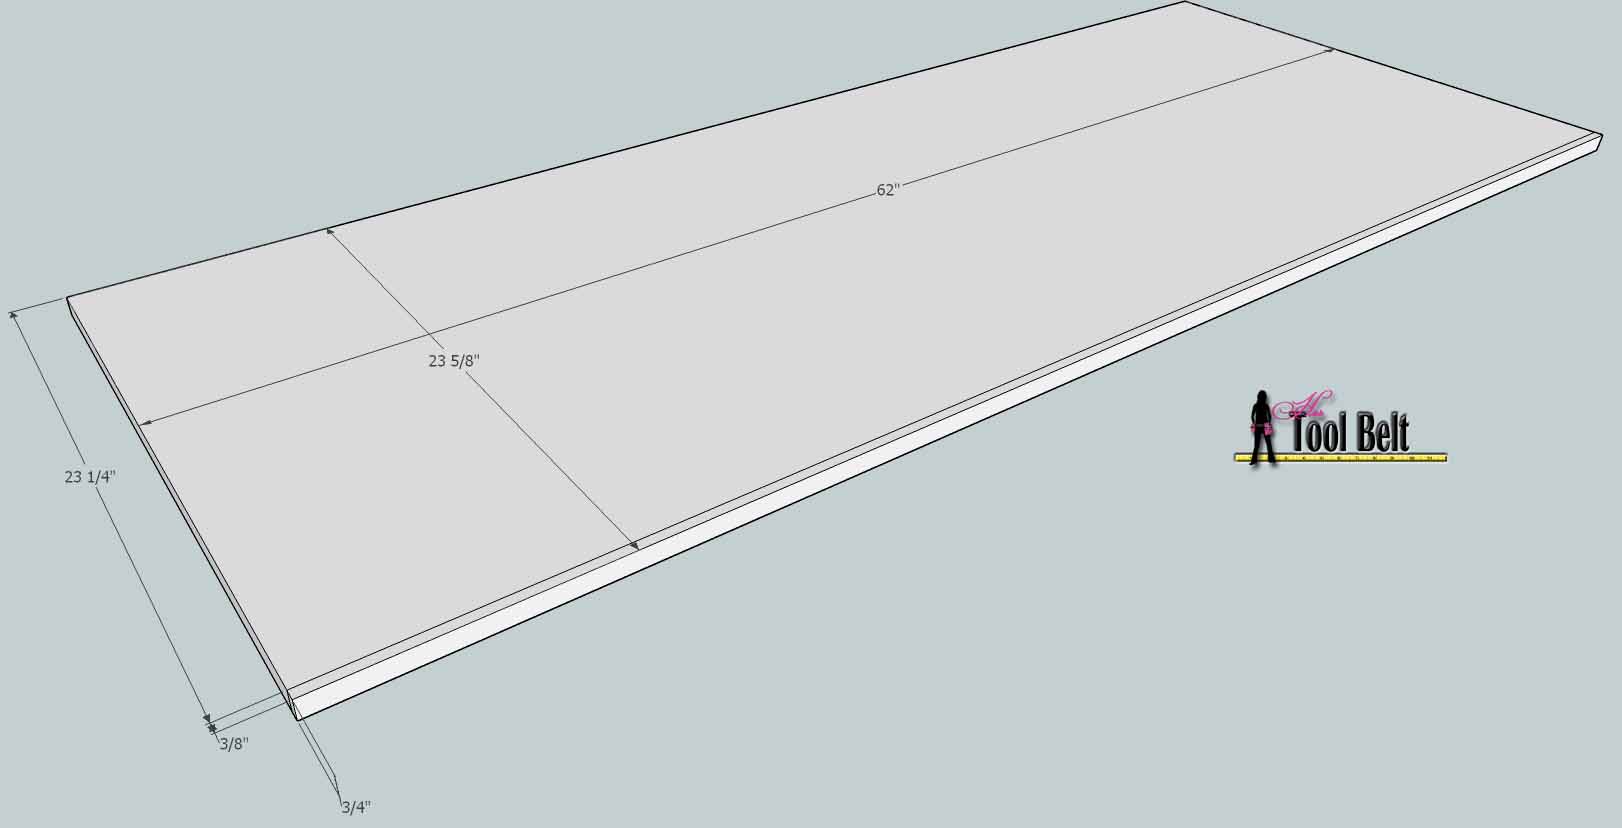
| 1 | 62″ | 23 1/2″ | 3/4″ | plywood (3/4) + thin molding on front | top |

Cut all of the solid wood pieces according to the cut list. Mark the placement of the two inner stiles (vertical pieces) on the top and bottom rails (long pieces). Then make the marks for how you are going to join each piece together according to the diagram above. For face frame joints, I use a biscuit cutter. Other common methods to join are 2 dowels (with a doweling jig) or mortise and tenon. You could also do a Kreg pocket jig, however if you decide to use a Kreg pocket jig you need to wait to install the screws until after the dado cuts. You don’t want to hit a screw with your saw or router.
Apply glue to each joint and clamp the face frame together. Check to make sure your face frame and inner rectangles are square. An easy way to check the square is by measuring diagonally corner to corner & the other corner to corner, they should measure the same if your rectangles/squares are square. Allow the glue to dry.

Once the glue is sufficiently dry, the next step is dado cuts. If your face frame has a better side, keep that for the front. The dado cut is a groove we cut out to fit the plywood sides onto the face frame, it makes a strong joint. Each dado is going to be 1/4″ deep. Make a dado cut 1/2″ wide for the outer sides of the TV console, flush with the outside of the face frame. Make a dado cut 1/2″ wide at 2″ to 2 1/2″ from the bottom for the bottom shelf of the media center. Make two 3/4″ wide dado cuts flush with the inner sides of the center rectangle, see diagram.

Cut 2 pieces of 1/2″ plywood that are 22 3/4″ x 22″. Cut a dado 1/2″ wide x 1/4″ deep between 2″ and 2 1/2″ from the bottom. These are the 2 outer sides of the console.

Cut 2 pieces of 1/2″ plywood that are 18 1/4″ x 22 3/4″. These are the bottom pieces for the outer 2 cabinet compartments.

Cut a piece of 1/2″ plywood that is 24 1/2″ x 22 3/4″. This is the bottom for the center shelf area.

Cut 2 pieces of 3/4″ plywood that are 22 3/4″ x 22″. Make a dado that is 1/2″ wide and 1/4″ deep between 2″ and 2 1/2″ on both sides.

You can make shelf adjustment holes now or later. The average shelf peg is 1/4″ diameter and 1/2″ long. I’d put the series of holes 2-3″ in from the front and back side, and every 1″ vertically. Remember to do the mirror image on the other piece.

Cut 2 pieces of 3/4″ plywood that are 22 1/2″ x 23 3/4″. You’ll want to add a thin piece of molding or solid wood to the front, so you have a nice finished edge to show. These are the shelves in the center of the console.

Cut a piece of 3/4″ plywood that is 62″ x 23 1/4″. Add a thin piece of molding or routed solid wood to the front, so you have a nice finished edge.
TV Console: Assembly
When I assemble cabinets, I like to glue the joints and put them together then use a 1″ – 1 1/4″ brad nail or finish nail to go through the plywood into the face frame where we dado’d. Sometimes the back of the cabinet will have a little extra play, so I’ll cut spacers to keep the back dimensions the same as the front. I also use clamps to hold it together while the glue dries. On this first assembly, do not assemble the top. 
Assemble the TV console, applying glue in the joints, clamp together and allow to dry. Add nails as necessary.

Once the glue has dried, add kreg pocket holes that go through the top inside face frame and a couple on the top of each vertical plywood piece. For the 3/4″ plywood pocket holes, make those on the side of the plywood that will be hidden with the door.
If you’d like, add a piece of molding along the bottom in the front. Cut the molding piece to be flush with the sides of the tv console. We are finished building the TV Console.
Media Center: Cabinets
Now onto the cabinets, here is the cut list for the cabinets.
| Quantity | Length | Width | Thickness | Material | Description |
| 4 | 30″ | 1 1/2″ | 3/4″ | pine (solid) | face frame |
| 2 | 21″ | 1 1/2″ | 3/4″ | pine (solid) | face frame |
| 2 | 21″ | 2 1/2″ | 3/4″ | pine (solid) | face frame (bottom) |
| 4 | 23 7/8″ | 1 1/2″ | 3/4″ | pine (solid) | top |
| 2 | 24 3/8″ | 1 1/2″ | 3/4″ | pine (solid) | top |
| 2 | 21 3/8″ | 22 3/8″ | 3/4″ | plywood (3/4″) | top |
| 4 | 30″ | 23″ | 1/2″ | plywood (1/2″) | sides |
| 8 | 22 3/4″ | 1 3/4″ | 3/4″ | plywood (3/4″) | rail mount |
| 2 | 23″ | 23 1/2″ | 1/2″ | plywood (1/2″) | bottom |
| 4 | 20″ | 12″ | 3/4″ | plywood (3/4″) | drawer front |
| 4 | 19″ | 12″ | 1/2″ | plywood (1/2″) | drawer back |
| 8 | 21 3/4″ | 12″ | 1/2″ | plywood (1/2″) | drawer sides |
| 4 | 19 1/2″ | 21 1/4″ | 1/2″ | plywood (1/2″) | drawer bottom |

The media center has 2 cabinets. Repeat these instructions for the 2nd cabinet. Cut all of the solid wood pieces according to the cut list. Make the marks for how you are going to join each piece together according to the diagram.
Apply glue to each joint and clamp the face frame together. Check to make sure your face frame is square. Adjust as necessary. Allow the glue to dry.

Once the glue is sufficiently dry, the next step is to make dado cuts. If your face frame has a better side, keep that for the front. Each dado is going to be 1/4″ deep. Make a dado cut 1/2″ wide for the sides of the cabinet, flush with the outside of the face frame. Make a dado cut 1/2″ wide at 2″ to 2 1/2″ from the bottom for the bottom shelf of the media center.

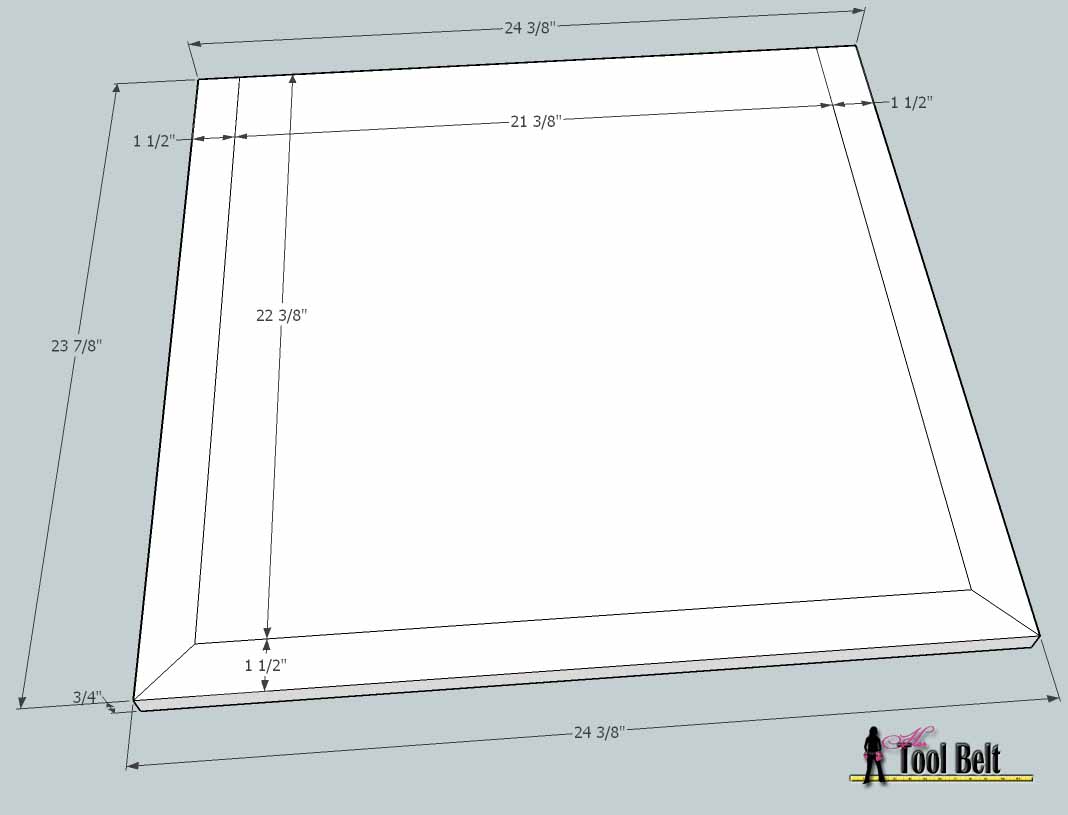
Cut a piece of 3/4″ plywood that is 22 3/8″ x 21 3/8″, for the cabinet top. Cut 2 pieces of solid pine that are 23 7/8″ x 1 1/2″ x 3/4″, one end cut at a 45 deg angle, as shown. Cut a piece of solid pine that is 24 3/8″ x 1 1/2″ x 3/4″, two ends cut at a 45 deg angle, as shown. Join the 3 solid edge pieces to the top plywood using your preferred joining method. Glue and clamp the pieces and allow the glue to dry sufficiently.
(Note: This diagram is if you plan on routing a nice edge on the front and side. If you decide to add pieces of molding on the edges, you can cut a piece of 3/4″ plywood 24 1/4″ x 23 3/4″ and add molding to the front and outside edges of the top.)

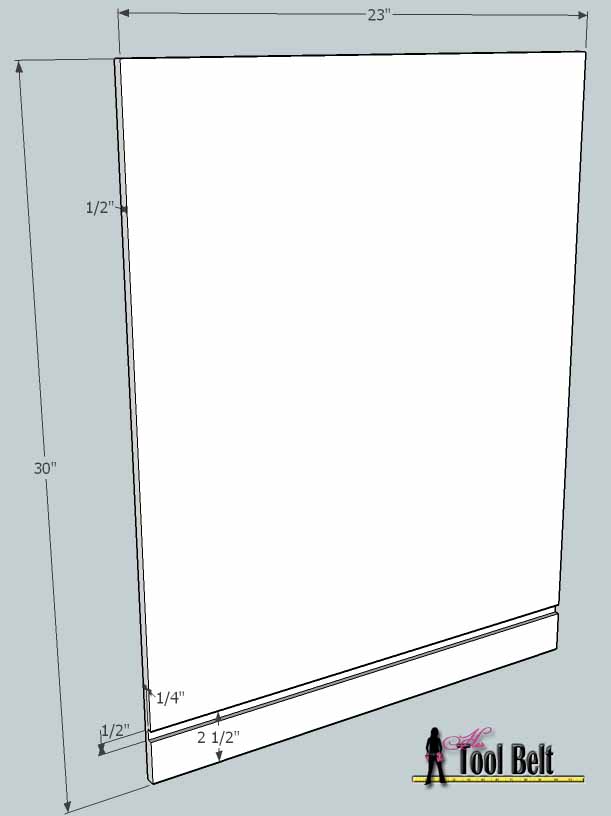
Cut 2 pieces of 1/2″ plywood that are 30″ tall x 23″ wide, these are the cabinet sides. Make a dado that is 1/2″ wide and 1/4″ deep between 2″ and 2 1/2″ on one side. Repeat for the other side piece.

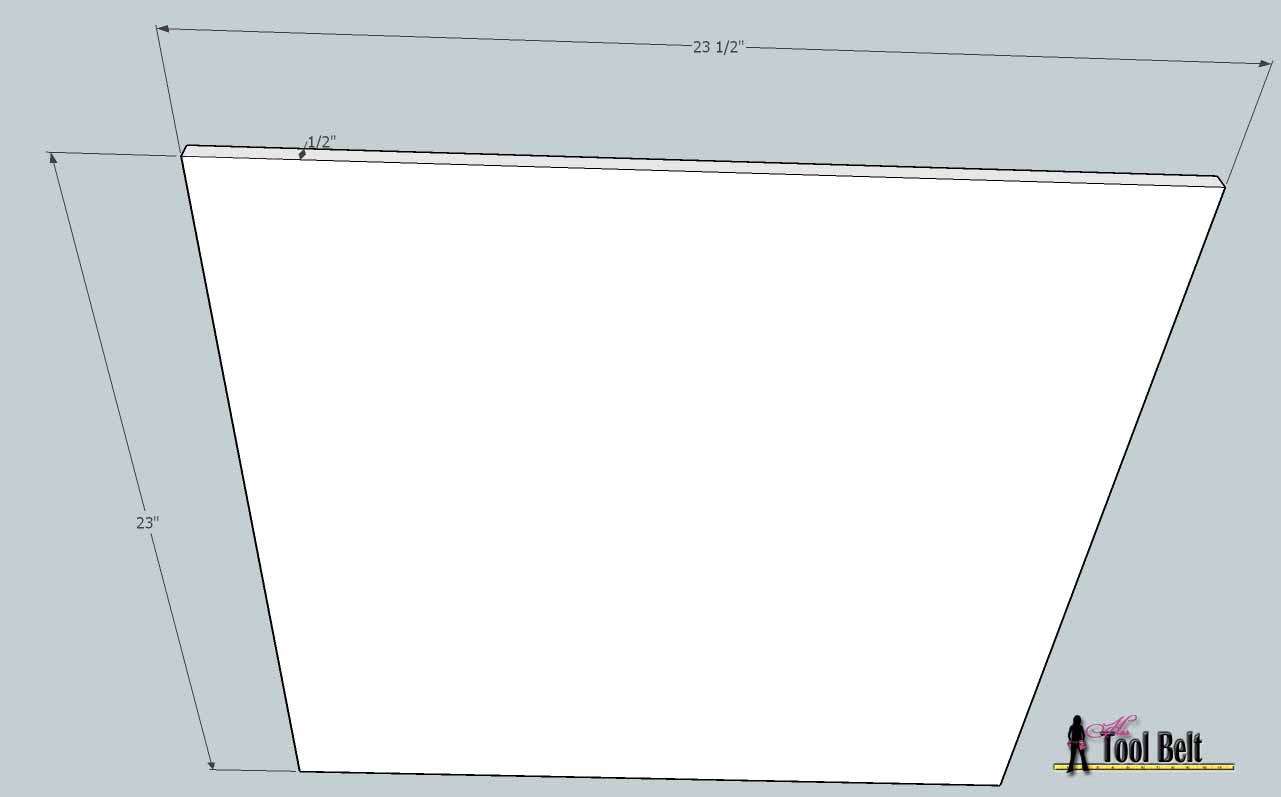
Cut a piece of 1/2″ plywood that is 23 1/2″ x 23″ for the cabinet bottom.
Cabinets: Assembly

Assemble the cabinet by applying glue in the joints, clamp together and allow to dry. Add nails as necessary.
Once the glue has dried, add kreg pocket joints that go through the top inside face frame and a couple places on the inside face of the sides to secure the top into place. For the top, make the back edge flush with the back of the cabinet and flush with one of the sides (that will be the side where the TV is, make sure to make the other cabinet mirror to this one.) Secure the top onto the cabinet.
If you’d like, add a piece of molding along the bottom in front and outer side of the cabinet. Do the mirror image to the other cabinet.

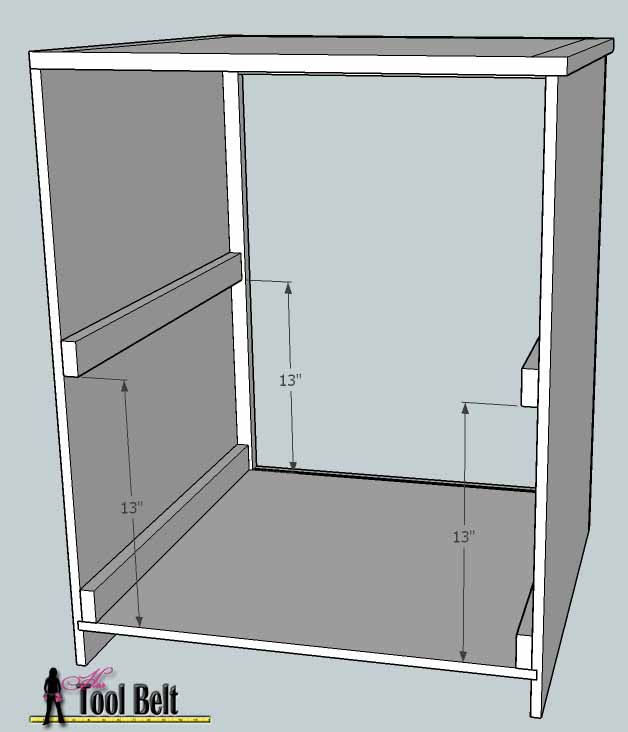
Cut 4 rail support pieces from 3/4″ plywood that are 22 3/4″ x 1 3/4″. Drill 2 or 3 countersink holes along the length of each rail support.

Use 1″ wood/ grabber screws and glue and mount the rail supports to the cabinet.
Try and mount the rail supports as parallel as possible, it will make the drawer slide installation easier later.
Cabinets: Drawers

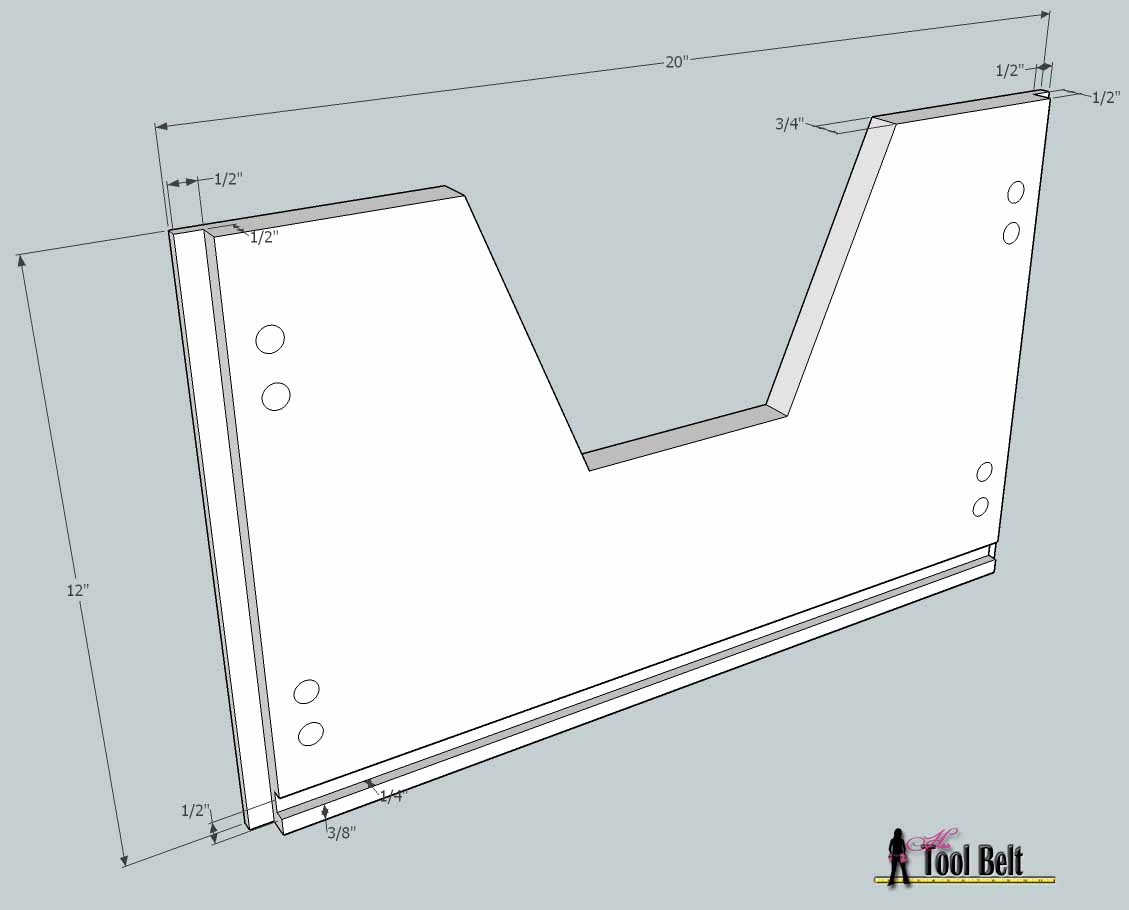
Cut 4 pieces of 3/4″ plywood that are 20″ x 12″ for the drawer fronts. Sketch cuts for the hand pull cut-out according to the diagram. Measurements are approximate, I’d suggest rounding the corners. Cut out the hand pull area. Round the edges along the hand pull with a 1/4″ round over bit or with a sander.

On the backside of the drawer front, make a 1/2″ deep dado cut 1/2″ wide for the sides of the drawer, flush with the outsides of the drawer front. Make a 1/4″ deep dado cut 1/2″ wide at 3/8″ to 7/8″ from the bottom for the bottom of the drawer.
Make Kreg pocket holes for added drawer strength (set for 1/2″ material thickness), as approximately shown in the diagram.

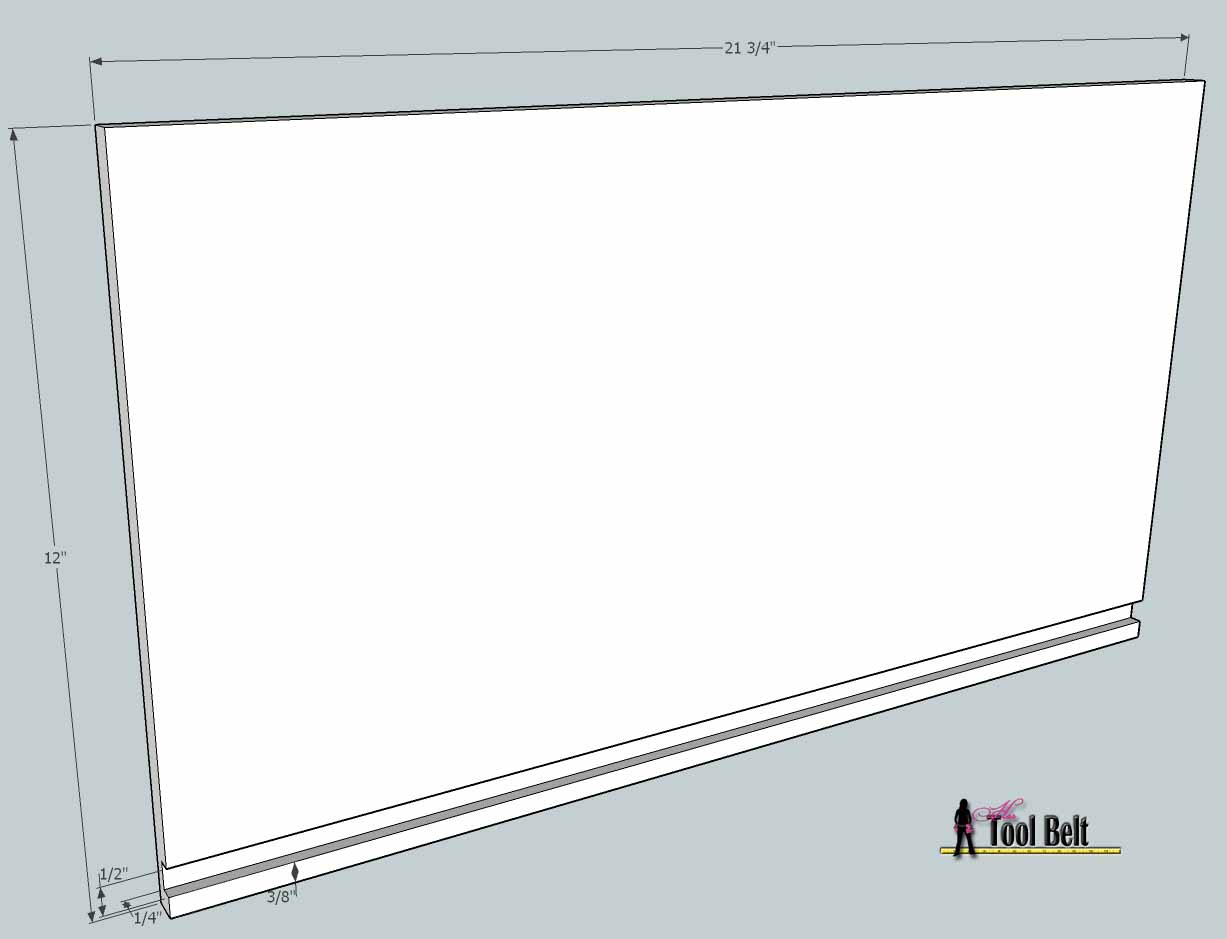
Cut 8 pieces of 1/2″ plywood that are 21 3/4″ x 12″ for the drawer sides. Make 1/4″ deep dado cut 1/2″ wide at 3/8″ to 7/8″ from the bottom for the bottom of the drawer.

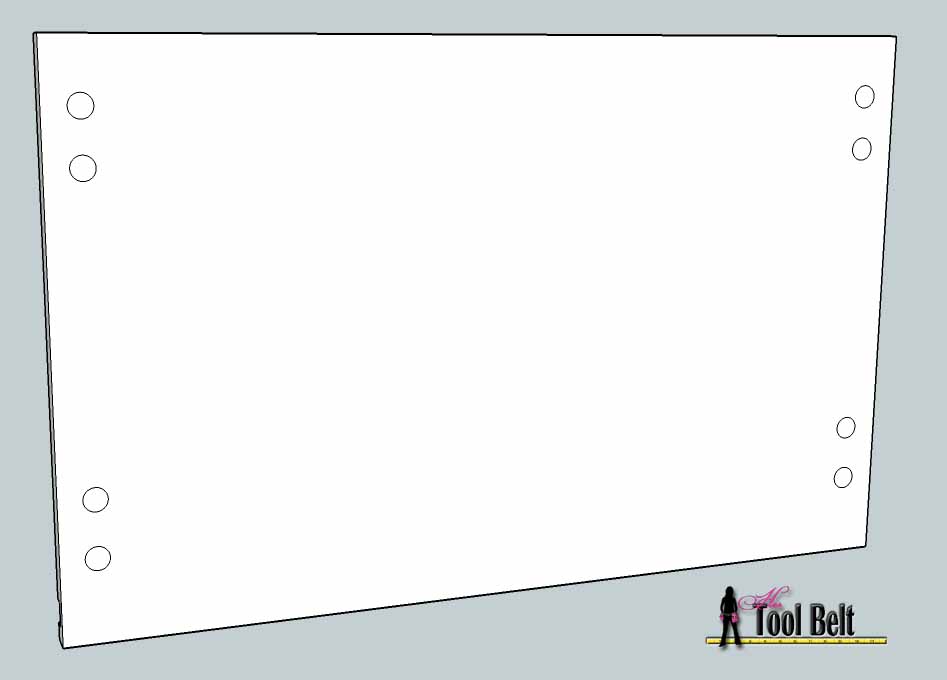
Cut 4 pieces of 1/2″ plywood that are 19″ x 12″ for the drawer back. Make 1/4″ deep dado cut 1/2″ wide at 3/8″ to 7/8″ from the bottom for the bottom of the drawer.

Make Kreg pocket holes in the back of the drawer back for added drawer strength (set for 1/2″ material thickness), as approximately shown in the diagram. 
Cut 4 pieces of 1/2″ plywood that are 21 1/4″ x 19 1/2″ for the drawer bottom.

Assemble the drawer by applying glue in the joints, clamp together and add nails as necessary.

Secure the drawer together by adding Kreg screws into the back of the drawer front and drawer back. Allow the glue to sufficiently dry. Now we are done with the most complex components, wahoo.
Media Center: Bookshelves
Cut list for the bookshelves:
| Quantity | Length | Width | Thickness | Material | Description |
| 4 | 45″ | 1 1/2″ | 3/4″ | pine (solid) | face frame |
| 4 | 21″ | 1 1/2″ | 3/4″ | pine (solid) | face frame |
| 4 | 23″ | 15 3/4″ | 1/2″ | plywood (1/2″) | top/bottom |
| 4 | 45″ | 15 3/4″ | 3/4″ | plywood (3/4″) | sides |
| 4 | 22 1/4″ | 14 7/8″ | 3/4″ | plywood (3/4″) | shelves |
| 4 | 22 1/4″ | 3/4″ | 3/8″ | molding | face of shelf |

The media center has 2 bookshelves. Repeat these instructions for the 2nd shelf.
Cut all of the solid wood pieces according to the cut list. Make the marks for how you are going to join each piece together according to the diagram.
Apply glue to each joint and clamp the face frame together. Check to make sure your face frame is square. Adjust as necessary. Allow the glue to dry.

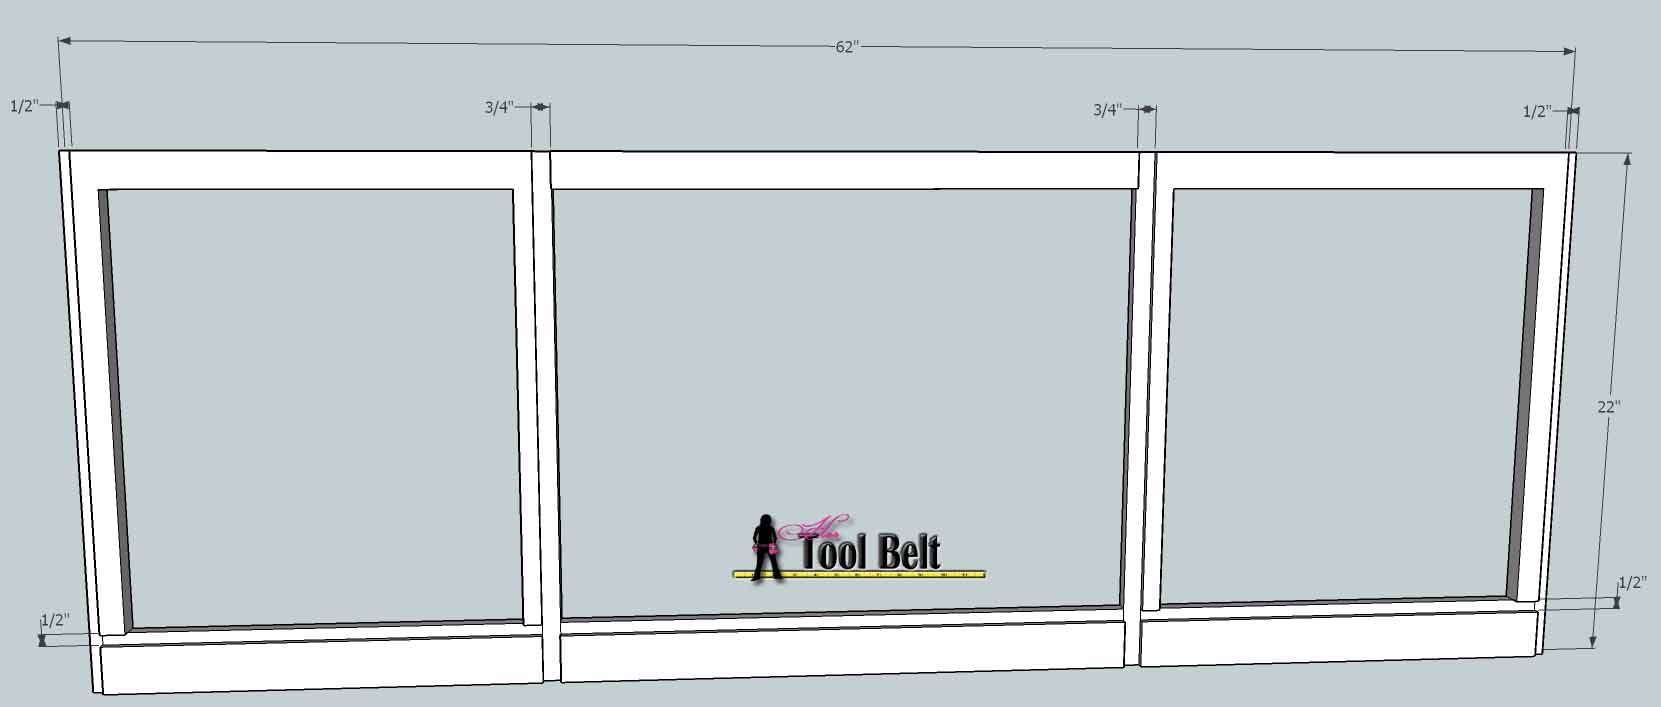
Once the glue is sufficiently dry, the next step is to make dado cuts. If your face frame has a better side, keep that for the front. Each dado is going to be 1/4″ deep. Make a dado cut 1/2″ wide for the sides of the shelf, flush with the outside of the face frame. Make a dado cut 1/2″ wide at 1″ to 1 1/2″ from the bottom for the bottom shelf. Make a dado cut 1/2″ wide along the top edge of the face frame.

Cut 2 pieces of 3/4″ plywood that are 45″ tall x 15 3/4″ wide, these are the bookshelf sides. Make a dado that is 1/2″ wide and 1/4″ deep between 1″ and 1 1/2″ from the bottom, on one side. Make a dado that is 1/2″ wide and 1/4″ deep along the top edge of the shelf side. Repeat for the other shelf side piece.
You can make shelf adjustment holes now or later. The average shelf peg is 1/4″ diameter and 1/2″ long (don’t drill all of the way through the plywood), I’d put the series of holes 2-3″ in from each side. I placed mine at about 13″, 14″, 15″, 27″, 28″, 29″ up from the bottom shelf (add more holes as you like.) Remember to do the mirror image on the other shelf side.

Cut 2 pieces from 1/2″ plywood that are 23″ x 15 3/4″ for the bottom and top.

Cut 2 pieces from 3/4″ plywood that are 22 1/4″ x 14 7/8″. Glue a piece of molding on the front face of each shelf piece.
Bookshelf Assembly

Assemble the bookshelf by applying glue in the joints, clamp together and allow to dry. Add nails as necessary.
If you’d like, add a piece of molding at the top on the front and outer side of the bookshelf. Remember to do the mirror image to the other bookshelf.
Media Center: Bridge
Cut list for the bridge:
| Quantity | Length | Width | Thickness | Material | Description |
| 2 | 14″ | 1 1/2″ | 3/4″ | pine (solid) | face frame |
| 2 | 59″ | 1 1/2″ | 3/4″ | pine (solid) | face frame |
| 2 | 14″ | 15 3/4″ | 1/2″ | plywood (1/2″) | sides |
| 2 | 61 1/2″ | 15 3/4″ | 1/2″ | plywood (1/2″) | top/bottom |
| 2 | 12 1/2″ | 15 3/4″ | 3/4″ | plywood (3/4″) | dividers |
| 2 | cut to fit approx. 11″ | 3/4″ | 3/8″ | molding | face of divider |
| 4 | 8″ | 2 1/2″ | 3/4″ | solid or plywood | bridge supports |

Cut all of the solid wood pieces according to the cut list. Make the marks for how you are going to join each piece together according to the diagram.
Apply glue to each joint and clamp the face frame together. Check to make sure your face frame is square, adjust as necessary. Allow the glue to dry.

Once the glue is sufficiently dry, the next step is to make dado cuts. If your face frame has a better side, keep that for the front. Each dado is going to be 1/4″ deep. Make a dado cut 1/2″ wide for the sides of the bridge, flush with the outside of the face frame. Make a dado cut 1/2″ wide at 1″ to 1 1/2″ from the bottom for the bottom shelf. Make a dado cut 1/2″ wide along the top edge of the face frame. Make a dado cut 3/4″ wide on the top face frame piece that is between 18 1/4″ to 19″ from the side of the face frame. Make another 3/4″ dado cut from the other side of the face frame, as shown.

Cut 2 pieces of 1/2″ plywood that are 61 1/2″ x 15 3/4″ for the top and bottom. Make a dado that is 3/4″ wide and 1/4″ deep between 18″ and 18 3/4″ from the side. Make another 3/4″ dado between 18″ 18 3/4″ from the other side, as shown.

Cut 2 pieces from 1/2″ plywood that are 15 3/4″ x 14″ for the sides. Each dado is going to be 1/4″ deep. Make a dado cut 1/2″ wide at 1″ to 1 1/2″ from the bottom. Make a dado cut 1/2″ wide along the top of the face frame.

Cut 2 pieces from 3/4″ plywood that are 15 3/4″ x 12 1/2″ for the bridge dividers. We will glue a piece of molding on the front face of the divider after we assemble the bridge.

Cut 4 pieces of wood that are 8″ x 2 1/2″ x 3/4″. These will screw to the top of the bridge and will span the 2 bookshelves to hang the bridge.
It may be easier to drill counter sink holes in the bridge top before assembly.
Bridge Assembly

Assemble the bridge by applying glue in the joints, clamp together and allow to dry. Add nails as necessary. Cut to fit and glue a piece of molding to the front face of both dividers. After the glue has sufficiently dried, use 3 or 4 wood or grabber screws per each support and mount the bridge supports onto the top of the bridge. Screw through the bridge into the supports.
If you’d like, add a piece of molding along the top of the bridge. Make sure it’ll line up with the top molding on the bookshelves.
Media Center: Doors
We have a few options with our doors. In the PB magazine, they used inset doors. Inset doors are flush with the face frame. Overlay doors stand out from the face frame. I made the media center with inset doors, keeping with the design in the magazine. For plans to make the overlay door option go here. Also I know that not everyone has a router/router table to make raised panel cabinet doors. Another option is a fun bead board door, or a flat panel door that you can make easily with a table saw. Both of these options will look great on the media center. A great example of a simple bead board door is on the Paprika Vanity. Whichever inset door style you choose to build, the cut dimensions are the same. Cut list for inset media center doors:
| Quantity | Length | Width | Thickness | Material | Description |
| 4 | 18″ | 2 3/4″ | 3/4″ | solid (pine/poplar) | TV Console Stile |
| 4 | 11 1/4″ | 2 3/4″ | 3/4″ | solid (pine/poplar) | TV Console Rail |
| 2 | 13 1/4″ | 11 1/4″ | 3/4″ | solid (pine/poplar) | TV Console Raised Panel option |
| 2 | 13 1/4″ | 11 1/4″ | 1/4″ | bead board or 1/4″ plywood | TV Console Flat Panel option (sub for raised) |
| 8 | 26″ | 2 3/4″ | 3/4″ | solid (pine/poplar) | Cabinet Stile |
| 8 | 5 3/4″ | 2 3/4″ | 3/4″ | solid (pine/poplar) | Cabinet Rail |
| 4 | 21 1/4″ | 5 3/4″ | 3/4″ | solid (pine/poplar) | Cabinet Raised Panel option |
| 4 | 21 1/4″ | 5 3/4″ | 3/4″ | bead board or 1/4″ plywood | Cabinet Flat Panel option (sub for raised) |
The cut list shows options for raised panel and flat panel, pick one or the other. If you are making the raised panel option, you may need to glue pieces of wood together to make a panel wide enough to fit. Join the pieces with a biscuit cutter or dowels then glue and clamp together. Allow the glue to dry sufficiently.
Cut the pieces for the doors. If you have a router and bits for making door joints, use it, or you can use your table saw for a similar look.

Cut the groove in the vertical stiles. Starting 1/4″ from an edge cut a groove that is 3/8″ deep and 1/4″ wide. Repeat for each stile.

The rail pieces are a little more involved, but totally doable. The rail has the same groove as the stile. Starting 1/4″ from an edge cut a groove that is 3/8″ deep and 1/4″ wide. Repeat for each rail.

On each end of the rail pieces we are going to leave a tongue to fit into the stile groove. So cut 1/4″ wide x 3/8″ deep on both sides of the tongue. You may have to make one of the sides a hair larger, so the tongue will be just under 1/4″ and smoothly slide into the rail groove. Repeat for other end of rail and each rail piece.

Cut the panel pieces whether from 3/4″ solid wood, 1/4″ bead board or 1/4″ plywood.
If you’re making a raised panel. Set your router height so you are left with a hair under 1/4″ to fit in the stile and rail grooves. Route around 4 sides.
Door Assembly

Dry fit the door pieces together. If necessary, trim any pieces so they will fit snug together.
When gluing a cabinet door, generally you only apply glue to the tongue and groove parts where the stile and rails join, not where the panel fits. This allows for expansion and contraction of the panel.
Glue the cabinet doors and clamp together until dry. Check to make sure the doors are square. Adjust as necessary. Remove any excess glue. Allow the glue to dry sufficiently.
When building with an inset door, you may have to trim the door edges to fit in place. Dry fit each door with the hinges. Trim the door as necessary and label it’s location. We’ll install the doors after painting.
Finish Work
Scrape off excess glue. Fill any holes or gaps with filler. If you are painting, go ahead and use spackle or joint compound (for your walls). If you are staining, use the proper wood filler. Let the filler dry then sand all of the components. I’m not going to lie, this is my least favorite part :-), but so important. Make sure to get any excess glue and filler smooth. End sanding your project with 120 -150 grit sand paper. Remove excess dust. If painting, prime each piece and allow to dry. If staining, use wood preconditioner and apply stain as you like.
Once the primer is dry, apply the paint and let dry. Touch up the paint as necessary.
For the finish coat, if you painted the media center a light color, use clear polycrylic (available at Home Depot). I typically use polyurethane for top coats, but it leaves a yellowish color on white paint. In a clean, well ventilated area, apply a thin coat of polycrylic to each piece. Allow to dry according to the directions. If there are small bumps and bubbles, use steel wool and lightly sand the bumps off. Use a tack cloth and wipe any dust or particles off. Apply a second coat of polycrylic, and let dry sufficiently.
For the drawer slides, I like to use ball bearing Full Extension drawer slides, they are rated for around 100 lbs. For this cabinet I used 22″ full extension slides available at Home Depot.

Separate the drawer slides and mount the non-bearing pieces along the bottom of the drawer sides with screws. Make sure that the drawer slides on each side of the drawer will be parallel. If they are crooked, your drawers will not function properly.
Mount the bearing side of the drawer slides on the rail supports in the cabinet. Make sure that the drawer slides on each side of the drawer will be parallel. If they are crooked, your drawers will not function properly.

To mount the inset cabinet doors you’ll need 12 inset hinges. I used this type Full wrap inset hinge, use whatever style that you like. Mount the hinges a couple of inches from the top and bottom of the door. Add door pulls or knobs as you like.
Enjoy your new DIY media center & way to go!
——————————————
Wow, Amy! Such a great piece of furniture, and a great detailed tutorial! Thanks for sharing!
Go visit Amy at Her Tool Belt for great tips (like how to wire and install an outlet) and a whole series of Tool Time videos with tool tips and how-to’s, plus more wonderful building plans like this beadboard vanity sink cabinet.


Thanks for sharing my Media Center! It’s been a wonderful addition to our house.
Beautiful media center!! It’s incredible that you built this. I love the toy drawers.
Thank you Crystal!
Hi there, I love what you’ve done! What program did you use to sketch out your design? Thank you!
What was the cost to build this?
May I ask what type of molding you used on the top and bottom of the unit as well as the top of the hutch cabinets? Thanks!
I made my own with a router, but you can substitute store bought molding.