How to Refinish Wood Furniture


How do you sand and restain furniture? Follow this tried and tested method and detailed step-by-step tutorial to learn how to refinish wood furniture, including intricate details, without sanding, from an expert.
As you are refinishing wood furniture, be sure to also read our tips for painting furniture with different paint types, how to prevent tannin (knot) bleedthrough, and how to stain wood any color.

How to Refinish Wood Furniture (Without A Lot of Sanding)
by Beck from Beckwith’s Treasures
This post contains affiliate links. Learn more and read our full disclosure policy here.
So you have a piece of furniture you love, but it’s needing some attention. Here’s my process, start to finish based off years of experience, to help you refinish it right!
This amazing antique dining table was literally caked with old, crackled varnish so it is the perfect piece to share!
At some point someone had stripped the top and the inserts, but not the base.

Stripping the old finish off intricate pieces like this ornate base might seem like a daunting task…

And the thick, bubbly old finish looks so permanent, but you can do this! I’ll show you how!

Don’t miss these other inspiring refinished furniture projects: Kitchen table refinished for a new look – Refinished Drop Leaf Table – Coffee Table Refinished to Buffet Table
First, choose the final finish.
The first thing you have to decide when “rehabbing” any piece of furniture is: how can the piece be “enhanced?”
I am first and foremost a die hard “wood lover.” Older pieces that are constructed of wood we just don’t see much any more in new, affordable furniture…walnut, cherry, mahogany, teak, rosewood deserve to show off their wooden beauty.
However, I’ve also painted many, many pieces. Here’s how I decide to paint or refinish furniture:
I paint the piece if:
- it has a lot of water damage
- it has broken or “bubbled” veneer that needs repair
- it is missing trim pieces that have to be replaced
- it is just an “outdated” piece with little value and a POW of color is what you’re after
- I want uniform-looking furniture
Want to paint? We’ve got you covered: How to Paint Furniture, 4 Part Series with Reviews
I refinish the piece if:
- it is mostly free of damage, or has only damage that can be corrected
- it is fully intact with no missing pieces
- I like the look of wood grain and its inherent color variations
TIP: If you refinish a table with inserts, make sure you strip, stain and finish those at the same time so they will match!
Next, Strip Off the Finish
Even if you are going to paint, I suggest stripping off the current finish or paint on your piece of wood furniture.
Can you refinish furniture without stripping?
Yes, but… In my experience, you will get a far superior result if you first strip the piece down to bare wood. My tried and true method doesn’t require much sanding either!
Bonus: you can pick up all the paint strippers you need at any home improvement store!

Products you will need to strip and refinish wood furniture:
- Citristrip (1/2 gallon, $20)
- A cheap “chip” brush ($1.50)
- Flat, plastic scraper (less than $2)
- Acetone (Crown, 1 gallon, $17)
- Lacquer Thinner (Crown, 1 gallon, $18)
- 0000 Steel Wool ($4)
- 220 sanding block
- Mineral Spirits ($8)
- An old toothbrush (never toss an old toothbrush)
- Protective Rubber Gloves ($5)
- Metal/glass bowl (For easy mixing, I buy the huge 8 cup measuring cups at thrift stores and garage sales!)
- Old towel/shop rags
- Anything disposable to protect your work surface (plastic drop cloth, old newspapers, flattened cardboard)
- New finish of your choice (Paint, stain and oil, clear coat, etc.) and the tools to apply it
Other Misc Supplies you may want to try:
- Sponges to apply stain, power sander if you’d like that sand blasted beachy look.
How to Refinish Wood Furniture, Die-Hard Rules
Regardless of “style” or “period” of the piece, I have a few “die hard” rules for stripping and refinishing ANY wood furniture. We all want your project to turn out amazing, so please remember:
#1: When stripping old finishes, there are NO shortcuts.
Painted or stained or lacquered or multiple finishes, there are zero shortcuts! If you don’t do it right, your new finish will look like crud and you will have wasted your time. Settle in and do it right!
#2: Always WEAR GLOVES, EYE PROTECTION, LONG PANTS AND CLOSED TOED SHOES.
You are working with chemicals! Trust me…splash this stuff on your skin and it will leave a mark! (I wear glasses so I bought an inexpensive pair of glasses to wear while I work! You choose your favorite protective eyewear!) Don’t mess around, be safe!
#3: Protect your work surface.
Do not do this on any grass you are fond of and always put something disposable (paper, cardboard, plastic, whatever) under the piece to catch all the drips and gunk!
#4: Always follow each product’s safety instructions
Remember to check for or indoor/outdoor use, fresh air requirements, etc.
Now, let’s get to work!
How to Refinish Furniture, Step by Step
This process uses chemicals rather than spending hours and hours sanding off the old finish. What’s the best way to sand old wood furniture? NOT with sandpaper! What’s the most efficient way to sand wood to a bare finish? Again, not sandpaper – these chemicals are faster and more effective, especially with carved sections.
Step 1: Remove heavy finish with Citristrip
If the existing finish (whether varnish, shellac, polyurethane or paint) is really “heavy” I first coat it with Citristrip.
(If the piece doesn’t have a real heavy existing finish or multiple layers of paint, you may not even want to use Citristrip…use your judgment! Skip to Step 2 and use just the acetone and lacquer thinner mixture.)
To apply the Citristrip, I use a cheap “chip” brush to apply it per the directions. If you are working in a hot location or feel like the project will need some time, you can cover the citristrip with plastic wrap, to help keep it from drying out.
After letting that sit a bit, I scrape all the flat parts with a plastic scraper or putty knife. ALWAYS scrape with the grain of the wood.

(For how to “scrape” all the turned legs and carvings…see step 2 below)
Sometimes the finish melts right off, other times it is pretty stubborn (like with oil-based stains) …just coat it again with the stripper, let it sit a bit, and then scrape it again! It may take 2-3 applications to get all the “heavy” finish off. Using plastic warp can extend the time it is actively working.

Step 2: Scrub with steel wool, acetone and lacquer thinner mixture
After removing the really heavy old finish or the majority of the paint, mix 1/2 acetone and 1/2 lacquer thinner in a glass or metal bowl.
Using 0000 steel wool, scrub the piece with this mixture. This is the best way to get the old finish and gel stripper off turned legs and etchings.
With the 0000 steel, I can scrub the piece without worrying too much about damaging the wood!
This will remove the stripper you couldn’t scrape off and melt the varnish right off the turns and carvings. Work from the top down and don’t be afraid to use this mixture liberally!

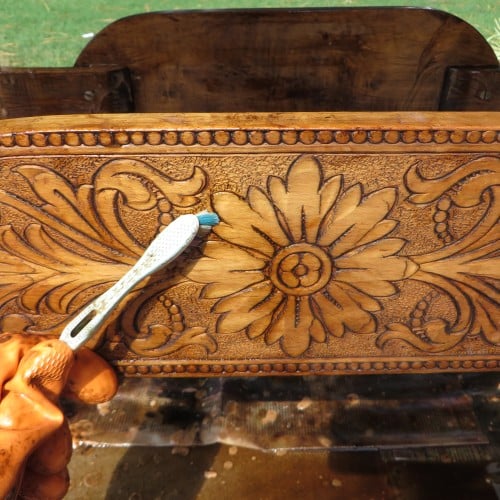
One exceptional tool for removing old finish….toothbrushes. Use an old toothbrush to get into all the corners, grooves and crannies…just dip it in the acetone/thinner mixture and scrub away!
They are tough enough to scrub out the crud but won’t hurt the wood!
Have you ever seen a piece of wooden furniture that has been refinished and all the corners and joints are dark? That’s because they didn’t get all the old finish off…use a toothbrush and you won’t have that problem!
This process will probably take some time and elbow grease. I usually mix several batches of the acetone/thinner and go through several pieces of steel wool.
I probably went around this table 4-5 times just scrubbing with the mixture! (This is where one of those low shop stools on wheels is a back saver!)

Do I need to remove all stain before restaining?
If you don’t take this process seriously and remove of ALL the old finish, you are wasting your time because you WILL be disappointed.
While this stripping process may seem labor intensive, it is much easier than sanding the old finish off and you are much less likely to damage the piece.
Which brings me to Step 3…..
Step 3: Sand as little as possible
You should almost always use chemical strippers if your goal is to remove all the old finish or paint and only sand a tad (with the grain…if needed…220 fine grit sandpaper) AFTER you have stripped all the old finish.
Many old pieces (unlike this table) may have veneer. Veneer can be thin and if you sand too vigorously you can do a lot of damage!
You will NEVER get all the old finish out of decorative carvings or turned legs (like this table) with sandpaper…not happening!
Also, palm sanders tend to leave little “swirly” marks. As faint as they may seem, they are going to be glaring if you apply stain.
Save yourself the grief…hand sand with 220 grit paper on the flat surfaces and steel wool on the ornate areas.
SAND WITH THE GRAIN!! Cross grain marks WILL show up if you stain the piece!

Step 4: Inspect your wood furniture piece
Once you strip all the old finish, you are REALLY going to see the “character” (grain) of the wood.
A lot of old finishes were applied with a “multi-layer” process or were sprayed on with the stain mixed in with the finish. This process was used to give the piece a more “uniform” look and hide the “variations” in the wood grain, especially with oak it seems.
If you like a more uniform look than your furniture piece now shows or if you found some surprises as you were working, there is no shame in deciding to paint it! If the open grain is more than you want, you can also opt to use grain filler on your old piece of furniture — this is YOUR furniture restoration project, so do what you like!
Also, if you find that your piece now needs some repairs, such as the stripping process dissolve adhesives (wood glue) that was used on joints, that’s not a huge issue.
It is best to strip and stain the piece BEFORE you do any major repairs. Stain will not penetrate glue…so if you get any wood glue on the wood, it won’t absorb a stain and will be visible forever!
So, rule of thumb: If you are going to paint a piece, repair it BEFORE paint…if you are going to stain, repair it AFTER stain

It took me four hours to completely strip all the old finish off this table!
Step 5: Clean up with mineral spirits
After you have stripped all the old finish, wash the entire piece with clean rags and mineral spirits.
Garage sales and thrift stores are great places to find old towels. Cut them up into washcloth-size pieces and they make a great soft cloth for refinishing wood furniture.
Which reminds me…WORD OF WARNING!!!! DO NOT THROW RAGS OR STEEL WOOL IN A TRASH CAN IF THEY HAVE ANY CHEMICALS ON THEM. THEY TRULY CAN SPONTANEOUSLY COMBUST AND BURN YOUR HOUSE DOWN!!!!
- Lay them out to dry in the sun.
- Bag them up after they are completely dry and have aired out for a few days!!
- Do not bag them with paper or cardboard and keep them separate from household trash!
While washing your piece down with the mineral spirits you may find a few spots that need a little more “scrubbing” to remove any old finish…not a problem…just scrub it again with steel wool or a toothbrush and the acetone/thinner mixture and then wash it down with the mineral spirits.
Let the piece dry and then give it a light sanding, if needed. (Again, ALWAYS with the grain!) Thoroughly clear off any dust from sanding.

Step 6: Apply your new finish
As mentioned earlier, there are many options here! If you love the color of the wood when it is wet with mineral spirits, apply a clear coat finish.
If you are going to paint, follow the manufacturer’s directions. My favorite finish is stain.
Find the paint you need: 5 Different Types of Paint for Refinishing Furniture
Tips for using stain to refinish wood furniture:
Don’t use stain that has a “finish” or “sealer” in it.
If you don’t like the color, you are pretty much stuck. Use a stain that requires a separate finish. That way, if you aren’t real keen on the color, you can immediately wipe it off with mineral spirits or even layer another stain color on top of it. Make adjustments to the color until you are happy with it. After applying stain wipe off excess stain before allowing to dry thoroughly before finishing.
Keep in mind, different woods will stain differently.
Your best bet is to stain a small “test” patch on the piece and have mineral spirits and a clean rag handy to wipe it off if you don’t like the color.
Soft woods may require a preconditioner for stain to apply evenly. Water-based stains and oil-based stains both have different needs, too, so read the instructions on the can.
My favorite furniture finish/sealant…
After the stain dries, I personally prefer a tung oil finish to seal the wood. Super easy to wipe on…pretty much “idiot proof.”
I apply 3-4 coats and sand with 0000 steel wool and wipe with tack cloth between coats!
The awesome thing about a tung oil finish is it is super easy to “fix” scratches and wear…just lightly “sand” it with 0000 steel wool, wipe with a tack cloth and apply another coat of the finish!
What’s the best oil to restore wood? I prefer tung oil. Here I discuss the (lack of) difference between oils. I usually “re-oil” the tops of my tables once a year…or as needed.
I prefer to NEVER apply polyurethane (or polycrylic) to stained finishes! I have an old walnut dresser I sealed with poly and I regret it! Someday it will get (re)refinished properly!
My Refinished Antique Table
I stained the top of this table with a brown walnut stain.

And I decided to use a glaze tinted with black paint on the base. I like the fact that the glaze allows the wood grain to show through!
After the glaze dried I sealed it with 3 coats of tung oil finish. My original plan was to paint the base white and I can still do that at some point if I choose.

For now I am going to leave it as it and just enjoy the beauty of the wood. This is one of those pieces that begs for “less is more!”
Enjoy a comparison of before and after photos:


Beck, thank you so much for sharing your know-how with us!
Remodelaholics, head over to Beckwith’s Treasures with all your questions about refinishing furniture — and be sure to check out her other projects, too, like this upcycled grandfather clock and how to beef up your door trim.
FAQ and Notes About Refinishing Wood Furniture
Is it better to sand or strip furniture?
Often the answer is both. Depending on the thickness of the finish you may start by applying a stripper and scrapping off the bulk of the finish and then sanding the rest. If the finish is already mostly worn off sanding may be the only step you need to take.
How do you remove wood dust after sanding?
There is a product called tack cloths here. These trap particles in and remove dust very thoroughly.
How do you refinish wood without stripping it?
If your piece is in great shape (no chipping finish) AND you want to refinish the wood to a darker stain, you can use gel stain over the original finish, whether that was wood stained or painted, like this. You can also get the look of a wood stain by using paint.
Can I use a gel stain to finish the wood?
Gel stains contain a finish inside the stain, so for this type of project that type of stain should be avoided. It is a perfect project for when you do not sand down or remove a finish. Gel stains act more like paint, see this railing refinish project or bathroom cabinet update.
I have an antique furniture piece, should I refinish it?
Did you know that in a valuable antique, that the original finish is important to the value of the piece? If you are not sure if your piece has value, it may be worth having it valuated by an expert before refinishing. You may chose to find a professional to restore or clean the finish rather than refinish.
Any tips for sanding?
Always sand with the grain of the wood. The more coarse sandpaper you start, the more sanding you will need to do. You need to step down to a medium-grit sandpaper and follow up with a fine grit before any finishing is applied to the wood. Otherwise you will have a rough finish and stain will soak in blotchy.
How to clean grime off of furniture?
You may not need to refinish a piece of furniture if the finish is intact. To clean off dirt and grime begin by wiping off dust down with a microfiber cloth.
To deep clean a simple mix of half a cup of distilled white vinegar, half a cup of warm water and a teaspoon of mild dish soap like Dawn will be perfect.
Be sure to wipe off remaining water and it can damage wood when left wet.
How do I refinish laminate furniture?
When refinishing a laminate piece, there are different steps you need to follow than when refinishing a solid wood furniture piece like this. Check out this tutorial for easy to follow steps, or try this technique to paint to look like wood. You can also use a specially formulated paint meant for previous finishes, like we used here.
My piece of furniture feels wobbly, should I refinish it?
Absolutely, but before refinishing take the time to make the necessary repairs to strengthen the joints, loose veneer etc. Before finishing you want the piece to be fully functioning and strong. Glues, epoxy putty, and fillers may effect staining so be careful when applying.
Glue will stop stain from soaking in to the wood and ecess should be wiped off before drying and sanded off if you missed it and it dried.
Wood filler pulls in stain in much more readily than the wood itself so it may be better to fill any holes with tinted filler after staining. If you aren’t sure test it before filling the wood and then finishing it.
More Furniture Refinishing Ideas from Remodelaholic:
- 20 DIY Furniture Makeover Projects
- Must-Know Tips to Prep and Refinish Furniture
- 5 Furniture Makeovers to Make you Flip
You can also follow along on social media: Facebook | Instagram | Pinterest | Youtube
How to Refinish Wood Furniture
Ingredients
- Citristrip 1/2 gallon, $20
- A cheap “chip” brush $1.50
- Flat plastic scraper less than $2
- Acetone Crown 1 gallon, $17
- Lacquer Thinner Crown 1 gallon, $18
- 0000 Steel Wool $4
- 220 sanding block
- Mineral Spirits $8
- An old toothbrush never toss an old toothbrush
- Protective Rubber Gloves $5
- Metal/glass bowl For easy mixing, I buy the huge 8 cup measuring cups at thrift stores and garage sales!
- Old towel/shop rags
- Anything disposable to protect your work surface plastic drop cloth, old newspapers, flattened cardboard
- New finish of your choice Paint, stain and oil, clear coat, etc. and the tools to apply it
Instructions
Step 1: Remove heavy finish with Citristrip
- If the existing finish (whether varnish, shellac, poly or paint) is really “heavy” I first coat it with Citristrip.
- (If the piece doesn’t have a real heavy existing finish or multiple layers of paint, you may not even want to use Citristrip…use your judgment! Skip to Step 2 and use just the acetone and lacquer thinner mixture.)
- To apply the Citristrip, I use a cheap “chip” brush to apply it per the directions. If you are working in a hot location or feel like the project will need some time, you can cover the citristrip with plastic wrap, to help keep it from drying out.
- After letting that sit a bit, I scrape all the flat parts with a plastic scraper. ALWAYS scrape with the grain of the wood.
- (For how to “scrape” all the turned legs and carvings…see step 2 below)
- Sometimes the finish melts right off, other times it is pretty stubborn…just coat it again with the stripper, let it sit a bit, and then scrape it again! It may take 2-3 applications to get all the “heavy” finish off. Using plastic warp can extend the time it is actively working.
Step 2: Scrub with steel wool, acetone and lacquer thinner mixture
- After removing the really heavy old finish or the majority of the paint, mix 1/2 acetone and 1/2 lacquer thinner in a glass or metal bowl.
- Using 0000 steel wool, scrub the piece with this mixture. This is the best way to get the old finish and gel stripper off turned legs and etchings.
- With the 0000 steel, I can scrub the piece without worrying too much about damaging the wood!
- This will remove the stripper you couldn’t scrape off and melt the varnish right off the turns and carvings. Work from the top down and don’t be afraid to use this mixture liberally!
- One exceptional tool for removing old finish….toothbrushes. Use an old toothbrush to get into all the corners, grooves and crannies…just dip it in the acetone/thinner mixture and scrub away!
- They are tough enough to scrub out the crud but won’t hurt the wood!
- Have you ever seen a piece of furniture that has been refinished and all the corners and joints are dark? That’s because they didn’t get all the old finish off…use a toothbrush and you won’t have that problem!
- This process will probably take some time and elbow grease. I usually mix several batches of the acetone/thinner and go through several pieces of steel wool.
- I probably went around this table 4-5 times just scrubbing with the mixture! (This is where one of those low shop stools on wheels is a back saver!)
- If you don’t take this process seriously and remove of ALL the old finish, you are wasting your time because you WILL be disappointed.
- While this stripping process may seem labor intensive, it is much easier than sanding the old finish off and you are much less likely to damage the piece.
Step 3: Sand as little as possible
- You should almost always use chemical strippers if your goal is to remove all the old finish or paint and only sand a tad (with the grain…if needed…220 fine grit sandpaper) AFTER you have stripped all the old finish.
- Many old pieces (unlike this table) may have veneer. Veneer can be thin and if you sand too vigorously you can do a lot of damage!
- You will NEVER get all the old finish out of decorative carvings or turned legs (like this table) with sandpaper…not happening!
- Also, palm sanders tend to leave little “swirly” marks. As faint as they may seem, they are going to be glaring if you apply stain.
- Save yourself the grief…hand sand with 220 grit paper on the flat surfaces and steel wool on the ornate areas.
- SAND WITH THE GRAIN!! Cross grain marks WILL show up if you stain the piece!
Step 4: Inspect your wood furniture piece
- Once you strip all the old finish, you are REALLY going to see the “character” (grain) of the wood.
- A lot of old finishes were applied with a “multi-layer” process or were sprayed on with the stain mixed in with the finish. This process was used to give the piece a more “uniform” look and hide the “variations” in the wood grain.
- If you like a more uniform look than your furniture piece now shows or if you found some surprises as you were working, there is no shame in deciding to paint it!
- Also, if you find that your piece now needs some repairs, such as the stripping process dissolve adhesives (glue) that was used on joints, that’s not a huge issue.
- It is best to strip and stain the piece BEFORE you do any major repairs. Stain will not penetrate glue…so if you get any glue on the wood, it won’t absorb a stain and will be visible forever!
- So, rule of thumb: If you are going to paint a piece, repair it BEFORE paint…if you are going to stain, repair it AFTER stain
Step 5: Clean up with mineral spirits
- After you have stripped all the old finish, wash the entire piece with clean rags and mineral spirits.
- Garage sales and thrift stores are great places to find old towels. Cut them up into washcloth-size pieces.
- Which reminds me…WORD OF WARNING!!!! DO NOT THROW RAGS OR STEEL WOOL IN A TRASH CAN IF THEY HAVE ANY CHEMICALS ON THEM. THEY TRULY CAN SPONTANEOUSLY COMBUST AND BURN YOUR HOUSE DOWN!!!! Lay them out to dry in the sun. Bag them up after they are completely dry and have aired out for a few days!! Do not bag them with paper or cardboard and keep them separate from household trash!
- While washing your piece down with the mineral spirits you may find a few spots that need a little more “scrubbing” to remove any old finish…not a problem…just scrub it again with steel wool or a toothbrush and the acetone/thinner mixture and then wash it down with the mineral spirits.
- Let the piece dry and then give it a light sanding, if needed. (Again, ALWAYS with the grain!) Thoroughly clear off any dust from sanding.
Step 6: Apply your new finish
- As mentioned earlier, there are many options here! If you love the color of the wood when it is wet with mineral spirits, apply a clear coat finish.
- If you are going to paint, follow the manufacturer’s directions. My favorite finish is stain.
Tips for using stain to refinish wood furniture:
- Don't use stain that has a "finish" or "sealer" in it. If you don't like the color, you are pretty much stuck. Use a stain that requires a separate finish. That way, if you aren't real keen on the color, you can immediately wipe it off with mineral spirits or even layer another stain color on top of it. Make adjustments to the color until you are happy with it. After applying stain wipe off excess stain before allowing to dry thoroughly before finishing.
- Keep in mind, different woods will stain differently. Your best bet is to stain a small "test" patch on the piece and have mineral spirits and a clean rag handy to wipe it off if you don't like the color.
- Soft woods may require a preconditioner for stain to apply evenly.
- After the stain dries, I personally prefer a tung oil finish to seal the wood. Super easy to wipe on…pretty much "idiot proof." I apply 3-4 coats and sand with 0000 steel wool and wipe with tack cloth between coats! The awesome thing about a tung oil finish is it is super easy to "fix" scratches and wear…just lightly "sand" it with 0000 steel wool, wipe with a tack cloth and apply another coat of the finish! I usually "re-oil" the tops of my tables once a year…or as needed.
- I prefer to NEVER apply poly to stained finishes! I have an old walnut dresser I sealed with poly and I regret it! Someday it will get (re)refinished properly!
Please Pin this!

Originally published 12.27.2014 // Updated 03.24.2021


Love seeing someone stripping and cleaning the wood. I’ve been doing this for years. Stopped selling my pieces because people had the nerve to say, people don’t want wood tones. Even when I painted pieces, I would get people telling me, you don’t need to clean, strip, just paint over, it will be fine.