Upcycled Vintage Desk into Kitchen Island with Storage
Adding a kitchen island is a great way to add some needed storage and counter space to a kitchen. If you’re a builder, you can build a good kitchen island from scratch — or if you’re not, then you can start with a sturdy piece of furniture and upcycle it into the island of your dreams — just like our guest today who turned an outdated vintage desk into a kitchen island with some paint, wood, beadboard, and love!

Read below for all the details from Lisa and her desk-to-island DIY, or if you’re lacking a desk, you can also make a storage-friendly kitchen island from a dresser (by Sweet November featured here)

or a filing cabinet (from Curbly)

or a console table (by Mom 4 Real, tutorial here)

or a dining table (by Teal and Lime, tutorial here)!

Vintage Desk into Kitchen Island
by Lisa from 2Perfection Decor
Hi! My name is Lisa from 2PerfectionDecor Blog. I am so honoured to have my ‘Vintage desk turned into Kitchen island’ be featured here today on Remodelaholic. I started my blog last year to document our journey on creating the perfect home for us. I love going to garage sales, antiquing for vintage finds and thrift store hunting. Basically transforming something old into something beautiful. I always try to incorporate vintage character pieces into our newer built home. Here is how we transformed a vintage Desk into a small space Kitchen Island solution.


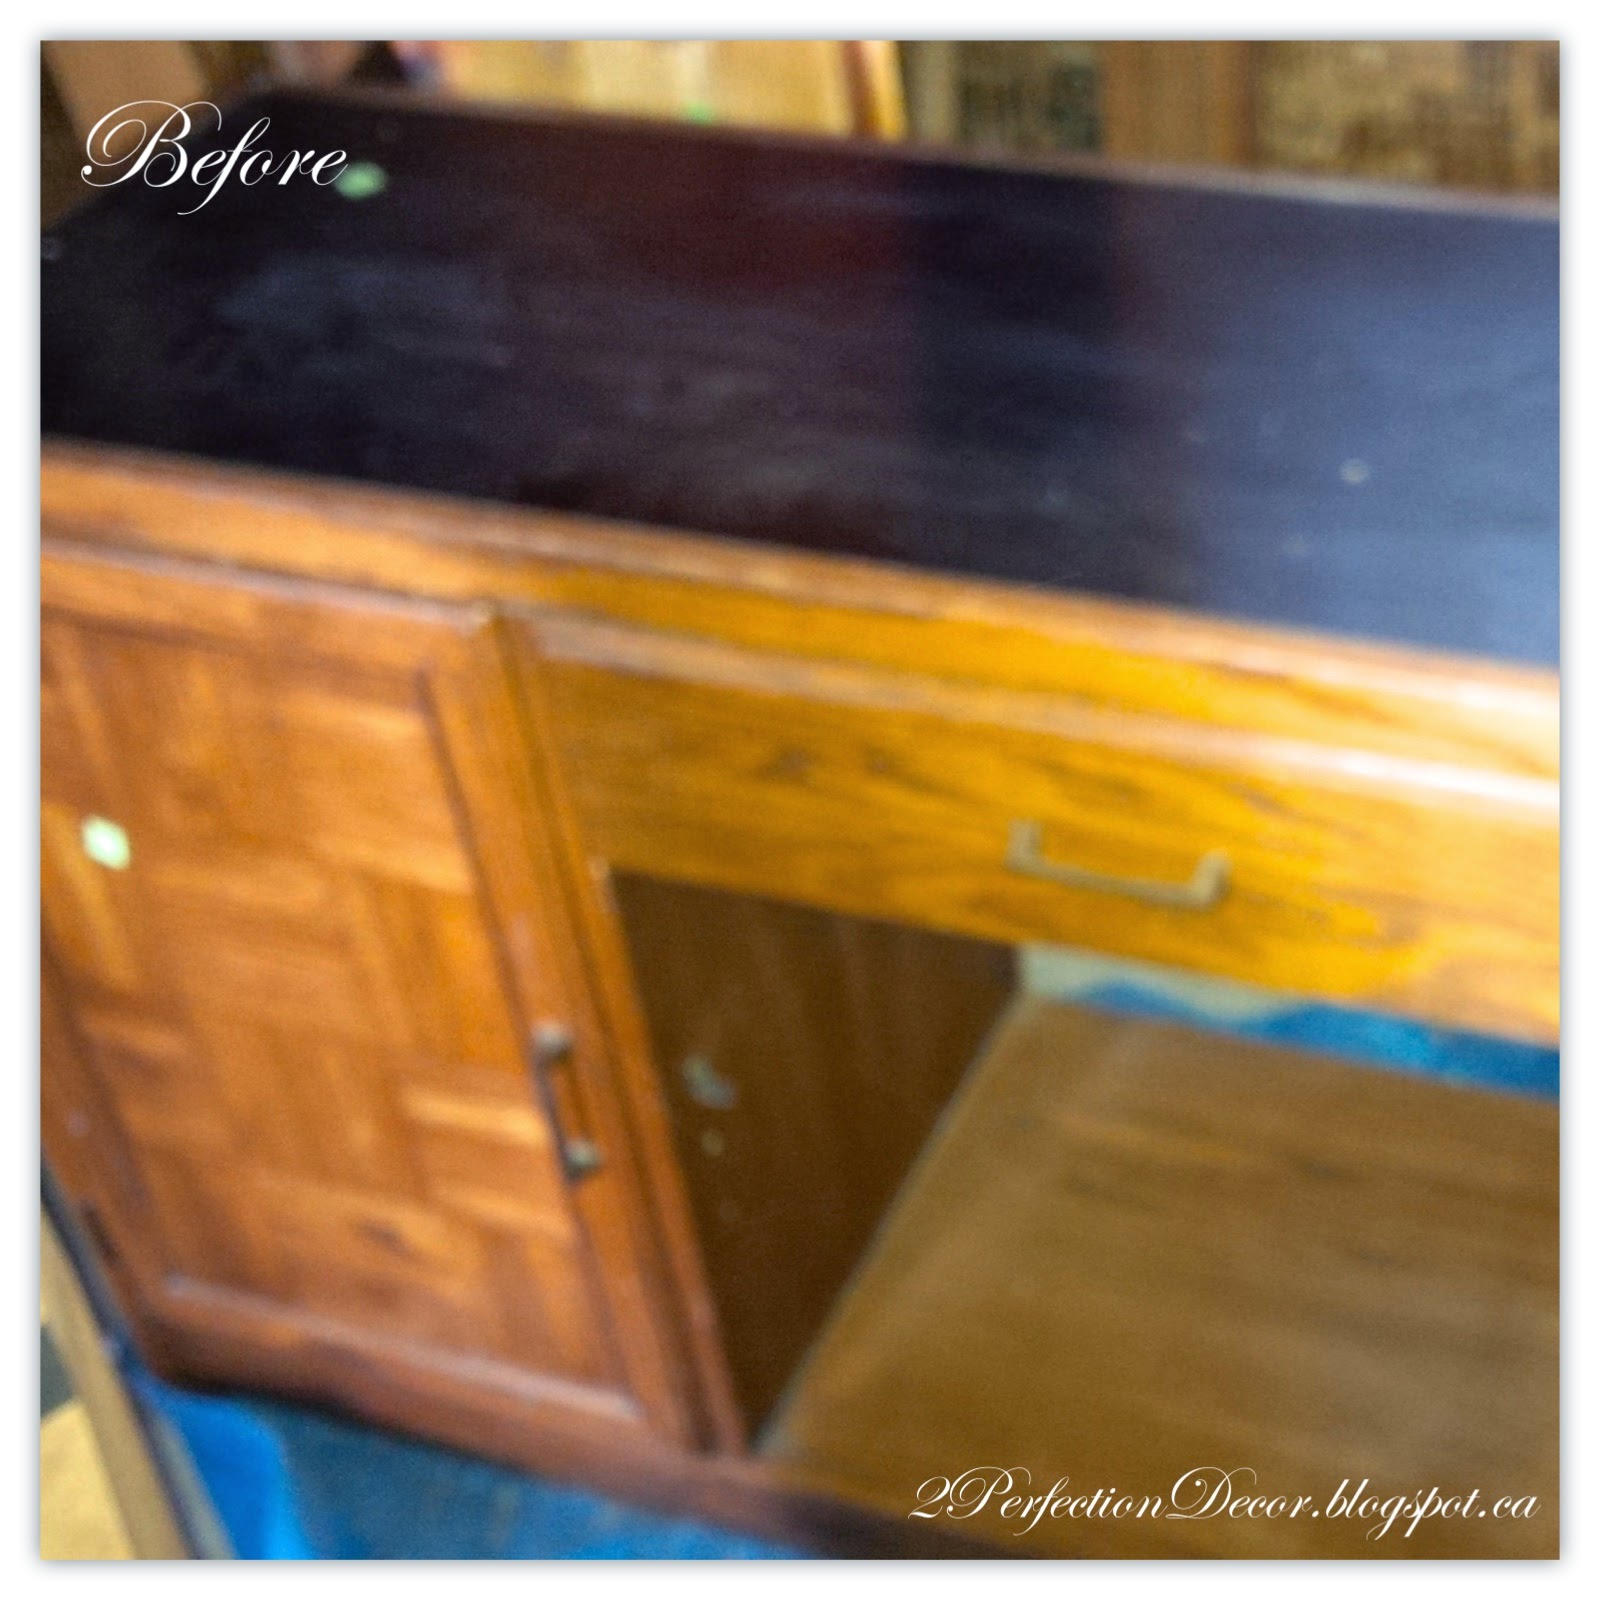
It all started with the FIND.. I had been searching for the ‘Perfect’ piece for months.. Finally I found it at my local Re-Store. $25 for the perfect size DESK.. It had a working easy sliding drawer and a cabinet with a shelf which was a major bonus..Plus this great open shelving area, cause gosh knows I LOVE Eye Candy! But the sizing was perfect. Except the height, colour and lack of character.

With a little imagination and beadboard the desk started to transform. I went to my local hardware store with my measurements and had them cut me perfect sizes of beadboard for the ends of the desk and the cabinet door.


We attached the beadboard using construction adhesive. And added 1 1/2 inch wood strips on the outer edge of the ends to create a shaker style end/ door.

Then came adding the height .. I found these great Pine ‘Furniture legs‘ from HomeDepot… Now, this was my first time working with furniture legs so we tried to go the easy route and just add the legs to the existing desk base as it currently didn’t have legs.. But the only places to add the legs made them sit in the middle of the island.. and they looked really silly.. floating legs 🙁 so we had to create a base first…

See our little hiccup below… Oops!

So back to the hardware store… For a hard piece of solid wood to use as a base for the legs. Once we drilled the solid base on, It immediately started to look better. Now I had a flat surface to add the legs.. Next we drilled in the legs to the outer corners of the desk.. It made the height a perfect island height at 36″H. With adding the base came a big gap between the base of the desk and its new base.. so trusty caulking came into play.. I think I used 3 tubes for this project. The main thing I want to reiterate is any gaps, holes and spaces can all be filled with your trusty caulking/filler so don’t worry or doubt yourself.. I had a pretty good idea of how it was going to look I just had to figure out a way to get there.


Next came the counter top.. the current desk had a black vinyl type laminate top. I knew I wanted to have a rustic plank top but in order to add the planks, the top had to be even and sturdy. So we added 3 thin shims of wood across the top so the planks had something to rest on.


Note that I had the Cedar planks cut in width to create the perfect size so an even number could fit perfectly. Regularly the planks are 5″wide, I had them cut to 4″ W. If I kept them 5″ the fourth board would have been 2 inches wide.. Not the look I was going for. So once the cedar planks were stained and sealed I installed them to the top. We just drilled into the desk base. It gave a rustic look we were craving.

I stained the Cedar wood planks then sealed them with Annie Sloan Dark Wax. It left it overall pretty water repellant. It says to re-apply every few months for durability.. I haven’t yet and its been 5 months and its holding up just fine 😉

Before painting I filled in any of the current Hardware holes so that I could add my own hardware. We filled in the holes using Wood filler and once dry we sanded using a sanding sponge.

We painted the entire island a uniform colour in Annie Sloan Chalk paint, in ‘Old White’.

To tie the island in with the rest of our kitchen I added a Restoration Hardware oil rubbed Glass knob to the cabinet door. And a oil rubbed bronze cup pull to the drawer.
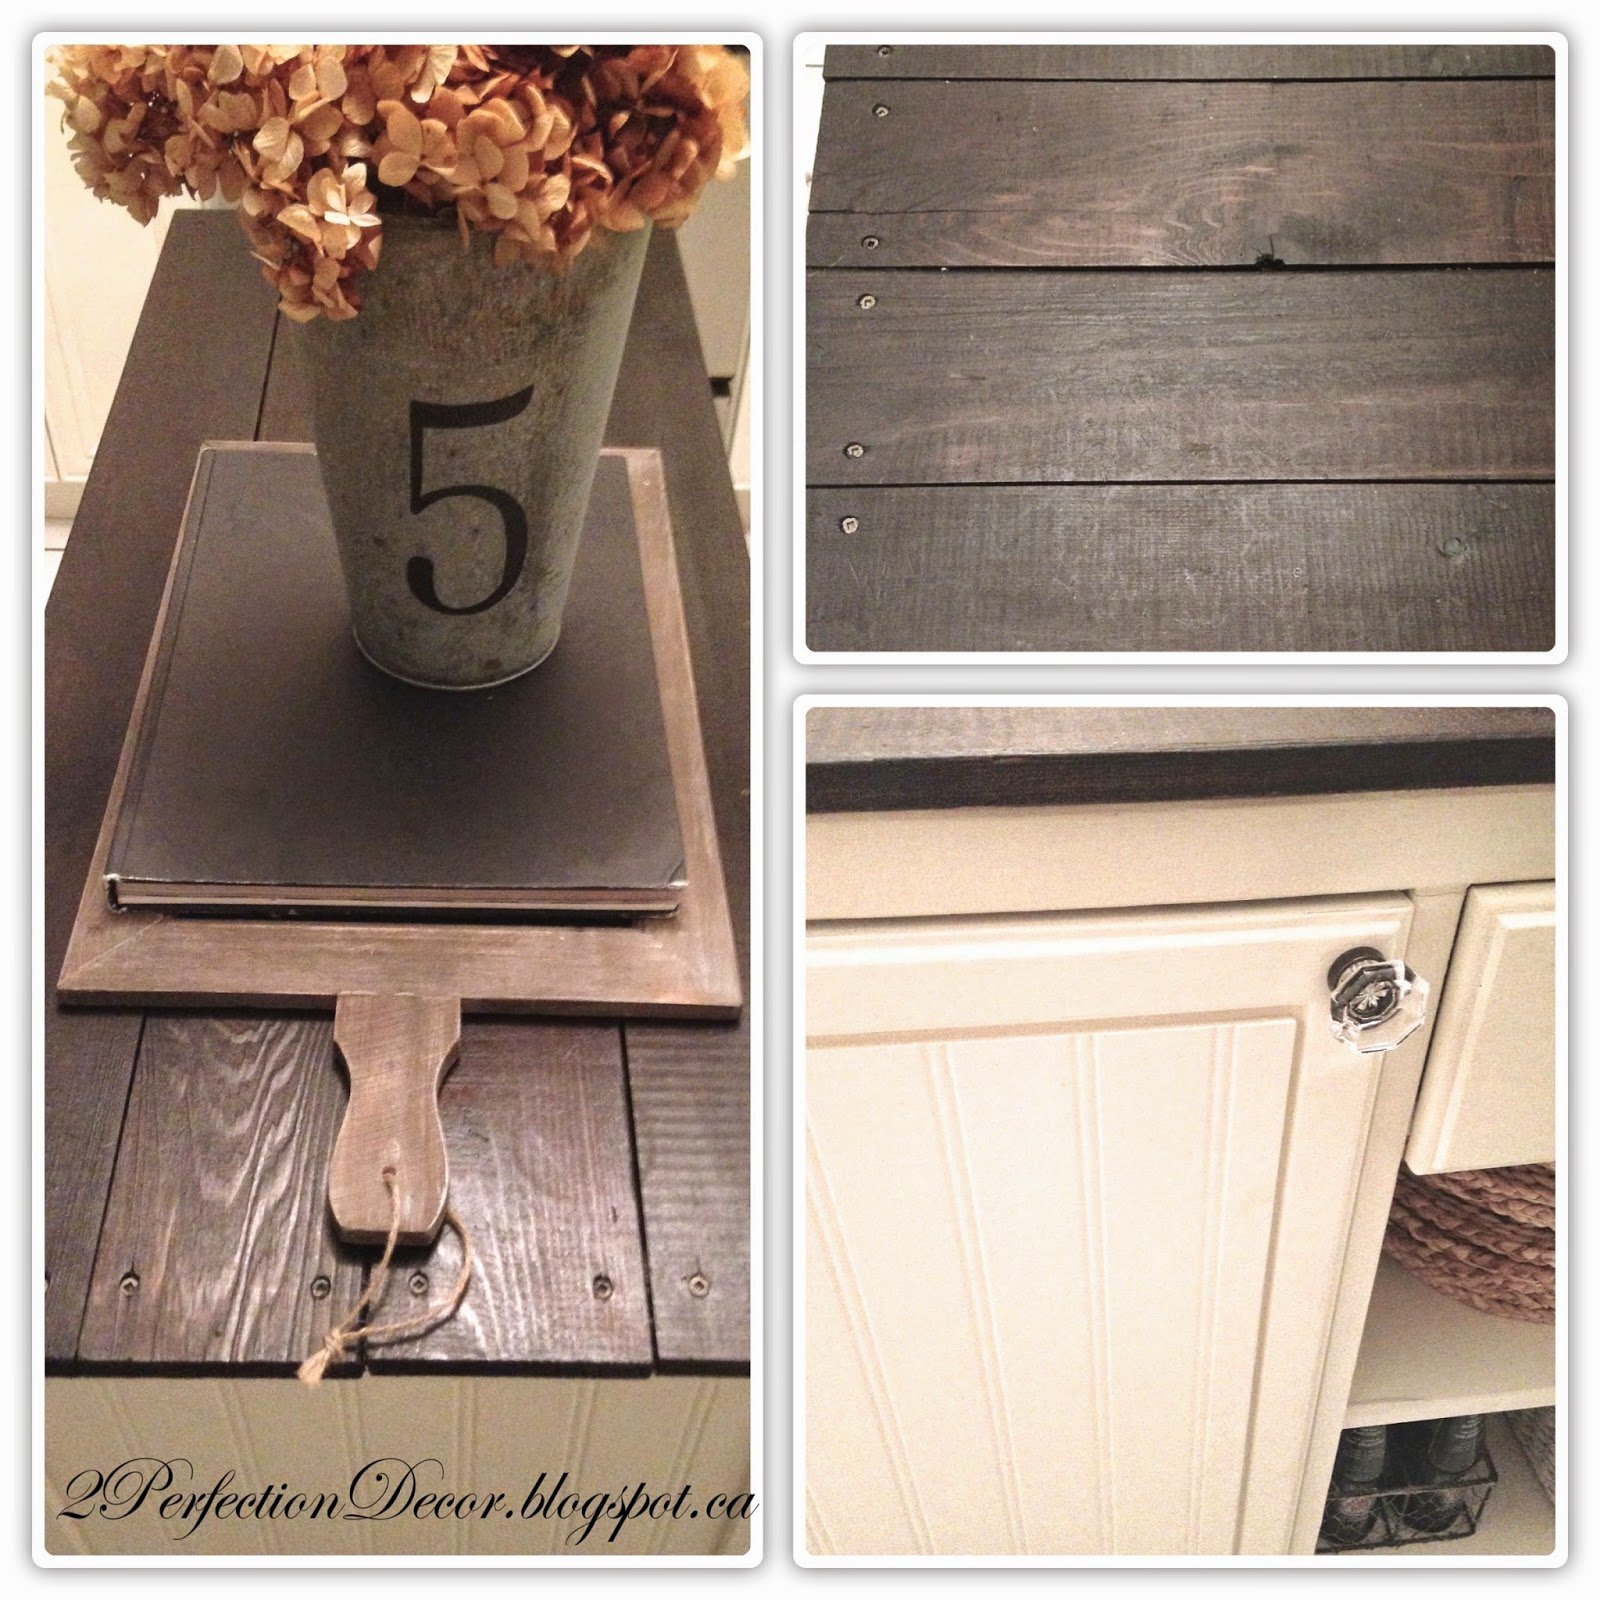

Now the island stores our cooking dishes, the drawer holds all the cutting boards and the open shelving gives me display space..

More recently I added this hook to the far end of my island closest to my stove for easy hanging storage of my oven mitts.

Hope this inspired you to go out and find your ‘Island’ treasure too. 😉

You can see our FULL Kitchen Reveal HERE.

Time & Cost: 2 Days for dry time- 4hrs
Vintage Desk = $25
Beadboard = $20
Legs: $6ea x 4 = $24
Cedar Wood planks for counter top = $14
Hardware = $20
Wood strips = $5
Wood Base = $10
Paint- Had from a previous project
Stain – Had from a previous project
Approx $120 to Complete our Kitchen Island Transformation.
——————————–
Thanks, Lisa! Such a nice addition to your kitchen!
Visit 2Perfection Decor to see Lisa’s other projects, like the rest of the updates she made to her kitchen (including a super easy way to give some extra style to a range hood!)


Gorgeous! I love the stain on the wood top – it looks so professional! It especially looks great with the paint you chose.
What a great idea! I love this. Brilliant idea.
Hi Cassity and Lorene, I am so honoured and excited to be featured on your blog today! My kitchen island makeover is one of my favourite makeovers to date. Hopefully others will feel inspired too!
All the best,
Lisa@2PerfectionDecor
Thank you so much for being our guest, Lisa!
I love this idea and it doesn’t seem like an intimidating project for a new DIY’er.