Update the Color of your Brick; Stained Brick Fireplace

Hello fellow Remodelaholic readers!! I am so happy to be here today to introduce you to my blog and show you one of my favorite projects. My name is Jodi and the name of my blog is Roly Poly Farm. I am brand new to blogging, so being able to introduce myself to you here and show you something I love is so exciting to me! If you swing by my blog, you’ll see me talking about my home remodeling projects, sharing only my best tried and true recipes, showing you a DIY craft or two and dishing about all the great deals and sales that I am always on the look out for!
When we moved into our home two years ago, our family room looked like this:

We bought some new furniture and painted, but the coolness of the grey brick was like a giant elephant in the room that needed to be dealt with. My husband was against removing and painting the brick, so I had to get creative and find something that would make us both happy.
So I turned to my favorite friend Google and started hunting for a solution. After a little searching I found something that I was able to use to transform by fireplace into this:

The product I found was a brick tinting kit made by a company called Dyebrick. Yay! After I looked at their gallery of projects and read their testimonials, I knew I had found my answer. I was able to sell it to my husband because it simply stains the brick, it doesn’t change the texture of the surface like paint can sometimes.
They have a variety of colors to pick from:
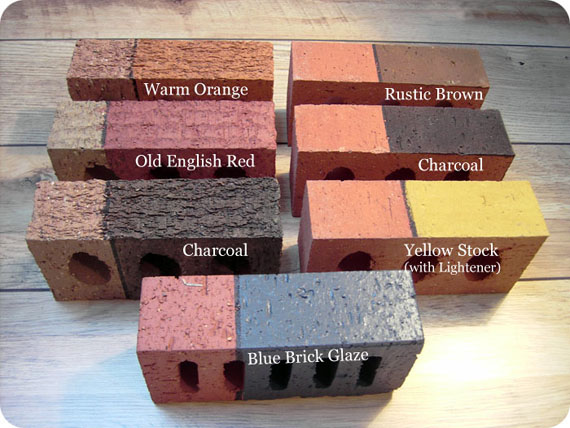
For my project, I used the Rustic Brown and Old English Red. I made two different “strengths” of the Old English Red, which gave me a total of three colors to work with overall. The company is located in the UK, but does ship to the US. I was about to order from their website when I decided to do a quick ebay search. For once in my life, I got lucky and there was someone selling multiple kits!! And better yet, at a FRACTION of the cost! Woot! I couldn’t believe my luck! I bought three kits total and this project cost about $110 total. Pretty cheap considering the impact it had on the room, I think!
From the company’s website, some features of dyebrick brick tinting kit are that its:
- Non-toxic
- Non-harmful
- Odourless
- Zero VOCs (Volatile Organic Compounds)
- Absorbs into and becomes part of the masonry
- Allows the masonry to breathe
- Can be applied to
- Brickwork
- Concrete
- Stone
- Mortar
- Render
- Blocks
- Concrete Roof Tiles
- …and more!
I wish I had taken pictures of the during process, but unfortunately I didn’t. 🙁 There’s really not much to it though. No prep of the brick, no taping off, nothing. You just mix your product and start! It has the consistency of water and really didn’t run all over and create too huge a mess of my grout. I used my faithful old Purdy brush to apply it, but if I was doing it again, I would at least try it with a foam brush to see what the result was. Dyebrick’s website has great instructions on how to prepare the product for its use and even some videos on its application.
.
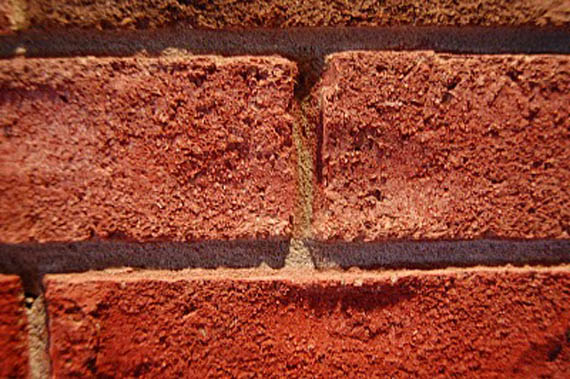
So, while I say it really didn’t mess my grout up too badly, it did get on it some (or a lot in some places), but this wasn’t a big deal. I just used a flat head screwdriver to “scratch” it off my grout when I was all done. What? A little tool abuse is acceptable sometimes. I was multi purposing it! Looking at my grout now, you would never know I ever had to do that. Well, maybe if you were inches away, inspecting it. If that were the case though, I’m pretty sure we would have to have a talk about somethin’…
Here is a picture of where I got some stain on my grout:
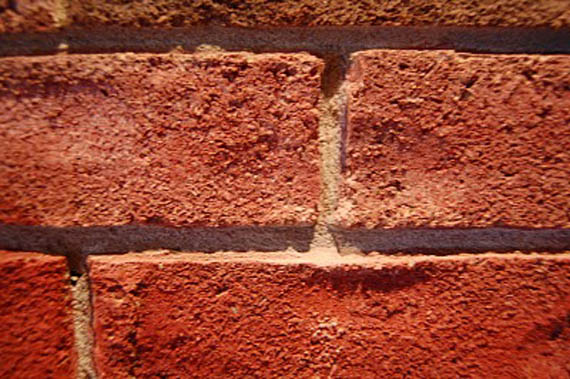
And what it looks like after a little screwdriver treatment:
Easy peasy!
(Actually for the above picture I used my 4 y.o.’s safety scissors, but you get the idea!)
And here are some additional shots of the finished product:


And the two bricks together in the same shot:
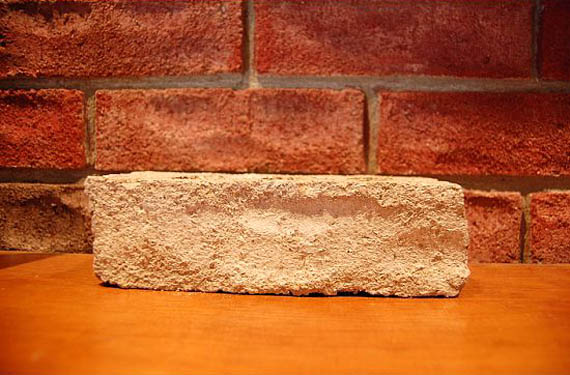
Crazy, isn’t it?! The same brick, transformed with just a little water thin stain!
It took me a few days to complete this, but I had a one year old and a three year old at the time, so I had to work when they were sleeping or otherwise occupied. Any other time I tried to work on it, I looked down and had a little munchkin climbing up my ladder to “help” me. It was very rewarding to do though and I loved how instant the transformation was. Cleanup was a breeze. I have no doubt anyone with a little patience and a paint brush would be very successful with this project!
I hope you enjoyed reading about my brick transformation! If you have any questions, please stop by my blog Roly Poly Farm!
Thank you so much, Cassity, for having me!


>i can't believe that! No one would ever know they weren't originally that color. You did a fabulous job! 🙂
Wendy
>what a fantastic job and your room looks totally different, very warm
>This is one of the best projects I have seen! Love Jodi's blog. I am a biased huge fan!
>You seriously can't tell you dyed any of the bricks! I love red brick fireplaces so this is definitely a win.
>What a striking difference! I love it!
>This looks like totally new brick. How wonderful that you found the perfect product for your design dilemma.
Traci
>Wow! I didn't even know this existed. It's beautiful!
>Amazing!
Great job !
I am a mason contractor just starting to include brick staining in my work, since repairs and patches are usually target rich environmemts.
There are a variety of products available, and I have been curious about Dyebrick. The only thing I would add is that there IS some wall prep involved.
I bought the products from Dyebrick but am having difficulty finding a pro to complete the job as we have very busy schedules. We live outside if St. Louis, Missouri. Any assistance you can provide in locating a pro is appreciated.
Any idea if this works on Dark Brick? My fireplace is a really dark even color, it would be nice if it had a little variation.
Katherine, I don’t think the stain would lighten your bricks, but there is such thing as white washing. I don’t know exactly how it is done, but you still see the texture and all of the bricks. It might be worth researching! Good Luck!
What a difference this made! Fabulous.
Did you find the exact product on ebay or some equivalent under a different name. I just looked for Dyebrick but did not get anything.
Planning to use this on an exterior wall to add a bit of grayish shade to match the wall paint.
Thanks.
This looks very cool. I am taking down a brick wall, and I want to reuse the brick, but it’s stained an ugly yellow by the mortar. Even after cleaning it off. Maybe this would help my problem. 🙂
Hello, great post. I also stained my terra cotta colored fireplace years ago to a nicer red. But then grew tired of the massive thing in my living room and now it is white.
Also, the ads on your blog are on top of words which make it impossible to read all of the blog. Just an FYI.
Cindy, thanks for letting us know. Sorry for the ads covering things up.
Looks amazing!! Awesome job and thank you for the info!
I bought concrete stain for brick fireplace. How did your fireplace brick end up different colors. I like the look of it but I only bought one stain color. Will the brick naturally change color.
Where did you get those beautiful curtains from and it is a greyish color curtain you are using?
Did you stain in between the bricks as well or only the actual bricks?
Hi Lindy! Thanks for the comment. This was a guest post, so you’ll have to head over to the original blog (linked at the top of the post) and she can help answer your question. Thanks!
Did you use mulitple colors of stain for this look?
Hi Cyndie! I belive yes, but this is a guest post so I am not entirely sure. If you will click over to the original blog (up toward the top of the post) then you can ask there. Thanks!
Writer of this post here…
I bought two different colors of stain and mixed the one that is more red in two different strengths, giving me three different colors.
Thanks for the info, Jodi!
I think this is great! Interesting that the trend is back toward original brick color when for so long now folks have been painting it white. I have an original brick fire place that I never got around to painting…now I will leave it! What color do you have on the walls, I love it. Very cheery!
Great job! Oddly – I want to reverse what you did! LOL I want to take my yellow and orange bricks to a beige and brown. I don’t want that “painted brick” look – many friends have done. I’m thinking about using a base stain all over all the bricks and then using the “sponge painting” technique, I want to add variations of colour! Here’s hoping!! (fingers crossed!!)
I’d love to see pictures if/when you do it!