A shower is sometimes the ONLY place we can get a few precious, solitary, quiet moments. It can be a short time of zen and relaxation at the beginning or end of the day. So, when your tub or shower is maybe a tad dingy and outdated, it can take rob you of your zen…over and over again.
And that’s a big time bummer. That was what was happening in our bathroom. The shower and tub were absolutely functional, which is great. They were just a tad, well “nude”. And similar to nude pantyhose, nude shower enclosures had their hey-day, but the 90’s has come and gone, and this shower enclosure needed to go, too. When I’m showering, I want to be the only “nude” thing around.
We wanted to spruce this space up, but we did NOT have the $1000-2000+ budget to rip it out and start over. And why would we? The space was totally functional. So we tried something different. It cost about $50 to update our tile shower and tub, and took one weekend to complete. Heather from
The Heathered Nest here at Remodelaholic again today, and I want to show you all you Remodelaholics how you can do this project, too.
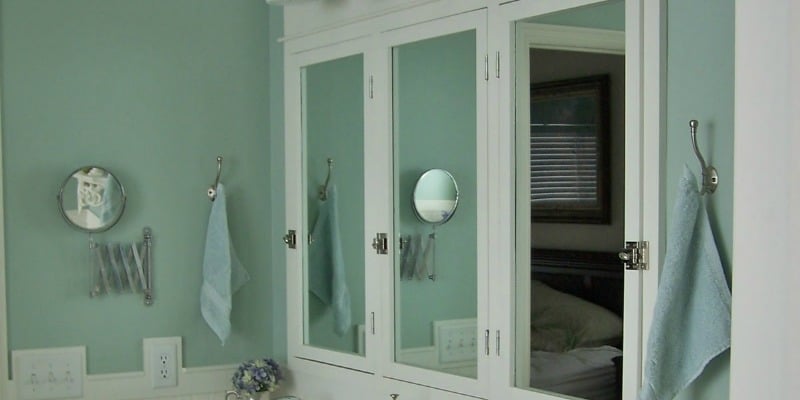
Here is another before of the almond surround. The lighting in this bathroom was also pretty bad, making the room look even a bit worse.

I originally read about the use of this product on the fantastic blog,
Petite Modern Life. Karisa writes a full tutorial on using this product, so I would encourage you to read her post if you’re interested in using this kit. There’s a second online tutorial for this same product that I’ve read as well. Also super helpful. That one is over on
Domestic Imperfection. The instructions on the packaging are also pretty helpful and clear.
Right now, I want to distill that info down to a couple key tips that will help you get through this project as painlessly as possible.
Tips for Using a Refinishing Kit to Update A Tile Shower and Tub
1. Protection
This stuff SERIOUSLY smells. I would consider doing this on a Friday morning before you’re headed out of town for a weekend…a weekend in spring when you can leave your windows open when you’re gone. No joke. Do not pass GO before you get yourself a GOOD project respirator mask to use while tackling this project. And take LOTS of breaks while you’re in the midst of the process. You need to get out of the room from time to time and breathe some fresh air.
2. Preparation and Cleaning
There is a lot of cleaning prep work to do before you start. Since I’m not a fan of preparation usually, I was tempted to skip some steps. DON’T. Do the prep, as described on the packaging. If your surface is not completely clean, I don’t think the finish will last very long…just a hunch. The instructions also call for a light sanding of the surface before you begin. I did NOT do this step because our tiles are smooth porcelain and I did not think that I would be able to get a good uniform sanding job done on them with their slightly beveled edges, etc…plus, as I’ve already alluded to, I’m a smidge lazy.
3. Application
The product is sticky, but goes on with a regular old paintbrush (that you will have to throw out after completing this project). I wish I could have simply rolled it on, but it wasn’t getting between the tiles that way, so I ended up painting the grids (vertical and horizontal grout lines) with a paintbrush. It took 2 coats with the paintbrush over the grids/grout lines combined with rolling two coats over top of the brushed paint.
The image BELOW was taken after ONE coat. And it’s making progress!
You can still see shadows in the middle of the tiles, and one spot that looks like we just missed it the first time with the paint, but overall, a pretty good covering for the first coat.
Can you see where we’ve started on the tub in the shot above? The tub was a bit tricky with all the angles. The roller worked well (mostly) but you’ll have a little bit of a challenge on some of the larger angles. Wanna see how it panned out?
TA-DAH!! OK, so perhaps not a miracle…I mean, it’s still 4×4 tile, folks. But there was no need to throw the baby out with the bathwater here, you know? It was a perfectly functional tub and shower. I just wanted a little bit of an update. And for $50, I think we done good.
Now, I have no illusions that this will be a lifetime fix. I think that within a couple years, this remedy may very well be showing some signs of wear and tear. I could be wrong. Good thing is that Rust-Oleum makes a patch kit for this product! And let me tell you a bit about that, because we’ve already tried it out. This reglazing project was the first part of a
low-cost bathroom renovation. And when we laid the tile, we dinged up the new glazing on the tile surround…check it out…
Ouch! And then, we may have scratched it up a little more when re-installing base moulding…
This moment was definitely followed by a SON OF A TILE SAW moment. Luckily, we anticipated this kind of thing, and so did RustOleum:
Tub & Tile Touch-Up (affiliate link).
To use the patch kit, you’ll need gloves, your respirator mask again, and I’d recommend a small paintbrush…like one you’d use for crafting. Don’t use one you love…it will have to be tossed after you’re done.
Make sure you wear your mask, and cover the floor or surfaces around your project. The kit works like a bottle of nail polish. There’s a small applicator brush attached to the lid, but I didn’t love that brush. I opted for my own small brush instead.
The product is pretty easy to use, just mix the contents of the two vials, then paint it on. Applying to vertical surfaces proved a bit challenging…sometimes gravity is not our friend. I found that in order to get the finish as smooth as possible (on vertical locations), it was best to put on a heftier amount and let it kind of glide itself into place. The vertical surfaces did not come out perfectly smooth at first. To try and get the vertical surfaces as smooth as I could, after letting the Rust-Oleum product dry, I used a VERY fine grit sandpaper (320 and 400 grit) on the surface. DON’T RUB HARD, or you’ll be doing this project twice. Even after this process, those vertical areas were not perfect. But I had a couple very tiny knicks on the horizontal surface of the tub, also from construction damage, and those cleaned up perfectly.

Compared to the initial glazing process, the touching up was very easy and quick. I did two coats, and let it dry between coats. As you can see, our boo-boo went bye-bye.
Truth be told, if you examine the spots on the very closely, the touch up finish is not completely perfect. Some of this may be user error, who knows. But, in general, I was pretty darn pleased with the results!
Overall, I think this project was a total win. It was stinky, but after a weekend of some effort, our tub and tile shower surround is bright and white and refreshed…all for about $50. So if you’re in the market for a little change without spending a wad of cash, I’d recommend you give this a try!
Interested in other applications for this tile refinishing kit? See how Kelli used it on her integral sink.
Like bathroom renovations? Check out some of our others…
————————————-
More ways to update your bathroom:
Install a new showerhead:
renovate, bit by bit:

or if you have a lovely tiled wall in your bathroom, you can paint it too!
See how here.
Related


Questions! Do you think the glaze would work on a toilet as well?
GREAT question! I would think YES! I haven’t tried it personally, but the tiles we glazed were porcelain, as is the porcelain throne!
Curious about the brand of tile and name of tile you layed on floor looks awesome
Hey Scott! Thanks for the kind words 🙂 That whole bathroom cost us about $1800 in total, and all the sources are found here: https://bit.ly/DIYbathroom Hope it helps!! Heather
The remodel looks fantastic! I had never heard of this Rustoleum product before. I also like your new shower curtain!
Does this kit work on fiberglass tubs and showers?
I am so glad this worked for you. I used the product on my tub, and within a year it was bubbling and I had to strip it all off. I followed the directions to the letter. This was done in a tub that is rarely used, and it still didn’t hold up.
Hi there – It’s been a few years now and I was wondering how this is holding up, or have you gone and remodeled this bathroom since? Thinking about using this product for a refresh that we’d be looking to last 5ish years. I’d be fine with doing this process again once every 2-3 years considering the cost. Can you use it on top of itself for a refresh? Feel free to email me directly if you have any pics or more info. Thanks!
I thought about doing this but was really worried about it pealing so I went with a full bath remodel. Did it myself with 15 cent subway tile from lowes everything including floors/tub/toilet/vanity/drywall/hardie I mean everything was still around 1500 but it is a LOT of work. Deff not an easy diy project but doable.