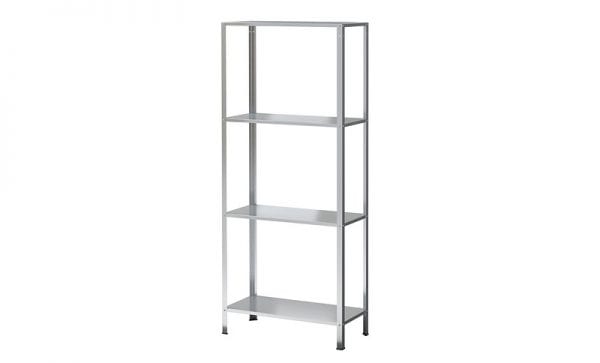
Wood and Metal IKEA Hack Industrial Shelf
Kicking off our IKEA to the Max week, we’ve got Suzy from Real Happy Space here to share her brilliantly easy IKEA hack industrial shelf — for the perfect blend of modern and rustic, metal and wood! We set our guests up with some Q&A’s to make it easy to get to know them and their projects — be sure to go visit Suzy, too, because you’ll love her projects! See all the IKEA to the Max posts here (and all our previous IKEA posts here), and be sure to subscribe by RSS or email to get updates for every post.

How to: IKEA Hack Industrial Shelf
by Suzy of Real Happy Space
Tell us about you and your site. What’s your favorite part of DIYing, and what are some of your favorite projects?
Hey fellow Remodelaholic readers! I’m very excited to be here sharing my Ikea hack with you guys today.
I started my blog, Real Happy Space, to share my diy home and decor projects (and spare my husband from listening to me yammer on about my latest idea). I love upcycling items, recycling scraps and tweaking something store-bought to make it uniquely perfect for our home. Two of my favorite projects so far are this penny starburst mirror and this wooden bench I pulled off the curb and transformed.
Which IKEA piece(s) did you hack? and why did you choose that (over another product, or building from scratch, etc)?
We have a small corner in our dining room that needed a furniture piece to provide some nice storage and display, but we also wanted to keep a few items out of reach from our mischievous toddler. The room already had a wood dining table and wood dresser, so I wanted a touch of metal to contrast those heavy wood pieces. In a nutshell, we were in need of a budget-friendly storage solution for a small space, so Ikea was a natural choice.

I’m not ashamed to admit that I always look at the least expensive options first and then work my way up. When I came across the Hyllis shelving unit I knew I had found “the one.” It was the perfect size for my space and you can’t beat that $15 price tag. Yes, at first glance it didn’t look like something I wanted in my dining room, but that’s where the hacking part comes in.
What did you do?
To dress up this basic shelving unit for my dining room, I first gave it a couple coats of matte black spray paint. It took two cans to cover the whole thing.
I wanted to make the shelves look a little more substantial, so I added wood planks to the shelves. I first cut 1” x 12” boards to the correct length (23 9/16″ for the bottom three shelves and 23 10/16″ for the top shelf). Next I ripped the boards to the correct depth (10 5/8″ for the bottom three and 10 13/16″ for the top shelf). After the stain and poly was dry it was time to add them to the shelving unit.

With the metal shelves completely assembled, I loosened the screws slightly for the bottom three shelves, then simply set the shelves in place and tighten the screws back up. This kept the wood snug in place.
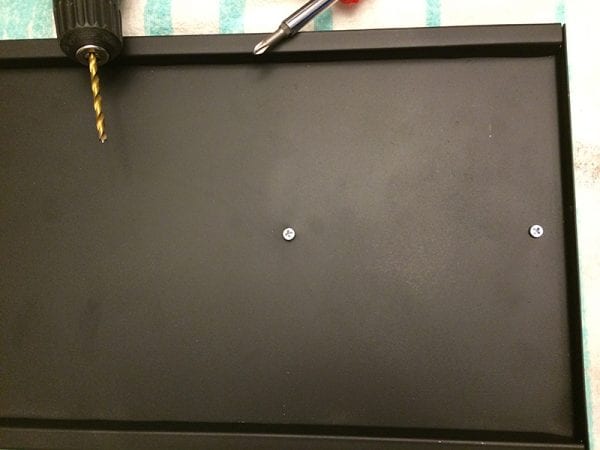
To attach the top shelf, I aligned the wood on top of the metal shelf and used clamps to secure it, I then unscrewed the metal shelf, flipped it upside down and placed it on my work surface. I used a drill to make four holes in the metal and wood, I then used screws to secure the wood to the metal. Lastly, I camouflaged the screws with a touch of spray paint.
Would you do it again? Why or why not? and if yes, what would you do differently next time?


There are so many ways you could customize this piece by using different paint or stain colors. I love that it’s so inexpensive, so you’re not risking much. Why not go out on a limb and try something totally different?

Update, 3/29/18 — Reader Features
Three of our readers shared their versions of it this week over on Facebook. Michelle is using a similar industrial style shelf in her kitchen:

And two other readers, Stacy (first pic) and Shanna (second pic) took the hack one step farther to make a wide media shelf, perfect for decor and the TV! (Just be sure to anchor any shelf like this securely to the wall, for the safety of both your TV and your fellow house-dwellers.)


Suzy, thanks so much for sharing with us!
Remodelaholics, go visit Suzy at Real Happy Space for more great projects — you won’t want to miss her master bedroom makeover (love the storage wall!)

And be sure to subscribe by RSS or email to get updates for all our #IKEAtothemax posts so you don’t miss what’s coming up…


I’m so happy to be kicking off the Ikea Hack to the Max week. Can’t wait to see all the other great hacks!
Thanks for sharing, Suzy!
Love it. and Doing it this weekend! Thank you for sharing on Pinterest Cass!
What stain and spray paint did you use?
I used Rust-oleum Painter’s Touch flat black spray paint. I did some experimenting with the stain – there are a few layers. I started with provincial (Varathane), then a layer of white/pickling stain (minwax), and lastly Jacobean (minwax). You could probably just skip the first two and go straight to Jacobean and it would look really nice.
Awesome hack! I’m so inspired 🙂 Did you have to sand down the metal before spray painting it or do any sort of prep prior to spray painting?
Hi Cassie,
Nope, I didn’t do anything to prep the metal before painting.
What do you mean your “ripped” the boards to the correct depth?
A rip cut is when you make a cut to a board parallel to the grain of the wood. My boards were 1x12s. The metal shelves were a little over 10″ deep, so I had to cut down the boards to fit that depth.
I just came across this hack via pinterest and it’s amazing! Can you tell me the height of each of the shelves (I can’t find those dimensions on the ikea site)? Thanks so much for this hack!
Hi Nicole, here are the shelf heights from bottom to top (with wood/after hack): 5 3/8″, 22 1/4″, 39 1/8″, 56″.
Love this DIY; can’t wait to try it out! How did you shear the boards to the IKEA shelves? Screws? Adhesive?
Thank you!
The top shelf is attached with screws. The other three just rest on the metal shelf and are held in place by the metal corner pieces/legs.
Love your Hyllis hack! Thank you for sharing tips and measurements. My Hyllis Shelf Unit is outdoors. What inexpensive wood do you recommend I use?
Hi Kara, If you’re wanting it to be weatherproof for many years, I’d go with a durable outdoor wood like cedar or redwood and an outdoor stain/sealer. If you’re looking for less expensive lumber, you could do regular pine, but it will weather more quickly, even when sealed with an exterior formula. If the shelf is directly exposed to weather and moisture, the cedar/redwood is probably worth the extra expense.
Hi Cass, In my initial comment, I forgot to tell you how nice your unit looks. You did a great job! Thank you for providing wood options. I will compare pricing and go from there.