Armoire Into Sewing Center Tutorial
Having a place to work or enjoy a hobby away from the hustle and bustle of the rest of the household is dreamy, but can seem impossible when you are short on space or cash. Today’s guest blogger found a way to create a dedicated work space for her sewing business without having to knock down any walls or spend a lot of money, an armoire sewing closet.
It may take less space than you thought to create a workspace that suits your needs and looks great, too. Here are some examples to inspire you.

Office Armoire | A Diamond in the Stuff

Personal Crafting Nook | Echoes of Laughter featured at Remodelaholic
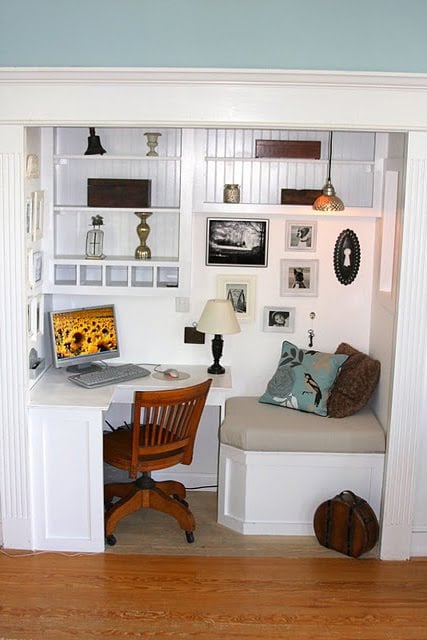
Closet to Office Nook | Whimages featured at Remodelaholic

Compact Closet Office | I Heart Organizing

Project Armoire | Maple and Magnolia

Craft Closet Makeover | Beneath My Heart
I love the way our guest blogger created a “happy place” for herself with paint and fun accessories. Let’s take a look at how she made her own armoire sewing closet.
Submitted by Moxie Design Studio
Hey Remodelaholic readers! A big thank you to Cassity for so graciously allowing us to post on her amazing blog. I’m Megan and my partners are Holly and Lindsay, together we comprise Moxie Design Studio. We have recently begun selling quite a few pillows and I was becoming extremely hampered by sewing at my kitchen table. Let me tell you, at 8 o’clock when the kids are in bed, it’s tough to get up the mojo to break out the sewing machine, cutting mat and toolbox with all my sewing supplies. Ideally, I’d have my own dedicated craft and sewing room, but that just isn’t happening in my 3 bedroom home. The next best idea I had was to create a “sewing armoire”. First, I had to convince my husband and fortunately, he’s become pretty accustomed to my wild and crazy ideas. I started with this beauty… Ok, not so beautiful. There seems to be an abundance of these available for sale as flat screen TV’s don’t fit in them anymore, so I got this guy for $80, not too darn bad. Before I began, I hit up Pinterest and Google for some inspiration on how to make this thing work. There really isn’t too much to be found except this for this one from Lindy Cottage Hill.
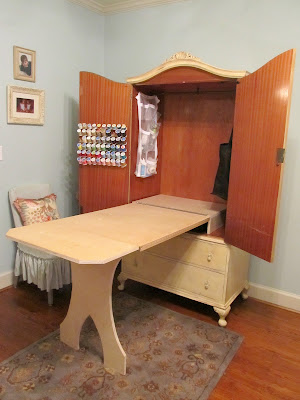
This tutorial is awesome and if you’re thinking about making one of these for yourself, I urge you to check this out. For my project, I didn’t want to go with something quite as extensive as a fold out table as it was going in my bedroom and I just didn’t have that much space to work with. I knew then my approach would be to do a pull-out drawer that my sewing machine would sit on and it would give me some knee space to pull up a chair at. But, I’m getting ahead of myself….Before I could do any rehab on the inside, I had to get that ugly oak painted.
Here’s what it looked like with the base coat, just a gray-ish brown paint with primer.  And with the final coat of a teal blue. I did some light distressing to age it a bit. The only thing left to do is spray paint the hardware oil-rubbed bronze. Our Midwest winters put a moratorium on spray painting, so I’ll have to take that gold hardware back off once our snow finally melts!


 But it’s not just a pretty cabinet, it turned out to be extremely functional as well. I stuck with my original plan to create a sliding shelf using drawer glides and a piece of solid cherry wood. Inside the armoire is a component shelf, where the TV sat and the VCR sat below (that pretty much tells you the vintage of this furniture!). This turned out to be a stroke of good luck as it provided me a very sturdy spot to mount the drawer glides to. I ordered drawer glides from Lowes with a 100 pound weight capacity and they have proven to be very robust thus far. I made sure to measure the depth of my shelf (16″) and ordered the drawer glides that were no longer than that as they come in several different lengths.
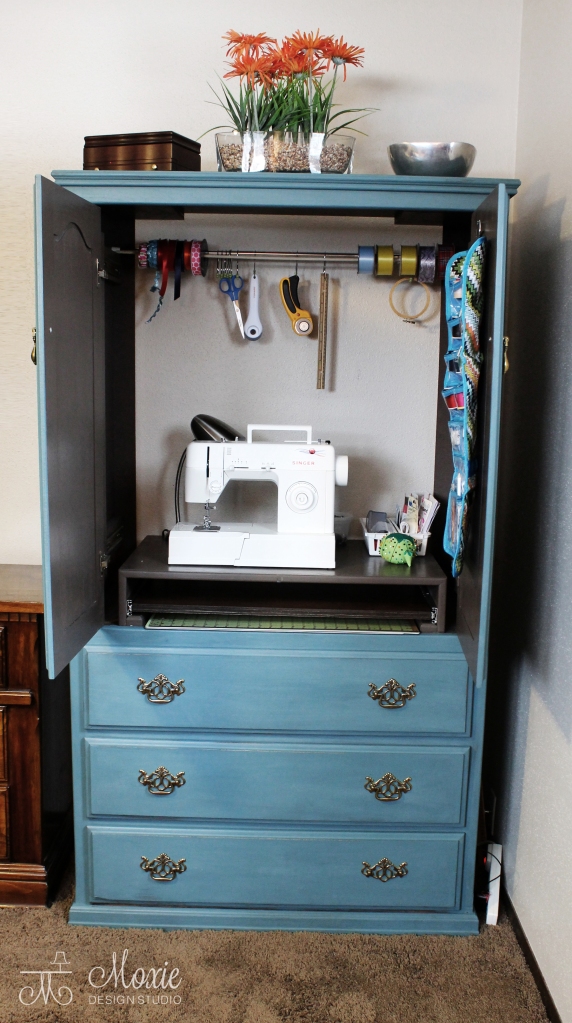
Here is the armoire with everything packed away. When I’m ready to start sewing, I’ll slide out the shelf, move the sewing machine down and slide the doors back into the body of the armoire. You can see the pull out shelf tucked under the component shelf and my cutting mats conveniently slide in just below that.
The sewing machine shelf pulled out all the way… I was a little afraid that the shelf would vibrate when the machine was running, but it’s been perfectly sturdy.
 For extra lighting, I use a desk lamp and mounted a plug-in fluorescent to the top of the armoire. These have given me the perfect amount of light for my projects in addition to the light on the sewing machine itself. I’ve finally been able to take all of my sewing supplies out of the toolbox and store them within easy reach. I used an over-the-door jewelry organizer to store spools of thread, stitch rippers and my scissors. Extra bobbins, pins and miscellaneous supplies are gathered in plastic bins on the main worksurface.
 I also needed a smart way to store my spools of ribbon. I used both a tension rod and wood dowel, and these both rest on the structure that supports the sliding doors on each side, no tools needed! I ended up using both as the wood dowel holds the spools with the really small holes in the spool, but it isn’t strong enough to hang lots of ribbon or my tools. That’s where the tension rod comes in. As I was going through all my crafty supplies, I came upon some shower curtain hooks that I bought several years ago on clearance and never ended up using. I thought for awhile about how I could use these and decided they would be perfect “hooks” for my rotary cutters, extra scissors and ruler. I love it when I come upon these unexpected uses for weird items!
Lastly, one of the best things about this armoire is all the extra storage. With three wide drawers at the bottom, I have enough space to store all my extra fabric, felt, trim, acrylic paint and miscellaneous craft supplies. Almost nothing gets me as excited about some good, functional storage! If any of you crafters/sewers/DIY’ers are in the same boat, with projects stacking up and nowhere to take them, this might be a good solution for you as well. My favorite thing about this project is that you can customize the storage to whatever your specific needs are. You don’t sew? Use the pull-out shelf as a worksurface for crafting or scrapbooking. The possibilities are endless!
Thanks again to Cassity for having us!
You are so welcome! Thanks for sharing a fun solution to a problem many of us have when it comes to finding space to do the things we love. If you are looking for more small-space office/hobby solutions, here are a few more projects we’ve featured at Remodelaholic:

Sewing Closet | Half Bath to Craft Room | Revamped Craft Cupboard


Love the sewing armour set-up. You might just have given me the answer to my latest dilemma :). Thanks for posting!
Yay! I love the idea too, I might have to get one set up for myself!
This is great information, Thanks!!!!!
Glad you liked it!
I LOVE IT! I’m wanting to work with my armoire for clothing so I’m missing a few neat things that you have in yours. I was wondering about the hinges for the doors, in order to slide them inside, do you have any recommendations on how to change my current hinges to something that might be more helpful? Also I appreciate the close up photos for everything! Great job!!!
Great transformation! Is there a tutorial for the sliding shelf you added? Or can you give some info on how you did it?
Hi Colbey — this is a post from a guest, so I don’t have information like you’re looking for, but I bet if you click over to the original author’s blog (linked up toward the top) then they can help you. Thanks!
Oh my goodness!!! I’m SUPER excited about this!! I’ll be moving to a new house soon and while it does come with lots of nice upgrades, I will unfortunately lose my craft room. This is a truly awesome idea and will be a great solution for me! If I do a blog post about my own soon-to-be sewing cabinet I will be sure to reference this post!! THANK YOU!!
Thanks, Sarah! Send us a picture when you’re done, too! https://www.remodelaholic.com/share-brag-post/
What slides did you use for the slideout shelf? Does it slide around when you sew?