Advent Calendar 12 Days of Christmas, Day 7
I really wanted to get this advent post up on the first of December, but who am I kidding, I didn’t even buy the stuff to make it til the 2nd of December… so it has taken me a few days to get it done.

When I grew up we had one of these felt Christmas tree advents (image source), or very similar. It was MAGICAL! My mom actually gave I to me when I got married, since I am the youngest, but I gave it to my brother, since it is one of those “special” childhood memory items… It was fun to give him it. However, that was 8 or 10 years ago, and I still haven’t replaced the calendar.

What I’ve wanted to make a new one for years, only a nativity! Alas… I just ordered one online 3 minutes ago, so much for homemade!
But to make up for it, I did make a tree advent that I think the girls will have fun decorating and redecorating through out the season. And that, is what I am going to show you how to make today! It is really easy, and can be more complicated if you so desire (which is usually what happens ’round here, we complicate things, and then tell you how to make it the easy way!)
Supplies
(1) 2′ x 4′ sheet plywood or MDF (Home Depot sells these pre-cut in the Lumber section, just ask, if you don’t have the saws to cut the wood, down, or a place to store the extra, this is the perfect size to buy!
(1) 1″ x 6″ x 6′ board (for side of bin)
(12) linear feet of pine 1″ x 2″ (for front and bottom of bin)
(9) linear feet of pine 1″ x 2″ (for front of bin)
(9) linear feet of pine 1″ x 2″ (optional frame)
(1) medium box of large size hook screws
Picture hanging hardware (heavy duty because of the final weight)
Craft Paints (optional)
Polyurethane (to seal the painting)
Shatter-proof Ornaments
1. On your 2×4 plywood, draw a simple Christmas tree shape, what ever you like, I made mine symmetrical using a measuring tape, but mostly just eyeballed it.. I outlined mine lightly with pencil.

2. Paint your tree and background. DO this anyway you like. You can do color washes so the wood grain shows through, or paint it solid.
I started off by white washing the background of the board. I used some leftover white wall paint and water, and added paint to the board and thinned it out with water as I painted.
 |
 |
When the background is dry you can paint your tree. I used 3 greens, light, medium and dark. I washed the whole tree with the light tone and lots of water, to keep it wet, then I used the darker tone and made 2-3″ sweeping motions from top toward the bottom to create branches. I made a little video, it isn’t great, since I was holding the camera and painting, but it will give you a good idea how to do it.
Work fast so that the paints mix and you paint.
 |
 |
Once the first two layers were on, I used a tiny bit of dark paint to add a bit of dimension here or there. Once completely dry, I covered with a coat of polyurethane or two. sand lightly between coat,s remove and dust before reapplying.
Allow to dry completely!
3. While it is drying you can make the bottom ornament bin. I got the idea from the storage bin plans we created a while ago. Basically you just need 4 sides, and use the tree plywood board and the back. Here are all the pieces.

We started by applying a molding around the top three sides. The molding on the sides ends with a straight cut by butting up to the storage bin, see images below.
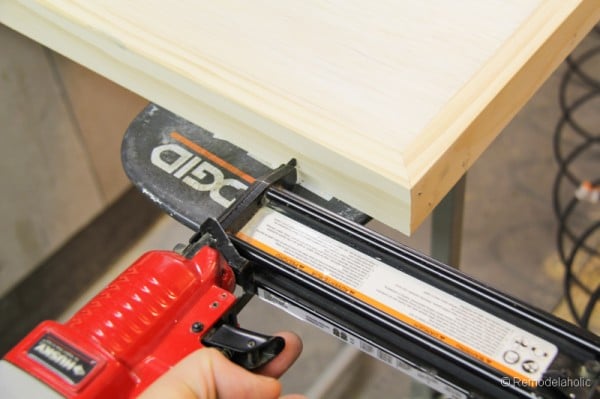
Attach the sides of the bin to the side of the plywood and nail in place.

Cut the bottom board to fit between the two sides, 2′ long ought to be perfect. Nail to the sides and through the back of the plywood, to the bottom of the box.

Now attach the front of the bin. We decided to use some scrap wood, so we have three slats on the bin. But you can just use a 1×6 and cut it to length and nail to the bottom and sides of the bin.


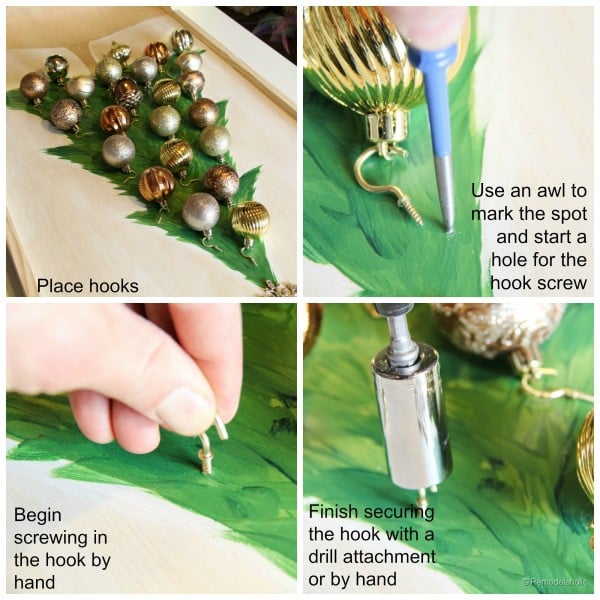
4. Screw in the hooks for the ornaments. after we installed our hooks we took some pliers and bent the hooks out a little so that they would be easier to hang ornaments on for the kiddos.
5. Attach hanging hardware, make sure it is secured to the wall safely, since it is heavy and you don’t want it falling on the kiddos! (we screwed ours to the door… guess it will be there forever, I kid. Fill the bin with shatter-proof ornaments! DONE!
This would be a great place to display homemade kid ornaments, if your tree’s design is themed or whatnot, ya know what I mean, right?
Let the kids enjoy…. and believe me they will. Once we showed our girls what to do, they were there for a good 30 minutes playing. NICE! Mission accomplished! As for the actual advent, I really want to add some numbered tags to each day… but I didn’t buy them and is snowed 1 foot of snow and I haven’t wanted to go to the store!!
 |
 |
 |
 |
 |
 |
Kid tested… kid approved! (lots of thumbs up around here… I didn’t ask them to do that)
Remember to check out the other great days!! Day 1: Santa and Reindeer Paper Garland, Day 2: Pipe Cleaner Ornaments, Kid Friendly Craft, Day 3: Sugar Free Pumpkin Steamers, Day 4: Fudge Brownie S’mores Pie, Day 5: Joy String Art Tutorial, Day 6; Snowman Wreath Tutorial (and I have a Blendtec Giveaway going on right now!) And these other great projects from my lovely friends:
 |
 |
 |
 |
 |
 |


What a super, sweet idea! Love that the kids can play to their heart’s content with this one!
That is my favorite part too!
I love loved my advent calendar growing up as well. My youngest two aunts made it for my siblings and I when we were young and it holds a special place in my memories of Christmas’ past. I don’t yet have kids of my own, but I have been wanting to carry on the tradition and make an advent calendar for my nephew…and this is the closest tutorial I’ve seen to what I envision. I love that you want to add number tags to the ornaments, but I wonder, it might be easiest to paint the numbers on the tree under each hook – just a thought! Thank you for sharing this!
Katie, thanks for the comment and suggestion!
Such a cute idea!! What a fun way to entertain kids and get them in the spirit of Christmas. Love it!! Pinning 🙂