DIY Bathroom Vanity How To
Find out how you can make your very own bathroom vanity with these awesome plans. I love how theirs turned out.
Submitted By: The Quaint Cottage
My name is Karen and I’ve been learning DIY since I was a child working around the house with my dad. He and I would sit around on Saturday evening to catch the latest installment of This Old House. So to say I like DIY is kind of an understatement. I took drafting classes in high school because from the age of eight I used to draw house plans for fun. I would even spend my allowance on those books with hundreds of house plans. I think at one point I had every copy of every floor plan imaginable. I gave up on my plans to be an architect when I went to college, but home detail and design are still a big part of my life. I even play that Sims game on the computer building the houses for my kids so their characters have the best house on the street.
When I first started the blog last summer, it was so my friends and family could get the details on my latest projects so I didn’t have to try to explain them individually. Also, after I realized how big of a blogging world there was with all the other moms out there recreating beautiful houses on a budget, it kind of sparked my creativity and brought more ideas.
My husband and I have lived in our builder grade home for the past twelve years with our four kids. We had to compromise on building this house. I wanted an old house (charm, character), he wanted new construction (no asbestos, new electric & plumbing). Needless to say, he won. However, that meant I could do whatever I wanted with the house to make it love charming like the old house.
Over the years I’ve installed 2,000+ square feet of travertine, ceramic and wood flooring (now I’m happy to say I’m carpet and vinyl free). I gutted the kitchen and installed cabinets, counters, backsplash and lighting. I installed (and still am) trim, wainscoting, batten boards and crown moldings. I even think I’ve repainted every room at least five times. I’m a DIY junkie and it is my hobby.
For the half bath project which has the vanity you asked about, it was a project I hadn’t planned on doing at first. Well, actually the half bath was the room in between my freshly finished laundry room and the dining room (which I had planned on working on next to switch into an office). I thought the half bath would stick out like a sore thumb if I didn’t at least give it a new paint job to freshen it up. Well, the paint job made me add a new light overhead to brighten the windowless room. Then I added paneling on the ceiling (I have a phobia of popcorn ceilings and refer to it as the enemy throughout the blog) and the back wall, which helped to cover the holes from running the electrical too. When I was running the electrical, I dropped a tool on the vanity and damaged it. The vanity top was still functional, but the damage gave me a reason to do what I wanted. I built a new vanity base because I wanted a white square sink. I saw the beautiful rustic Pottery Barn vanity and since I’m too thrifty, I decided to recreate it as best I could for my needs. I think the PB vanity was over $1500. I was able to make mine for around $250 (including the sink and faucet).
I used cedar 4”x4” posts for the legs, utility grade shelving boards for the drawer front and side pieces and installed a small open shelve at the base for a basket. The step by step plans and tutorial are on the blog.
Also, another popular post on the blog is the DIY farmhouse table, my knock off Restoration Hardware vase, and my laundry room make over where I made wood countertops and paneled the ceiling.

When I started planning my mini half bath make over, I came up with this inspiration board.
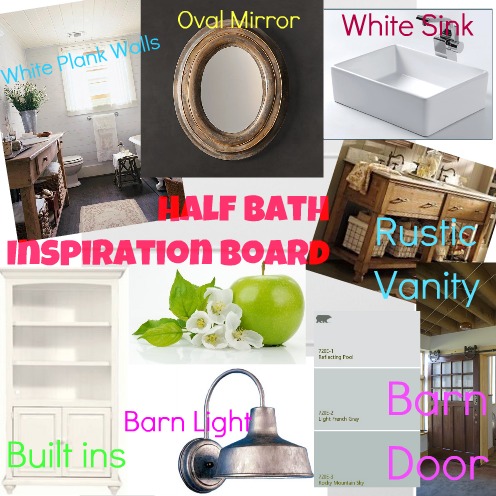
As you can see, I installed the white plank wall and ceiling. I added the barn light. And painted the walls the Light French Gray. Here is how far this room has come so far.
Now, I needed a vanity upon which to set the white square sink. I spotted this sink/vanity combo at Pottery Barn and thought it was beautiful. However, it was way out of my budget. Remember, this project began with just the need to repaint the room.
Here is a picture of the inspiration piece:

Here is a view of the sink top (which I found at Overstock.com). I found the cute little soap pump at Target and the faucet at Lowes.

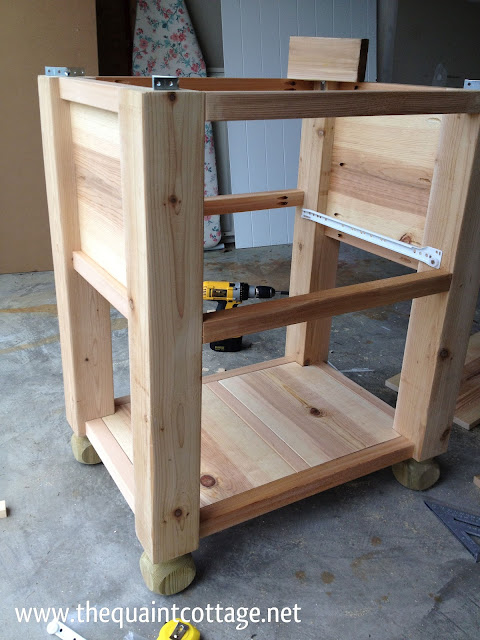
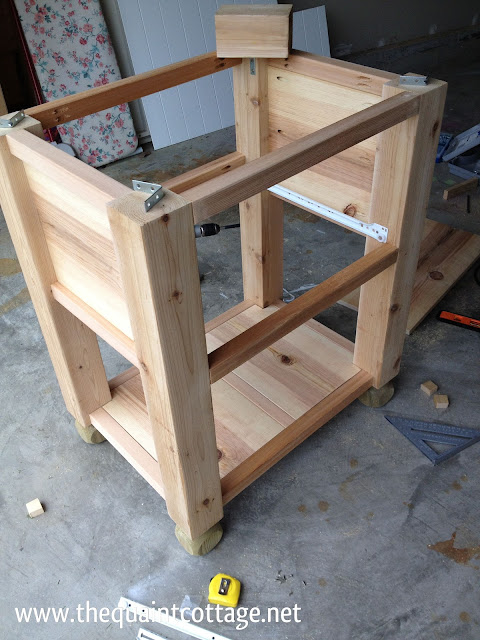
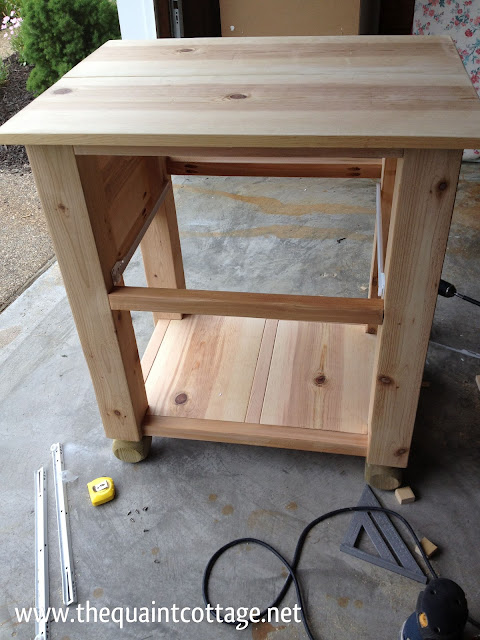
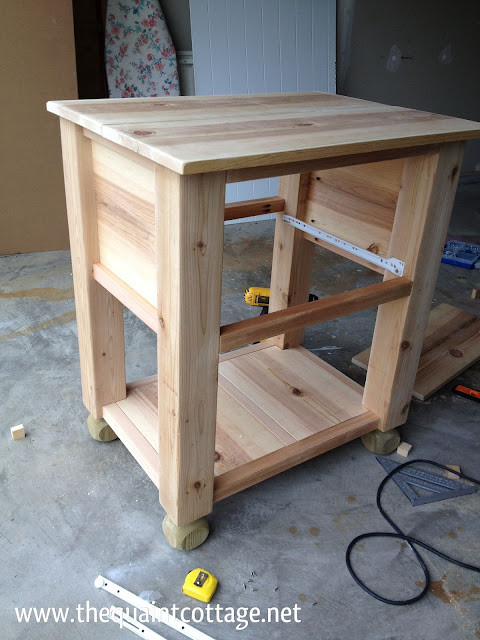
Here is how I built the base:
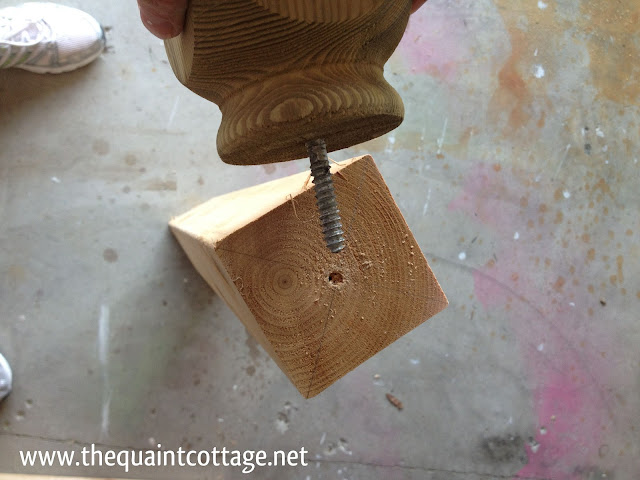
I used cedar to make the legs and the cross supports, cedar fence post tops for the feet and 1×11.5 utility shelving (which was more rustic, cheaper and aged looking than the pine or white wood).
I would suggest (if you don’t mind the reduced height) to cut the 8′ cedar 4×4 into 4 equal pieces for the legs to save $$$. I had to cut 3 legs on one 8′ piece and the 4th on another. I will use the extra wood for another project, but I thought of it after I already made my cuts. You can make up the difference with taller feet or chunkier top.
Cut List –
4 – 4×4 26″ (legs) may need to adjust for the sink height
4 4″ feet
6 – 2×2 13″ (sides)
2 – 1×12 13″ (sides)
5 – 2×2 21″ (front and back)
1 – 1×12 21″ (front)
2 – 1×12 16″ (bottom shelf)
1 – 2×2 16″ (bottom shelf center)
2 – 1×12 30″ (top)
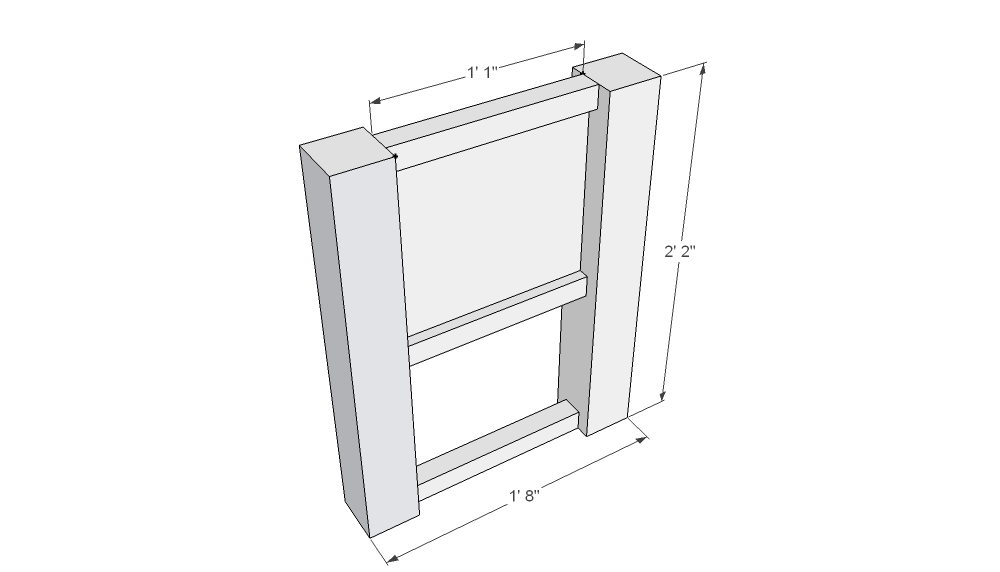
First, I assembled the two sides by attaching the pieces and face to the legs.
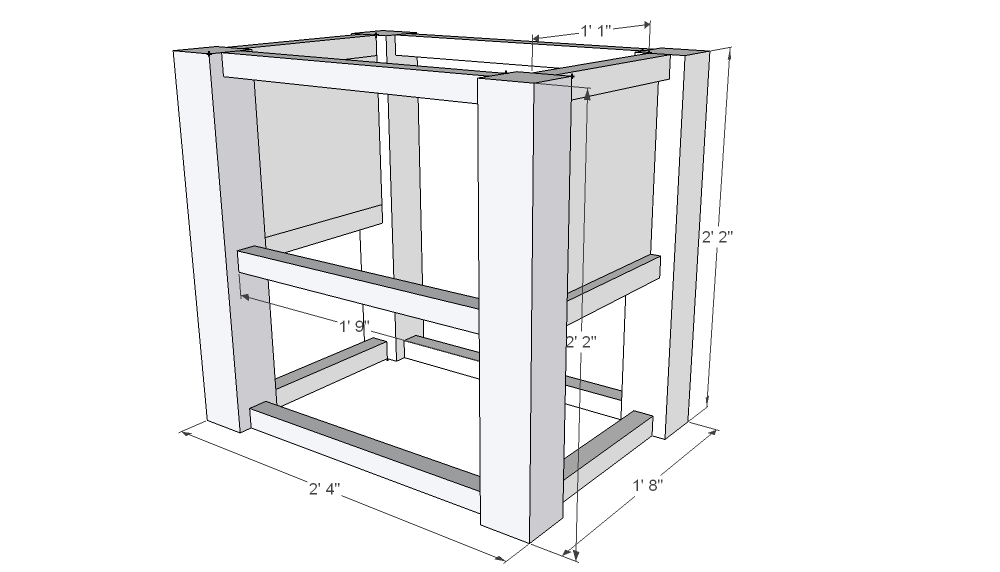
After the two sides were built, I attached the front three support pieces and the two back supports.

Attach the top pieces to the frame of the base with “L” brackets. Once you find the position you like for the sink, mark the openings for the drain and the supply lines.

Attach feet and front piece. I made a small “U” shaped drawer to allow a spot for the drain.
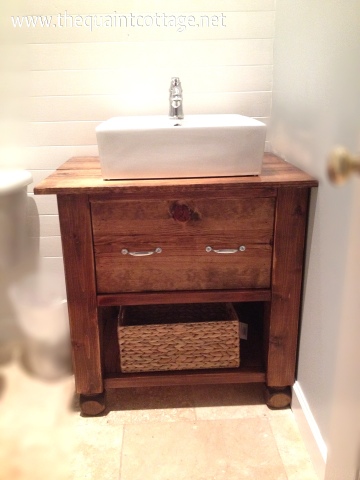
The overall height for the sink base is 30.75″ and with the sink it is about 36″. Make necessary adjustments depending on your sink and the height you require.
Faucet-$80
Sink & Drain – $150
Wood-$70


Check out these other fun vanities or nightstands:


This came out great! What a fabulous detailed post 🙂 nIcely done!
I like your sink better than the pottery barn one 🙂 And thanks for letting me know Overstock has sinks. I would have never thought to look there!
Trying to install a bathroom vanity.
I spy a Kreg Jig. Nice work.
I am so glad I found your sight. I’ve demolished an awful bathroom and am currently building it up. So much to learn but oh so interesting. It is so nice to see women out there doing their own DIY. I find them hard to find 🙁 I love your vanity and am going to try this myself because I love the elegant rustic look and the wood will warm the grayness of the ceramic tile. I’ve had help along the way putting in the subfloor and some with the sheet rock. I am thinking about my …dare I say?…popcorn ceiling! I hate those things too. I’ve saved your instructions to pdf but will visit your post more often. Thanks for the plans and thanks for showing me I’m not alone 🙂
Rose, we are glad that you found us. We do hope that you come back often for more inspiration.
I love this! Could you tell me what you used to stain/finish it? The color is perfect for what we’re looking for!
Kate that is a great question. Follow the link at the top of the post to their site and ask about it there since this post is over a year old.
What did you use to seal the top of the vanity. I just built something similar. I want to seal the top with something durable and would appreciate your help. Thank you
Wow! Thiis blog look exactly like my old one!
It’s on a completely different subject but it has pretty much the same
page layout and design. Excellent choice of colors!
Hello Cassity! I absolutely LOVE this tutorial!!! I have 2 questions before I undertake it next week…
1- Where did you find the utility shelving for the front face and top? A quick search on homedepot.com found nothing.
2- how did you attach the cross supports? Did you screw screws in diagonally?
Thanks in advance!!!!
Hi Peniel — This was a guest post, so if you’ll head over to the guest’s blog (linked at the top of the post) then you can ask there and hopefully they have an answer for you. Thanks!
I love it even better. Great Job!
Thanks, Angie!