Twin House Bed Frame + Trundle Bed Woodworking Plan


Build your own house bed frame with this beginner-friendly twin bed plan! The printable woodworking plan includes one-sheet plywood DIY trundle bed, too.
You’ll also love this crib size house bed playhouse frame reading nook, and if you prefer to buy instead of DIY, check out our favorite pre-made house beds here.

Hi it’s Amy from Hertoolbelt back again with another build project and woodworking plan. We spied this adorable house bed frame in an Australian magazine, Home Life, and couldn’t wait to design plans!
By popular demand, we’ve also updated the plans (Jan 2021) with instruction to build a DIY low-profile trundle bed to slide under the main bed!

We’re big fans of house shaped bed frames and other woodworking projects. Justin and Cassity’s first big viral project was this Bunk Bed Playhouse based on an IKEA bunk bed.
Since then, we’ve also designed a
- playhouse frame reading nook
- house headboard
- house shaped garden arbor
- playhouse room divider
- house shaped bookshelves
- and a dollhouse (with printable furniture and decor!)
How to Build a Twin House Bed Frame + Trundle Bed
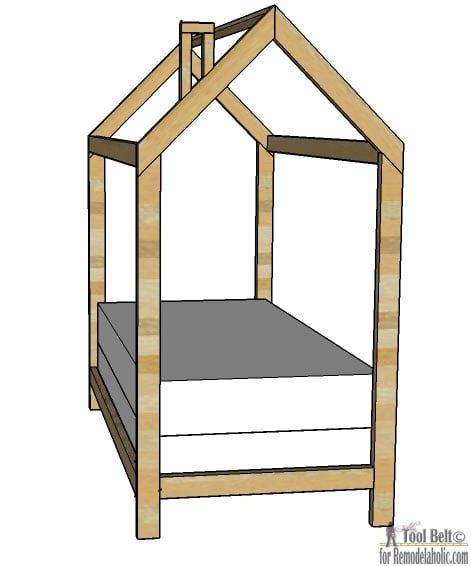
This house bed frame is designed to fit a twin mattress and box spring 39″ x 75″, with a no box spring option that uses 1×4 bed slats instead for a lower mattress height.
You can also build the optional trundle bed to have an extra bed for another child or for guests or sleepovers.
Here are the overall dimensions of the bed. The size is the same whether you add the trundle bed or not; the bed rail height is the only thing that needs changed to accommodate the trundle.

This post contains affiliate links. Learn more and read our full disclosure policy here.
Twin House Bed Frame Materials Needed
- printable woodworking plan
- 9 – 2″ x 4″ x 8′ boards (actual 1 1/2″ x 3 1/2″)
- 3 – 2″ x 2″ x 8′ boards (actual 1 1/2″ x 1 1/2″)
- *5 – 1″ x 4″ x 8′ boards (actual 3/4″ x 3 1/2″)
- *1 1/2″ wood screws
- 2 1/2″ pocket screws (self tapping)
- 2″ brad nails
- Kreg Jig pocket hole jig
* No box spring option (recommended for trundle bed version)

Yes — you can build a twin bed frame from just 2x4s and 2x2s! This bed is easy to make in a weekend for all skills levels.
The optional 1×4 bed slats are a great option for a Montessori bed or low bed frame for young children, or to pair with the new trundle bed option.
Building this homemade bed frame requires only a miter saw and a pocket hole jig (plus drill and hammer or brad nailer).
The trundle bed is built using one sheet of plywood and some 2″ casters, so you’ll also want a table saw (or circular saw with edge guide) to cut down the plywood.
How to assemble a house-shaped twin bed frame
After making the cuts following the cut list and diagram in the printable woodworking plan, you’ll use pocket holes and screws to assemble the bed as detailed in the step-by-step plans.
Can I disassemble the house bed to move it?
Yes! If you apply wood glue to *only* the joints for the headboard and footboard sections, you’ll be able to remove the screws connecting the bed rails and roof beam to the headboard and footboard and move the bed in sections.
If you anticipate disassembling and moving this bed multiple times, you might consider adjusting the plans to use metal surface-mounted bed rail brackets instead. Connecting the bed slats using webbing to make your attached bed slats will also take up less space than using a box spring, while making disassembly and re-assembly easier than installing the bed slats with screws, as suggested in the building plan.
Finishing the DIY House Bed Frame
Once you finished building the twin house bed frame, remove any excess glue, apply wood filler to nail holes, cracks and blemishes and allow to dry. Sand the wood filler and house frame until smooth, finishing with 120-150 grit sand paper. Stain or paint and prime as you like.
It looks like the bed in the inspiration picture was whitewashed. For tutorials on whitewashing see Whitewash Planked Ceiling and White Wash vs Dry Brush.
For a colorful pop, use our colorwashing stain technique to stain the bed ANY color you like!
If you want a more traditional or rustic stained finish, you can mix up your own homemade stains using our recipes, or use pre-stain wood conditioner with an off-the-shelf stain.
The little details are what make any project. I love the little pendant light hanging from the roof. IKEA carries light cords for $5 that plug into an outlet. They also carry cords with fun colors for $8. Add a pendant cover/shade that fits your decor or hang a strand of string lights and you have the cutest House Frame Bed on the block!
Get the printable twin house bed plans HERE
Reader-Built Kids’ House Beds
We love seeing photos of what you’ve built using Remodelaholic plans! Send photos to hello@remodelaholic.com or tag #imaremodelaholic on Instagram to show off your work.
This darling little girls’ rainbow room is courtesy of @home_kimprovements! And that rainbow shiplap wall (details here), I am in LOVE!

The very talented By Brittany Goldwyn built the twin house bed and added safety rails to make it a toddler bed for her growing daughter. See her modifications here.

Leigh Anne from Houseologie built this house bed following our plans and it turned out so amazing! See some of her tips and more pictures of the beautiful finished room here.

Feb 2018: Reader Alisha submitted this bed that she built and it is perfectly adorable!
“We followed the plans to a T and everything turned out perfect! Made all of the cuts first, then assembled and it came together very easily. Once built, I finished it with a thin coat OF white chalk paint and some light, lanterns and lace overhead. It is gorgeous and cute and we get tons of compliments on it!”

November 2019: Make It Laura shared her process of building the bed following these plans as a beginning DIYer! Read the blog post here and check out her Instagram highlight here for more info. Doesn’t the yellow look so cute with the polka dot wall decals!
![]()
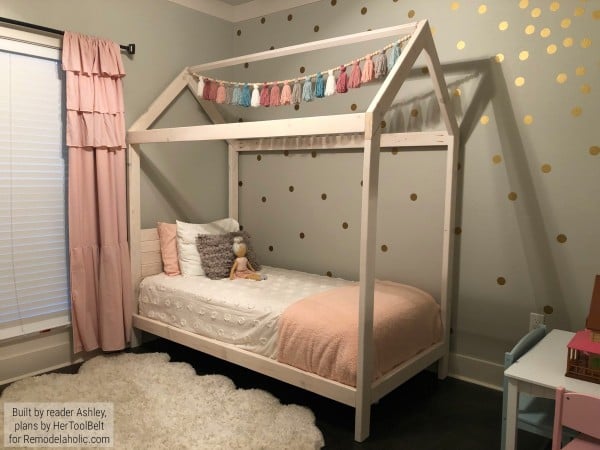
April 2020: Ashley built the bed for her daughter’s room. Look at the super cute tassles! Thank you for sharing, Ashley!
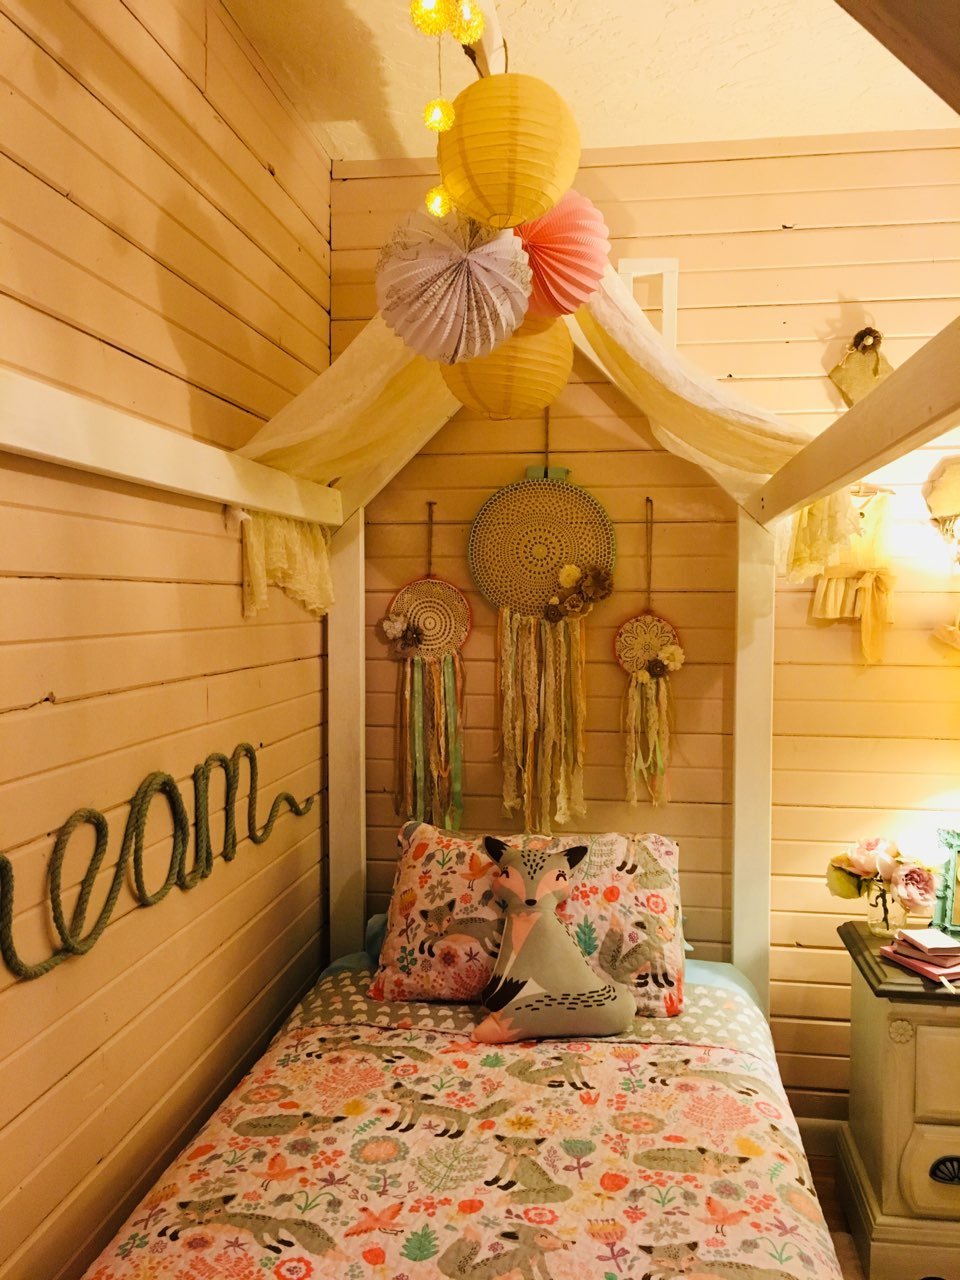
May 2020: Reader Anna built our house bed frame with chimney for her little one who is a Frozen fan!

March 2021: Danielle built this sunny yellow floor bed for her daughter’s rainbow room!
“Almost everything in her new room is diy! I made the quilt from the “postcard from Sweden” pattern with Kona fabric. The raindrops are diy from felt and the cloud light is a paper lantern (of course with an LED light that doesn’t get hot) low wattage nightlight bulb with batting glued on.”

Click here to purchase and download the House Frame Twin Bed printable woodworking plan.
More fun DIY kids’ bed ideas:
- Camping Tent Bed Canopy
- Hanging Loft Bed
- DIY Daybed Cornice and Canopy
- Built-In Bed Nook with Storage
- Bunk Bed Cottage Playhouse
 First published 18 Oct 2014 // Last updated 28 Jan 2021


For the roof pieces, you have them marked as 34″ in the cut list, 31 1/16″ on the cut diagram, and 30 1/16″ under step 1. Which one is the correct measurement? I am in the process of building this and just noticed the error. Thank you.
I apologize about the confusion. In the cut list 34″ is long enough that you can cut the angles later. The correct dimension is 30 1/16″. Thanks for catching that mistake.
Hi! I’m wondering the same question as Samantha. We are also building this right now.
I apologize about the confusion. In the cut list 34″ is long enough that you can cut the angles later. The correct dimension is 30 1/16″.
Hi,
would it be possible to email me the step by step please? I really want to try add make this myself for my little boy!
Hi Courteney,
There’s a link/button in the post that says “click here to get a printable version of this building plan” — just click there and enter your email address and it will come straight to your inbox.
I am wondering how rigid this frame is. I am a little concerned about building this for my daughters first “big girl bed” . Does it seem to have much play on the uprights or is it fairly solid. I suppose I could use 4x4s but I would rather not.
What size mattress (in centimetres) does this need, when using without the boxspring
Thanks
What is the estimated cost for the wood to build this bed?
I used soft white maple. $400
You can used less expensive wood line pine or poplar.
I know this question is from a year ago but I still wanted to give you my thoughts. I just built this bed last week for under $20. I used 2x4s that we selected from the hardware store. The 2x4s take a little sanding (had the sandpaper) to get them smoothe but it’s worth the sanding to save the money. I used paint I had on hand but if I had to purchase the paint and sanding discs it may have added another $20 to the price.
Thanks for the comment, Sari! We’d love to see a picture if you’d like to share — you can message us over on Facebook or submit a photo here: https://www.remodelaholic.com/share-brag-post/
Do you have any idea how much weight this can support? I plan on building it but want to make sure I can lay in it with my daughter. We’re about 160 lbs together
Super helpful post, thank you! I am wanting to build this for a full size mattress. I know it will be 15 inches wider but do you know how long the upper boards for the ‘roof’ would be? (6th grade geometry is seeming awfully long ago 😉
Thanks,
Aubre
Have you received a response? I was wondering the same thing!
Find an online calculator for a building truss. Use roof pitch 12/12 and it will calculate the length
40 21/32. Using the old pythagorean theorem.
Had to figure it out myself cuz I’m building for a full and couldn’t find dimensions.
Do you have plans for a full size house bed???
Hi Amber,
Thanks for the comment! We don’t currently have full size plans, but we’ll put it on our list. Thanks!
How in the world do you make those pocket holes in the top?
The easiest way I’ve found to make the Pocket Holes is with a Kreg Jig. It’s a bit of an investment, but makes your projects turn out looking very professional. You can pick one up at most home improvement stores or even on Amazon.
Hi,
How does the kreg jig work on the angles? I set at 1 1/2 but the drill holes are far beyond the wood?
I’m having the same issue right now. my holes are ending up too close to each other in order to have at least two screws. I don’t want to use a biscuit jointer either cause I don’t think it will be strong enough joinery.
Put the pocket holes on the angled cut closer to the ‘inside part of the angle’, rather than the ‘pointy end’ of the board. You should be able to get the holes in the 2×4 that way. If the top part of the pocket hole goes through the side of the board, fill it with wood filler.
If you can’t fit two screws, get at least one screw in. The wood glue is really what gives the joint strength. The screws act as your clamp until the glue is dry.
Put the pocket holes on the angled cut closer to the ‘inside part of the angle’, rather than the ‘pointy end’ of the board. You should be able to get the holes in the 2×4 that way. If any part of the hole goes through the side of the board, fill it with wood filler.
Hi! Do you have this plan for a full size mattress too?
Thanks!
Not currently but we can add it to our wishlist 🙂
Love this! I’m wanting to do this on the floor not raised at all. Any tips?
Super cute bed ideas! My 8 year old would love the house form. Visiting from Friday Favorites.
Did anyone come up with a solution for the pocket holes in the top/roof part? Surely it can’t actually be clamped on the regular jig? I feel like I’m missing something here.
How much did it.cost to make this bed?
Looking to put this closer to the floor. Would you just move the bottom boards down? Anything else I would need to do?
Do you have the dimensions and supplies for a full bed? I SOO HOPE SO
Awesome design! By any chance you have dimensions for a full size!
Once I finished assembling the bed, the top part of my bed wobbles back and forth but not the other way. Is there a reason for my bed wobbling? Is there a way to fix it?
Mine does slightly as well. I’m going to take the triangle pieces cut from making the angled cuts on the 2×4’s and put them on the bottom inside corners (either glue or screw) or on top or below the long side 2×4’s at the ends. Should be enough support
Hi and thank you for the plans. Nevertheless i have a question. On the first image you show a 80 inches external size, but if you add 77 inches plus 2×2 inche for the vertical board it gives you 81 inches instead of 80. Same happens on the other size. 35.5 plus 2×4 gives you 43.5 but again the first image show 42.5. Why? Thanks.
Hi Mauricio,
A 2×2 is actually only 1.5 inches, and a 2×4 is 1.5×3.5 — so the difference between the actual measurements and the nominal measurements is what makes up the difference in those numbers. It can be confusing 🙂
What is the mattress size for this bed without the box spring? Thanks