How to Make Your Own DIY Felt Letter Board

Today we have an awesome gift idea (and, of course, make one for yourself, too!) — a DIY felt letter board! Make one in any size and color you like!
Other simple DIY projects that make great gifts: Yard Dominoes, Two-Tiered Square Lazy Susan Organizer, and I-pad/Tablet Stand.

How to Make Your Own DIY Felt Letter Board
by Allison of Shark Tails (blog currently unavailable)
This post contains affiliate links. Learn more and see our full disclosure policy here.
Felt letter boards! They have that retro element that I love and are also so versatile: I can see myself changing it up on the daily from song lyrics to sassy turn-of-phrases to movie quotes. Endless possibilities!

I looked into purchasing a letter board online from a couple different places (Amazon, Letterfolk) but since I am Canadian (the horror!), the shipping prices were insane and once the exchange rate was factored in I was looking at over $200. No can do. I decided to DIY one using a few simple materials and my trusty hot glue gun.
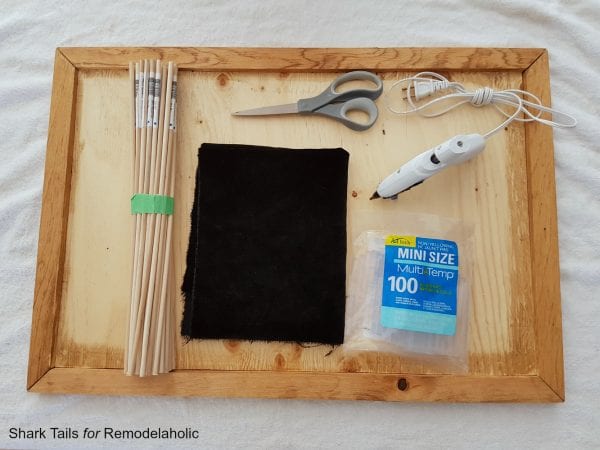
What you’ll need for DIY Felt Letter Board:
- frame with a backing and a deep enough inset for your dowels (I made my own using scrap 2x2s and plywood, but you could easily grab one from your local thrift store or a craft store.) Or make your own with this DIY frame tutorial.
- 1/4″ wooden dowels, cut to size
- felt or other thick fabric (more on this below)
- fabric scissors
- hot glue gun and lots of glue sticks
- letter board letters
- lint roller and utility/putty knife
How to build a DIY Felt Letter Board
Step 1: Dowels
Cut your dowels to size, if necessary. The inside of my frame measured 16″ across, and the dowels I got at Home Depot were 48″ long, so I cut them into three using my mitre saw.
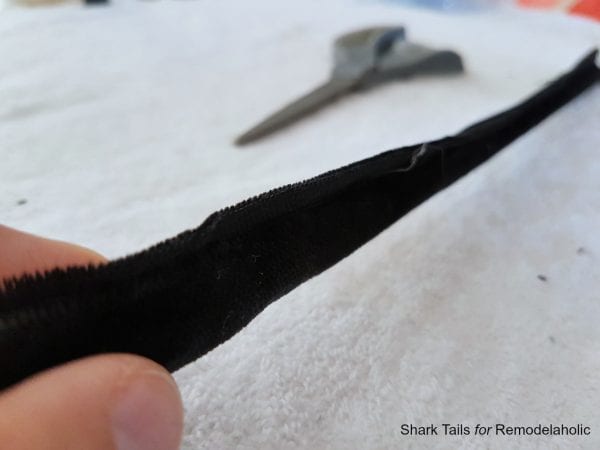
Step 2: Fabric
Cut your fabric into strips. I was unable to find black felt so I used some black velvet. I love the way it looks, but I will warn you it was super messy due to the edges of the strips fraying. Use felt if you can. I cut each strip a little longer than 16″, and about 1″ wide. I did not do this precisely: I simply eyeballed it.


Step 3: Hot Glue
Crank the tunes, fire up that hot glue gun, and start wrapping dowels! I found the technique that worked best for me was:
A. squeeze one line of glue down the middle of the strip and place the wood dowel on top.


B. Add another line of glue onto the edge of the fabric and roll/fold it until the dowel touches the glue.

C. Do the same to the other side: glue and roll/fold so the entire dowel is covered.


This probably seems like it would take forever, but it actually wasn’t that bad. I think I had all the dowels I needed wrapped in about two hours, and I didn’t even end up using them all!
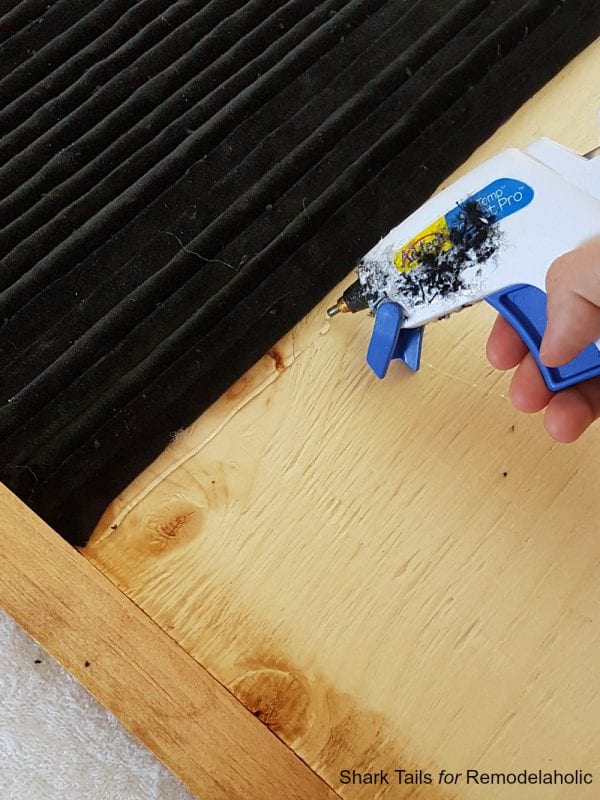
Step 4: Install into Frame
It’s time to secure your dowels into the frame. I squeezed out a strip of glue and then placed the dowels into the frame as snugly together as I could, holding them in place for a few seconds while the glue dried.

Step 5: Finishing touches
Once you have all of your dowels snugly secured in the frame, remove all the little glue wispies from the fabric. A lint roller worked really well! I also went all around the edge with my utility knife tucking in any fabric ends that were peeking out.

(Although the velvet was a pain to work with, I do think it adds a certain luxurious element to the board that you wouldn’t get with felt.)
All in, this project cost me under $60, a steal for a large wooden felt letter board! The most expensive part were the 1″ tab letters that I purchased online from Amazon. (I bought 3 sets: search “letterboard letters” and a ton of options will come up). The fabric was $6 and the dowels were $20: everything else I had on hand. The final result is even better than I’d hoped!

We recently put an opening and breakfast bar in the wall that separates the kitchen from the living room, and this DIY felt letter board is the perfect piece of decor to fill the empty space on the right hand side. Extra points for anyone who can name that movie reference!

This thing is seriously so much fun to change around…


For a little effort and minimal dough, I think this DIY felt letter board makes a great impact! I love how versatile it is: you could make it as big or as small as you want to suit any space and you can make it any color or design to fit your decor!

I contemplated hanging this in our bedroom, but in the end decided the kitchen was the best spot for it because more people would be able to enjoy all the clever musings I intend to display.
Thanks for reading, everyone — until next time!
-Allison
A few things about myself: I’m Canadian (I’ve lived my whole life in the same small town except for a 6 year hiatus spent living in South Korea), I have three rambunctious dogs who I love an insane amount, and I’m a huge fan of mid-nineties gangster rap. My style is relatively eclectic and ever changing; something I loved last month I most likely hate today, which is a constant source of frustration for my poor husband. I started Shark Tails to document the process of updating our 90s home (seriously, my house is where all the golden oak came to die) and hopefully inspire others who may be trying to do the same on a limited budget (did I mention I’m cheap?)
Find Remodelaholic on Facebook, Instagram, Pinterest and YouTube.
Click here to see our other 12 Projects of Christmas — decor, gift ideas, and more!
Plus, try these other DIY gift ideas:
- reclaimed wood pallet memo board
- DIY dollhouse plus free printable furniture
- YARDZEE yard dice tutorial + printables
- ballerina doll tutorial

Originally published 11/23/2016 — Updated 12/09/2020


Try the gray stuff, it’s delicious! Don’t believe me? Ask the dishes!
Beauty & The Beast
Congrats on you first Remodelaholic post!
They can sing, they can dance….
Thanks Marjory! 🙂
How big was your frame and did you make it? I really want a felt letter board but I don’t feel like spending over $50 on it. Thanks!
Did you order your letters from Amazon.com the US version? That is where your like takes me to. I cannot find the letters for the price you stated on the Canadian Amazon. Also will smaller letters work as well say 3/4″ or 1/2″?
I brought one from Amazon,The letter is 3/4″
Can you direct me to the exact link for the letters you used? I have ordered several letters and the tabs on the back are way to short…
Hi there just wondering where you got your letterboard letters from….i have made my own board and now am nervous that letters i purchase overseas might not fit….i want to know how deep the prongs are on the back of the letters and how far apart they are spaced before i spend loads of money before sending to New Zealand..help….can you tell me where you got them from….and what the back looks like..thanks
This DIY is awesome! I will try it as soon as possible!
Thank you for all the details and the explainations!