Rustic Chevron Twin Headboard Building Plans
We are excited to welcome back Amy from Her Tool Belt as our next Headboard Week guest and as a new member of our contributor team! Amy knows her way around tools and building plans (remember her awesome media center plans?), and she has some awesome projects up her sleeve for you, starting with this rustic barn wood headboard.
PS: Don’t forget to link up your DIY headboard at the party at the end of this post (or here — same party, just in different spots 🙂
Howdy, I’m Amy from Hertoolbelt, here to share with you my Rustic Chevron Headboard tutorial. Last summer I got the opportunity to salvage some barn wood from an old hay barn on Grandpa’s farm. My first project with the reclaimed lumber is a bed for my son. I came up with a chevron design, hoping to show off the natural character of the weathered wood. I love how it turned out.

A few things to consider when using barn wood:
- Does it have a strong smell? If so don’t use it in your house. The barn wood may have soaked up manure or other things, that may never air out. Use pieces of wood that were higher up in the barn.
- Does it have bugs? If it does, google how to get rid of them in your case.
Quite often old barns were built using rough cut lumber. So a 2″ x 4″ rough cut lumber board actually is 2″ x 4″. A 2″ x 4″ board at the lumber yard is 1 1/2″ x 3 1/2″, but we call it a 2 x 4. This bed plan is designed using the rough cut lumber dimensions. Adjust the dimensions to your lumber size as needed. To build this bed with standard lumber sizes go here.
Build a Rustic Twin Headboard
by Amy of Her Tool Belt
Click Here to Get a Free Printable Version of this Building Plan
Alrighty let’s get building. Here are the overall dimensions of the headboard.
![]()
Rustic chevron headboard cutlist
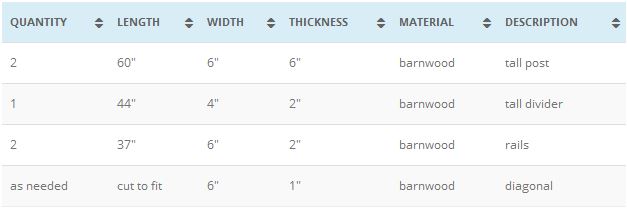
To make my lumber manageable I used a chain saw to roughly cut the boards to size. (Leave a little extra in case your saw doesn’t cut straight.) When making the final cuts use a compound miter saw or table saw to get more precise cuts. I used a band saw to do the final cuts on the 6″ x 6″ beams.
Cut 2 posts that are 6″ x 6″ x 60″. Pick the best side that you’d like showing in the front. On the inside route out 2 pockets for the rails 1″ deep, 2″ wide and 6″ tall according to the diagram. Using a table saw and dado blade, or a router make a dado groove down the center of the post as shown in the diagram. Repeat for the other tall post, but remember to do the mirror image of the first post.
![]()
The design of the headboard uses dado slots for the diagonal boards to slide into. I did this because it makes a cleaner look and is more forgiving on the diagonal cuts.

Cut 2 boards that are 2″ x 6″ x 37″. Cut a 1″ x 1″ dado along the center of one long end of each board. These are the headboard rails.

Cut a 2″ x 4″ x 44″ board. Cut a 1″ x 1″ dado along both long ends.
![]()
We need to cut tongues that will fit into the rail dado’s that we just cut. On each end make cuts to match the diagram. The tongue should fit snuggly into the rail groove, trim as necessary. These are the headboard center dividers.

I didn’t give any dimensions for the diagonal panels, because I think it’s best to cut those to fit. The plan suggests using 1″ x 6″ wide boards, but you can use whatever width, and varying widths will be cool too.

Partially assemble the headboard by putting the bottom rail in the corresponding post holes. Place the divider in the center. Start the diagonal panels with a 45 deg triangle on each lower outside corner. Then measure the length of the diagonal side of the triangle and that is the length of the shorter side of your next diagonal piece. Continue to cut the ends at 45 deg. Once the boards get past the inside corners, the boards will repeat the same length with 45 deg ends, until you reach the top. When doing the top boards, I left them a little long to dry fit, then took a straight edge and marked where they needed to be cut at the top. Trim pieces as necessary to fit together. Disassemble all of the pieces.
We’ll add some Kreg jig pocket holes to hold the headboard together. Add 2 pocket holes to the bottom of the lower rail on each end. Add 3 pocket holes to the rear face of both rails on each end.
To assemble the headboard, I found it easiest to lay one post on it’s side. Put in the top and bottom rail, screw into place with 2 1/2″ long screws. Stack the diagonal panels in order starting on one side, install center divider, stack other side diagonal panels, then the other post. Use 2 1/2″ long screws and screw the rails into the post. (The diagonal panels aren’t screwed down, they float in place.) Tip the headboard upright. To secure the headboard to the wall, use 1 or 2 ‘L’ brackets. Attach the ‘L’ brackets to the wall, preferably in a stud, and secure the other side to the headboard.
Alright your rustic headboard is done!
 ————————————-
Thanks, Amy! Love the character of the weathered wood, and the chevron pattern is perfect!
If you’ve missed any Headboard Week posts, go here to see them all (like this easy and stylish upcycled door headboard!). Check back tomorrow for more tutorials and inspiration, like this fabulous feature wall headboard:

Don’t miss a single Headboard Week post! Follow us on Facebook here or subscribe to our RSS feed here.
[inlinkz_linkup id=418236 mode=1]


Thanks for featuring my rustic headboard. I’m loving this headboardweek, it’s so fun!