The Amazing Things You Can Do with Salvaged Wood
Today we get to hear from not one by two guest bloggers—a husband and wife blogging team! (We’re kind of partial to those, around here.) They are going to be sharing the knack they have for reimagining old, worn out things into new, useful things. One of their recent projects was this reclaimed wood key rack.
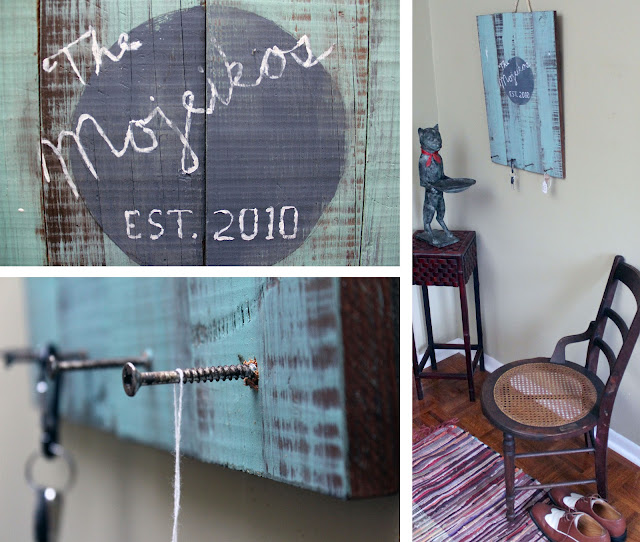
It totally reminded me of a project from awhile back shared here at Remodelaholic, when with some wood scraps they make a key rack that looked like something out of a vintage Hollywood hotel set. (You know, front desk, a row of keys behind the snooty desk clerk…so fun!)
There’s a lot of great stuff that can be made from wood that gets leftover, tossed aside, or scrapped from other projects. You’ve probably seen as many pallet projects around the web these days as I have. But you know what? I still love seeing them! It just fascinates me what you can get from little sawing and hammering and a lot of imagination. Creative people out there are salvaging old wood in many forms and turning it into beautiful new pieces that can be enjoyed for years to come. It’s a terrific cycle, and it feels good to be a part of it. Check out some of the salvaged wood projects I’ve enjoyed, lately.


1. Design, Dining + Diapers | 2. Thrifty & Chic | 3. Funky Junk Interiors | 4. Cherished Bliss | 5. Nesting Place | 6. Tidbits from the Tremaynes
I’m excited for our guest bloggers to share one of their salvaged wood projects, now. Welcome to Remodelaholic, Leslie and Pete!
Submitted by: Salvaged Spaces
Salvaged Spaces is a blog led by us, Leslie and Pete. We started blogging to share our love of junk, DIY, and before/after projects with the rest of the world! Leslie graduated from the University of South Florida with a Bachelor of Arts in English and a Master of Education degree. Pete completed six years in the military and earned his Bachelor of Arts in Geography from the University of South Florida. Pete currently works as a utility mapper and Leslie stays at home with little Lucy June. We are a couple of junkers living in Florida who are always searching for dirty treasures! When we’re not getting dirty in the salvage yards, we enjoy spending their time with their daughter, dog, and cats.
If you don’t mind, we’re going to show off a few of our latest projects, and then we’ve got a tutorial for you.

Light Up Globe (this one’s for you, Cassity, we know how you like maps!)
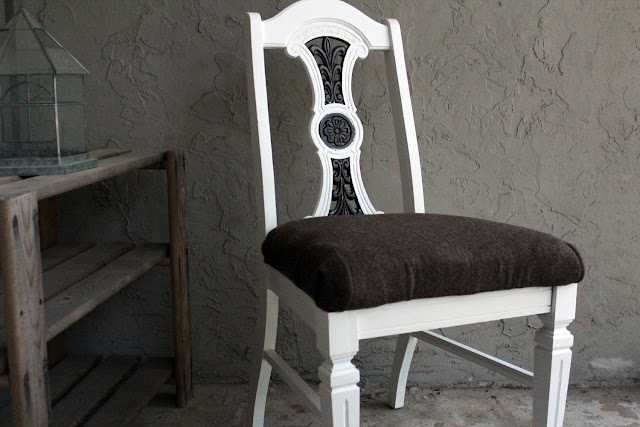
Chair Reupholstered with an Old Tweed Coat
If you can’t tell, we’re serious about salvaging, and we have some serious fun with the things that we make. Which leads us to the tutorial we have for you.
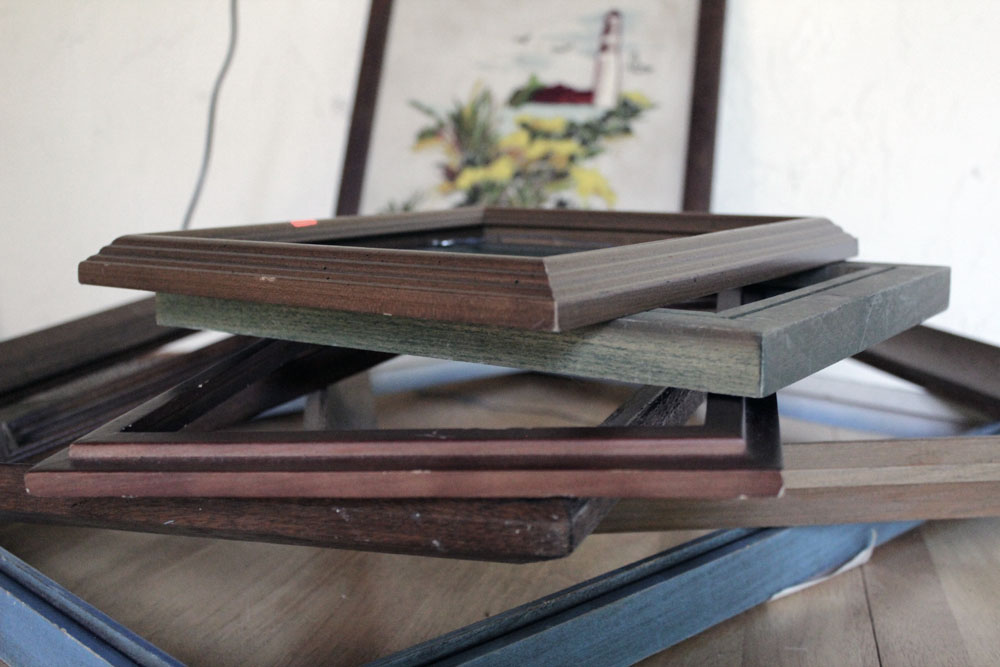
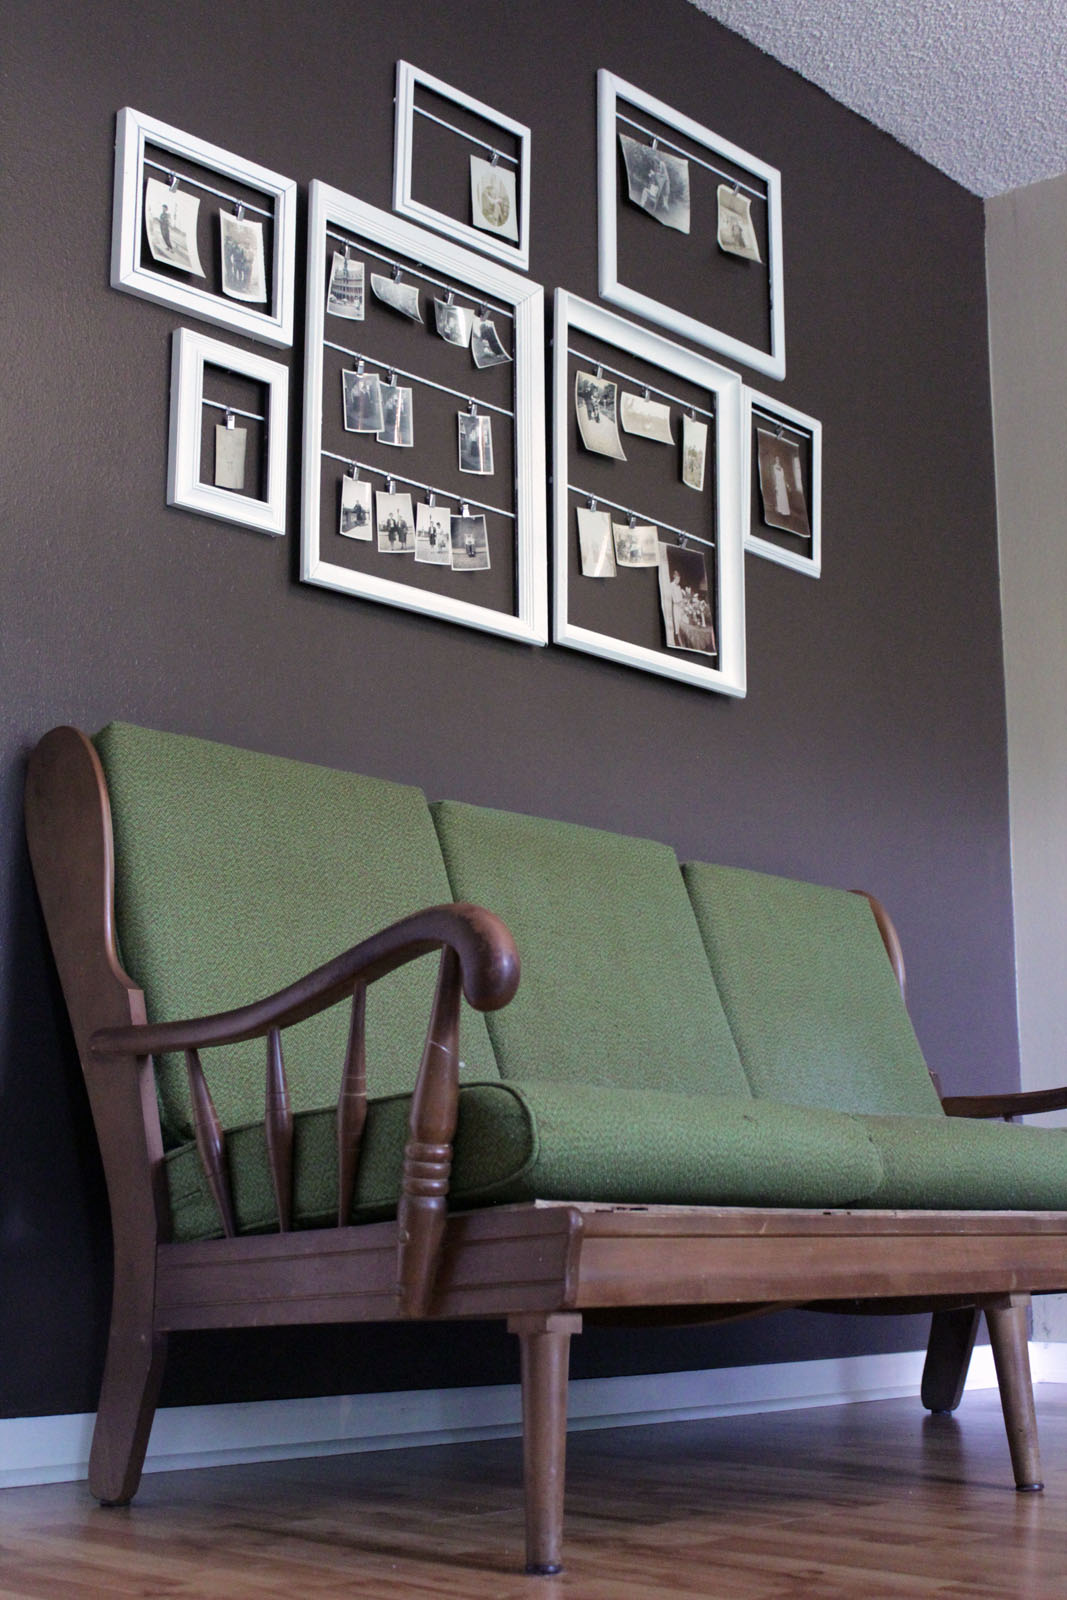
I came home with a stack of salvaged picture frames and no idea what to do with them.
Leslie and I kicked some ideas around, considered some suggestions we got on Facebook, and then decided to do something weird. I went to an antique shop in town for supplies: a stack of old photographs, most from the 1920s to 40s, some from the war, portraits, candids, and landscapes, all salvaged from an old woman’s estate after she passed away several years ago. The rest of the supplies are things we had laying around: paint, string, and thumbtacks.
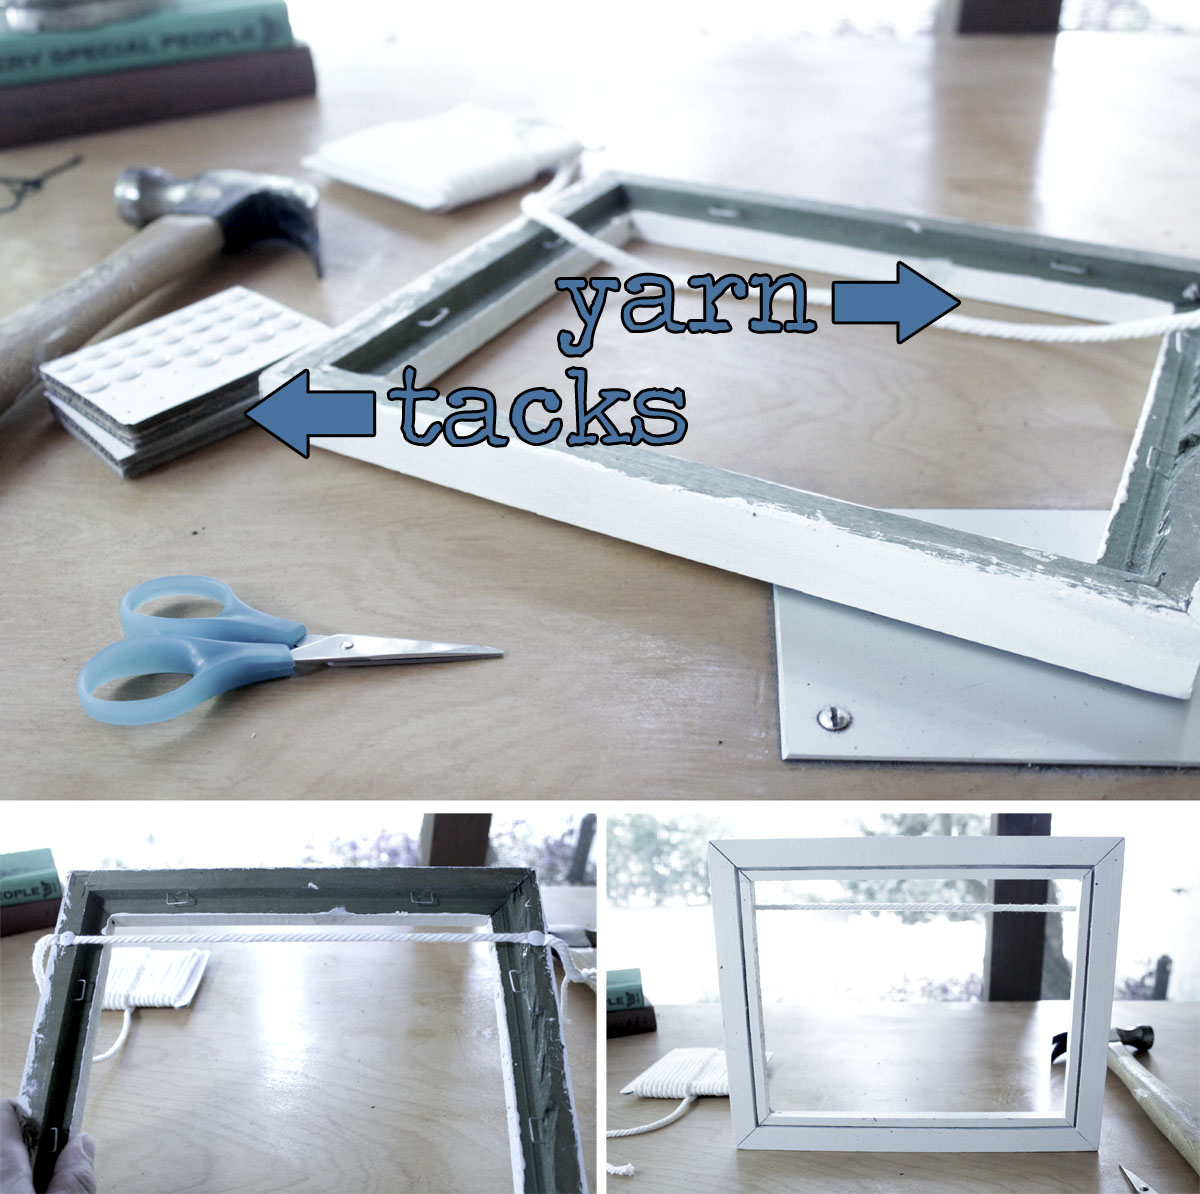
The first thing I did was paint all the frames white. After they dried, I flipped them over one by one and attached a length of yarn horizontally with thumbtacks hammered into each side of the frame.
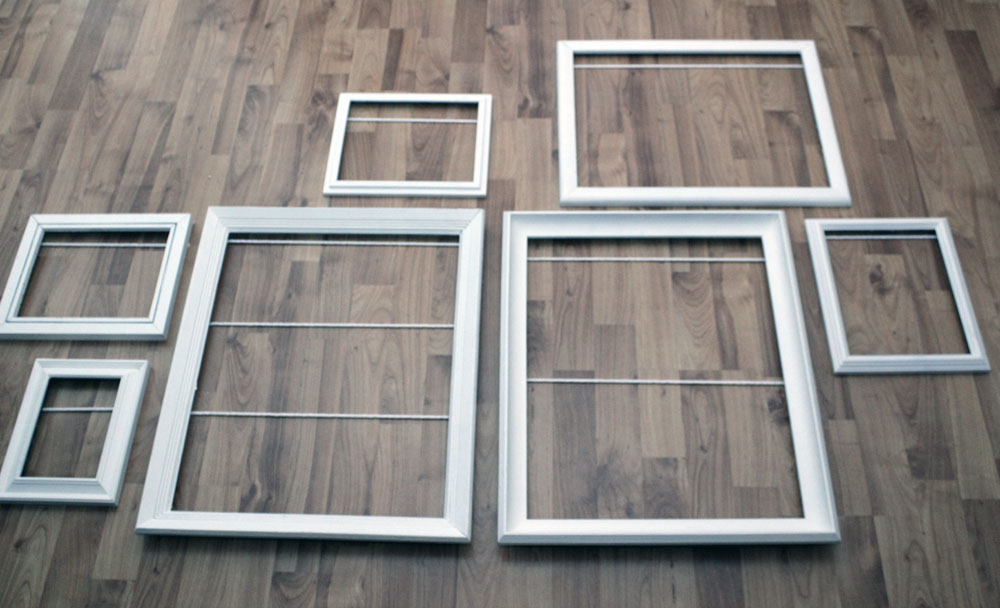 After all the frames were “strung,” I arranged them on the floor so I could plan out where to hang them. This step probably took way too long.
I put the frames up on the wall and sorted through the old photos, picking out my favorites. I wanted the interesting ones, but I was also mindful of the colors. The photos that were more sepia toned than black and white would be best, so they would blend with our brown wall. I hung the pictures with some metal hook-and-clasp things that we picked up at an Ikea a couple years ago for a few bucks, and I think they do the trick nicely.
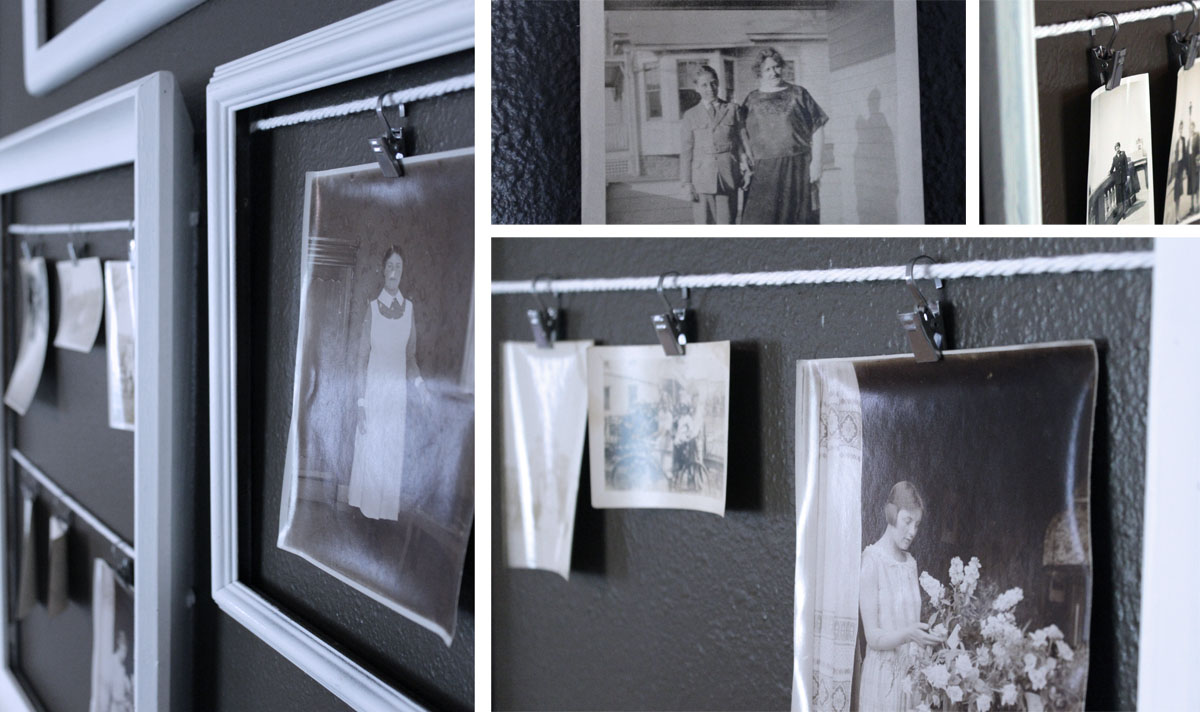

Now our wall is kind of like a museum of someone else’s life. We have no connection to the person these photos belonged to or the people in them. Besides some writing on the backs of a few (mostly in German), we don’t even know anything about these people. But even though they can’t talk, they still tell a story. There’s a young woman picking out flowers–maybe for her wedding. Another is a woman in an apron standing by a chair–this might be the only photograph ever taken of the housemaid. There’s a series that might be a woman standing on a bridge, first by herself, then with her sister, and finally her best friend.
We’ll never know these people, and they will never know us, but we don’t mind them hanging around.
Thanks for sharing this tutorial, Leslie and Pete! It’s a terrific way to use old frames and get a gallery wall. The vintage photos you added have to be a lot of fun to look at and make for great conversation pieces. And since I’ve got Christmas on the brain, I have to say that this would be an amazing way to display holiday cards.
Did you love today’s salvaged wood projects? Check out a few more of those here at Remodelaholic.

1. Reclaimed Mahogany Island | 2. DIY Trumeau Mirror from Scrap Molding | 3. Reclaimed Wood Coffee Table


Such a great idea. I love it! Thanks for the tutorial
Fantastic ideas. I’ve some more in my blog.
Always love your tips, girl, keep ’em coming. Need to try that eggnog cookie, for sure and will show son, Joshua, that sweet coffee table!
Lezlee