Yo Cabbie, finally…, Upstairs Bath Remodel; Part 6
Other posts in this remodel:
Wet your Appetite, Part 1
Got Paint, Part 2
Tile with Style, Part 3
For Vanity’s Sake, Part 4
Mirror Mirror, Part 5
This post has taken a long time in coming. Building the cabinet took a week or two longer than expected. Then it was Thanksgiving, and I wasn’t in the mood to paint… for 4 weeks, and when I finally got the energy to do it Christmas was here. (Should I think of any more excuses? I think not! Honestly, I hate excuses!)
The truth of the matter is, we take a long time on projects. I have learned from this remodeling project that I need to have the project completely done before I am allowed to start posting about it.
It is just too easy for me to live in an unfinished house. It doesn’t even faze me! For example, there was a time in college, where we didn’t have carpet over the sub-floor in our hall for three and half years. I had to wear shoes in that house, big deal.
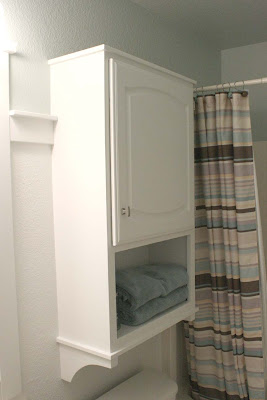
Anyway, one of the whole reasons for this little bath remodel was that I wanted a cabinet above the toilet. This way, cleaning products will be in a safer location, and there will be more room for toiletries. Especially since we have no drawers in our tiny vanity.
Also, we had done this in the past. Which is another reason, I wanted it, I missed the space that it created.
**FYI** When we did this before, we just modified one of those over the commode cabinets that has legs.. you know what I am talking about right (picture below)? Well, we just attached it to the studs with good heavy duty screws and never installed the legs, when putting it together (such an easy customization/fix to those sorta silly looking things!). Here is a picture of one of the cabinets I am talking about, and here is the picture of our old bath with the cabinet in it.


This time, we were trying to do this without spending any money,or VERRRRY little! I decided to run to The Habitat Re-store and buy an old cabinet door(to save time), then build a cabinet around that door. I found one for $4.00, easy as pie! And Justin, bless his heart designed it around my specifications and built… and rendered it in 3D so we could discuss how it looked. Here are the final renderings, (he even did one with a mirror on the inside of the door).


>That looks great! Questions? How did you get the 3D thing?
>Hey Vanessa,
Thanks for asking, my husband actually built it in 3D using a CAD(computer aided drafting) program. We both had to learn how to use these programs in school. It comes in really handy for remodeling!
>Nice!!!!! You guys always make your stuff look so clean. Great craftsmanship Justin.
>Looks great! Wish we had a habitat restore near by. I am thinking of something like that project in my laundry room to have a little more cabinet storage. Jackie
>Wow it looks great! I'm impressed by the CAD drawing. I had to take CAD for my engineering degree, but haven't touched it since college.
>Excellent! You can never have too much storage space, esp. in a bathroom. At least that's how I feel about things…
You guys did a great job, at a great price. Nice work!
I'm recapping some of my projects from last year – I'd love for you to stop by.
Happy New Year.
XO
Heidi – Heart and Home
>Your bathroom looks great, good job. Nothing wrong with taking your time we gave one of our guest bathrooms a facelift last year, it took me five monthes to complete..
Now remember I said face lift, first I had to find a vessel sink, then and antique dresser to put it on, then there was the floor. Glad I took my time, because I love the changes. My first visit, great blog. I will be following you through the next year. Hope you stop by sometime.
Sandy
>very nice! You can never have too much bathroom storage, can you? 🙂
thanks for linking up!
>Great concept, design and execution!
>Thanks for visiting and becoming a follower. I signed up to follow you
as soon as saw some of your great ideals. Talk soon.
Sandy
>LOVE IT–you are ALWAYS welcome to post as much as you want to my parties.
Cheri
>That looks so good! What a talented hubby!
>wow! great job! very good thrifty project. I love the re-store too!
gail
>Super impressed! I wish I had the tools you do! Thanks for linking!
>Looks amazing! And I love your shower curtain too.
>I'd be surprised if you hadn't heard of it, but have you ever tried SketchUp for your 3D modeling/rendering? Super fast and intuitive to learn, dynamic drawing (changes on the fly, vs. CAD finishes the command then redraws), FREE, and actually has lots of plugins and tools for landscape architects.
I'm a big fan of it, in case you didn't guess.
>You are great. How can you do all this things? Incredible.
Hugs,
Cris Turek
>love that! thanks for linking!
>Wow! What impressive DIY skills!! I love that you built it around a cheapo door. What a thrifty idea :).
>Wow! I am so impressed and can't wait to take a look at more of your posts! 🙂