DIY IKEA Hemnes Desk Hack into Hidden Double Desk for Kids
This IKEA Hemnes desk hack turns a regular laptop or writing desk into a hidden double desk! Use it for keeping your workspace organized or for a shared home office with a parent workspace on top and a kids’ desk under the hinged lid.
Read more tips for a shared home office and see our favorite home office ideas here.

Simple DIY IKEA Hemnes Desk Hack
In the life of a Remodelaholic, there’s a constant battle for balance between saving time, spending money, and getting exactly what you want from a project… or as close as possible, anyway.
When a project is affordable, fast, and fits the exact need, that’s the trifecta that gets the Remodelaholic happy dance.
Today’s IKEA Hemnes desk hack turned a basic two drawer wood desk into a shared kids’ flip-top desk and got a big huge happy dance in the process!

We did both desks in ONE day, and the video above and written tutorial below show you how you can do this, too, using a table saw and pocket hole jig like we did, or with simpler tools like a jigsaw and some metal plates instead.
Why We Use IKEA Hacks
We like building furniture from scratch, but we also like saving time using IKEA hacks as shortcuts!
When our site manager, Lorene, brainstormed this idea and asked if it would work (and if we’d help), we said, “Let’s do it!”
A trip to IKEA, and about an hour of work time later: tada!
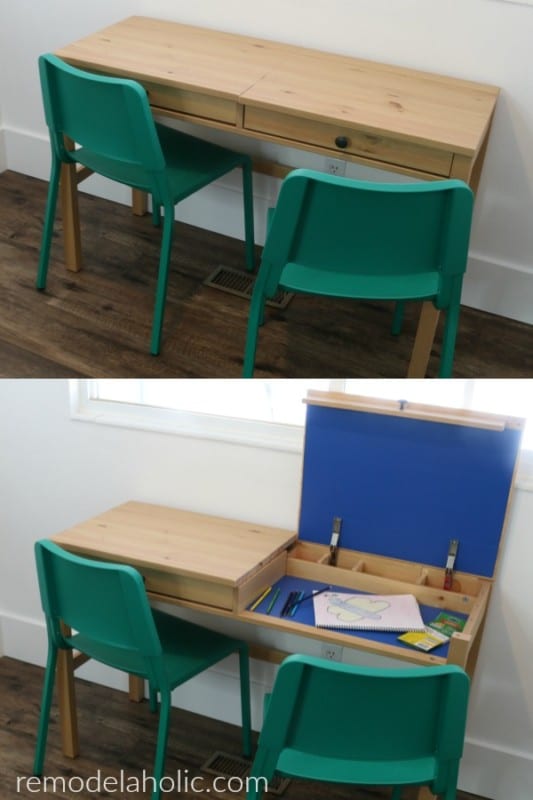
For a very affordable price (~$100/desk), we turned the solid wood HEMNES desk into a 2-person hidden desk.
When closed, the top is nearly seamless and great for homework, a laptop, and other relatively calm and clean kid (or parent) activities.
Flip the top open and inside is a hidden compartment, just right for additional art supply storage and the mess that comes along with it.
We lined the interior with contact paper for easy clean-up (below) too, with the added bonus of covering up the holes from assembling the desk *and* differentiating each child’s workspace.

Each kid’s art desk workstation is just shy of 24 inches wide and just over 12 inches deep.
This improved IKEA desk provides the 2-person desk capacity of our popular farmhouse computer desk, but for kids, and with the added benefit of a built-in mess-hiding feature!

But wait, there’s more! (Imagine that in our best infomercial voice.)
We hacked these for our blog manager, Lorene, who has 4 kids in need of some desk workspace, so we doubled the hack.
Double the desks means that now there are 4 workstations available, plus we can slide the two desks together to provide an even larger desktop space — perfect for playing card games, working on a puzzle, or completing a bigger collaborative project.

This is going to be a great solution for Lorene’s kids’ homework station, and this would be wonderful for homeschooling or small space living — maybe even a tiny house! Dining table to homework desk, anyone?

How to Hack the IKEA Hemnes Desk into a Two-Person Flip-Top Desk
This post contains affiliate links. Learn more and read our full disclosure policy here.
Watch the video above for the full details, including a tip for aligning the surface-mount hinges at the right location.
These surface mount hinges work as both a hinge and a lid support in one, holding the desktop up 90 degrees so it won’t flip closed and smashed little fingers. They’re really easy to install and require no special holes or tools to install, while still being hidden hinges, invisible from the top of the desk.
In a nutshell, you’ll follow these steps to complete your IKEA Hemnes desk hack:
- Build the base of the desk following the IKEA assembly instructions, swapping the 4 Rockler surface mount hinges for the 2 IKEA hinges (again, watch the video for placement instructions and tips).
- Attach the two desktop pieces together, and then cut the wood desktop exactly in half to make the two hinged flip-top desktops.
- Attach the drawer fronts to the desktop to form the faux drawers, and install the drawer divider to serve as a desktop support.
- Finally, and optionally, cut pieces from the leftover drawer sides to form dividers in the section formerly intended for power cord management.

Set up the study corner and set the kiddos loose!
We used our green FEAFE chairs from our patio dining area makeover. They’re a great craft desk chair: colorful and completely washable.

Materials & tools needed for this IKEA desk hack:
- 1-2 IKEA Hemnes desks (ours are the brown stain)**
- 2-4 sets of Rockler surface mount hinges (one for each hinged desktop section)
- (optional) adhesive contact paper — we found a steal of a deal here on Amazon!
- table saw, jigsaw, or circular saw
- Kreg-Jig pocket hole jig and screws or biscuit joiner*
The HEMNES is solid wood AND affordable, making it the perfect candidate for a hack! The price has gone up since we purchased these in 2018, so here are some other similar options.
—
You want a writing desk that is as much solid wood as possible. If possible, you want a solid surface under the drawer since you’re not using the drawer. If the drawer section is open on the bottom, you’ll need to add a few boards to create the inner desk.


*A note about pocket hole joinery:
We used our old friend the Kreg-Jig and pocket hole joinery on this IKEA desk hack, both for joining the two sections of the desktop together and for attaching the faux drawer fronts.
Drilling pocket holes and attaching with pocket hole screws is a fast and easy method for joining two pieces securely, so we use it often.
If you want to make it prettier, you can also plug the holes with pocket hole plugs — or make your own with this handy tool! (We didn’t worry much about that since we covered the holes with the contact paper anyway.)
If you want to try a different joinery method, we’d recommend a biscuit joiner — or you might be able to use a dowel jig as well.

If you don’t have a Kreg-Jig or another type of joinery tool, you could easily and affordably get the same function from this desk hack by using metal plates to join the desktop together and L brackets to attach the faux drawer front.
In that same use-what-ya-got spirit, you can absolutely do this with just a jigsaw or circular saw and NOT a table saw, too. After joining the two sections of desktop, just draw a line and use a straight edge (like shown here) to ensure you have a straight and even cut down the center of the desktop.
More IKEA hacks:
KALLAX hack entry storage console

KALLAX hack into flat file drawers
IKEA hack wood and metal shelf


When the tables are face-to-face with the desktops up, it looks like the perfect set up for a DIY Battleship game. The classic game is good for teaching logic and reasoning. Here’s an interesting Battleship variation to teach math: https://familystyleschooling.com/2015/10/28/board-slam-battleship/. I’m not affiliated with the site, just a humble math tutor always on the look out for creative ways to teach math. I could even see the interior lids made into whiteboards, chalkboards. A magnetic surface would also be interesting. Nicely done.
Thanks, Della! This would be excellent for battleship, it’s true 🙂
Wow! This IKEA desk hack is a great solution for all home schoolers and it looks fabulous too!