DIY Faux Zinc Finish Tutorial

I’m going to show you how to take a box store plastic planter like this one found at Walmart for $21…
 And achieve a faux zinc finish to turn it into a time-worn beauty like this…
 In some places, a planter like this retails for over $100…yikes! No need to break the bank, just create your own. The best part is that this technique can be used on anything…light fixures, wood boxes, decor, furniture…you name it!
How to Paint a Faux Zinc Finish
(interested in creating a similar finish on furniture? here’s another option)
All you need are a few things to achieve this effect. Here is the list of materials:

- a planter (or any object you wish to zincify)
- Rust-O-Leum Professional Cold Galvanizing Compound Spray
- flat white paint
- paint brush
- rag
What better than zinc in a can? Seriously, this stuff is made of zinc and therefore will give you the power to turn anything you spray into a zincified object. Easy!
 Now you might be wondering what’s wrong with the urn as is? Nothing really, but it doesn’t have enough character in my opinion. I tend toward the French/Nordic style that is all about texture and patina. This particular urn was in a dark color with gold accents and also had a texture to the surface that I liked.
 This project is better done outdoors, like most spray painted projects, for ventilation purposes. This stuff goes on easy and thick, with dry time for second coat in an hour. When spraying, be sure to stay about 12 inches away from the object your spraying and keep the can level. Make sure to shake it every so often to prevent clumps. This stuff sprays great and I’ve never had a problem with it.
 For an even coat, start spraying before you actually hit the object and continue until after you’ve went past. This will give you a nice, even coat.
This is how the planter looks after only one coat. Pretty solid, right?
 After an hour of dry-time, I applied a second coat and let that cure. Once that’s done, it’s time to add the time-worn wear because we want it to look aged and not fresh out of the factory.
A couple years ago, in haste I bought some cheap ceiling paint to use in my kitchen as a quick refreshing. Mistake. It was water and did nothing to refresh, only waste my time. However, because I work on furniture, it was the perfect consistency to white-wash my pieces for my shop, like this one.
 So grab some cheap ceiling paint, or flat white paint and your paint brush. (note: for a cup of flat paint, add 2 Tablespoons of water to thin)
Since most zinc pieces have oxidation that occur naturally, we want to replicate that in our piece. This tends to happen in the nooks and crannies and trickles down vertically. I started on the rim of my urn and worked in small patches. Brush on the paint, coating the section you’re working on completely.
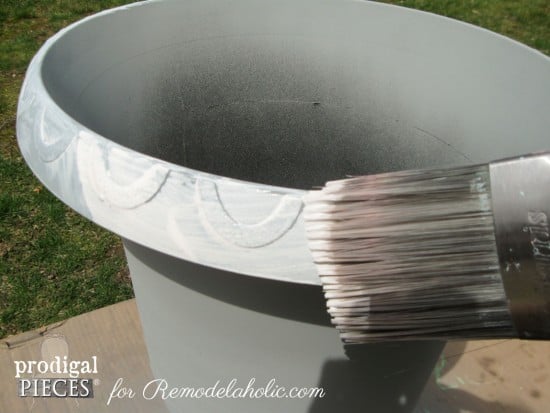 Depending on your temperature and dry times, you will need to quickly wipe most of it off with a dry rag, leaving some behind in rest in those crannies.
 For the rest of the body of the urn, take your brush and (again, working in small patches) brush vertically, so that it looks like years of rain have washed it and created this effect.
 Same as before, just grab your rag and wipe vertically and also pounce to create that patina we’re after.
 After all is done and your project has cured for a couple of hours (allow 24 hours for complete curing), you can fill your planter. Because I live in the brisk northeast where the snow just melted, I don’t have much to choose from as far as flowers go, but I was able to snatch these perennials to fill my urn.
 Time to fill it up! Most of these plastic pots have drainage holes, but I like to add broken clay pots or rocks to the bottom to promote better drainage and prevent soil loss.

 After adding some potting soil and the plants, my zinc beauty is ready for display.
I think we achieved the time-worn look and have created an eye-catching piece that looks as if it cost a hundred bucks.
 With the base coat of zinc, and addition of the whitewash, those embossed details being drawn out, it’s now a welcome addition to my garden.
 The plants will grow and spill over the edge later on, and may even outgrow my urn because they’re meant to be ground cover, but they’ll stay for now until warmer weather comes and more is available.
Aren’t those details spectacular?
 Now go on and give this finish a try and show me what you do with it. (and don’t forget to stop by and visit me too!)
If you like this technique, you can also see how I’ve used in in my garage door tutorial here.
 Got questions? Just let me know and I’ll be happy to help! Until next time…
————————————–
Paint is a faux-ers best friend!
See more ways to use paint to give you a great-looking (but fake!) finish like these:
weathered oak (a la Restoration Hardware)


or another method for getting an antique zinc look


Just a FYI when I do planters and need filler I no longer use rocks cause it makes them SO heavy.. I use left over Styrofoam that was used in shipping or where ever. I just save it and cut it into smaller usable sized and fill the bottom with that. I keeps the planters lighter and keeps the Styrofoam out of landfills. It does nothing to harm my plants or planters.. Have done it for years..
Hi Dayna! Yes, I typically do the same, but this planter was too lightweight and tippy. :o) I hope you enjoyed the tutorial!
Great idea. However I’d add one more step and that would be to spray a clear coat over your finished work to seal in the paint to prevent chipping and fading. To keep the flat look I’d go with a flat clear coat.
You could do that if you wanted, but I have not found it necessary in my projects. :o) Thanks!
Larissa I am so thrilled that I found you because this is exactly what I have been wanting to do to a large garden urn I have!! Your project turned out perfectly!!
xoxo
Karena
Yay, Karen! So glad you like it and I would love to see what you do with it. 🙂 Have fun!
Hi, I love your project and will be mimicking it this weekend, but I am wondering about it being outside in the wet West Coast for the winter. Will it last or does it need some sort of protection?
Thanks so much!
Hannah