Get organized! See our favorites in the shop

Remodelaholic

DIY tutorials, Woodworking plans and more.

FREE BONUS: Kitchen Organization Boot Camp
  • Home
  • About Us
    • About US
    • Contributors
    • Facebook
    • Pinterest
    • YouTube
    • Instagram
    • Disclosure and Advertising
    • Contact Us
  • Shop
  • Project Ideas
    • Our Houses
      • Birch House (current projects)
      • Canyon House
      • Park House
      • Downing House
      • Logan House
    • DIY Project Plans
    • All projects
    • Barn Door Baby Gate
    • Dutch Door
    • Framing A Wall Mounted TV
    • Indoor Playhouse
    • Beach Themed Living Room Design
    • Chicken Coop Building!
    • Computer Desk
    • Computer Desk Plans
    • Custom Newel Posts and Stair Remodel
    • Family Room Sneak Peek
    • Headboard Tutorial
    • Living Room Progress
    • Mood Boards
    • Scrabbled Family Names
    • Pets
  • Design By Room
    • Bathrooms
    • Landscape
    • Kids Bedrooms
    • Kitchen
    • Living Rooms
    • Laundry Rooms
    • Master Bedrooms
    • Mood Boards
    • Office
  • Holiday
    • Christmas
    • Halloween
    • Patriotic
    • Easter
    • Fall
    • Saint Patrick’s Day
    • Thanksgiving
    • Spring
    • Valentines Day
    • Winter
  • Crafts
    • Printable
    • Art
    • Paper Crafts
    • Kids
    • Fabric Crafts
    • Decorate
  • Recipes
    • Appetizers
    • Beef
    • Beverages
    • Breakfast
    • Chicken
    • Desserts
    • Dinner
    • Fruit
    • Healthy
    • Holiday
    • Lunch
    • Main Dishes
    • Salads
    • Sandwiches
    • Sauces
    • Seafood
    • Side Dishes
    • Soup
    • Vegetables
  • Videos

Easy Rolling DIY Lego Table

Written by Tasha

  • Facebook
  • Twitter

GENIUS! Easy, DIY lego table using a basic Ikea storage piece. Full tutorial by Designer Trapped in a Lawyer's Body for Remodelaholic.com!

Hello Remodelaholics!  I am Tasha and I blog over at Designer Trapped in a Lawyer’s Body about thrifty DIY renovations, home projects and crafts.  You may remember some of my other contributor posts about how to transform an outdated, cultured marble vanity with concrete or how we made our own screen door that is prettier AND sturdier than what you can buy in a store. Well, I am back with another stylish DIY project that will help you keep your kids’ Legos organized!  Can I get an Amen?!

We have been on a mission to get our girls’ playroom organized for the past several months.  In March, I shared how we built industrial bookshelves and desks for our twin girls’ playroom, which has helped us a great deal already!  But we still have many other toys to store and organize.  There are loads of great ideas out there, like these 50 Smart Toy Storage Solutions and loads of chic storage options to choose from.  But we weren’t finding the perfect Lego storage for our girls, so we decided to create our own!

How to Build a Rolling DIY Lego Table

Materials Needed:

Contains some affiliate links for your shopping convenience. See our full disclosure policy here. 

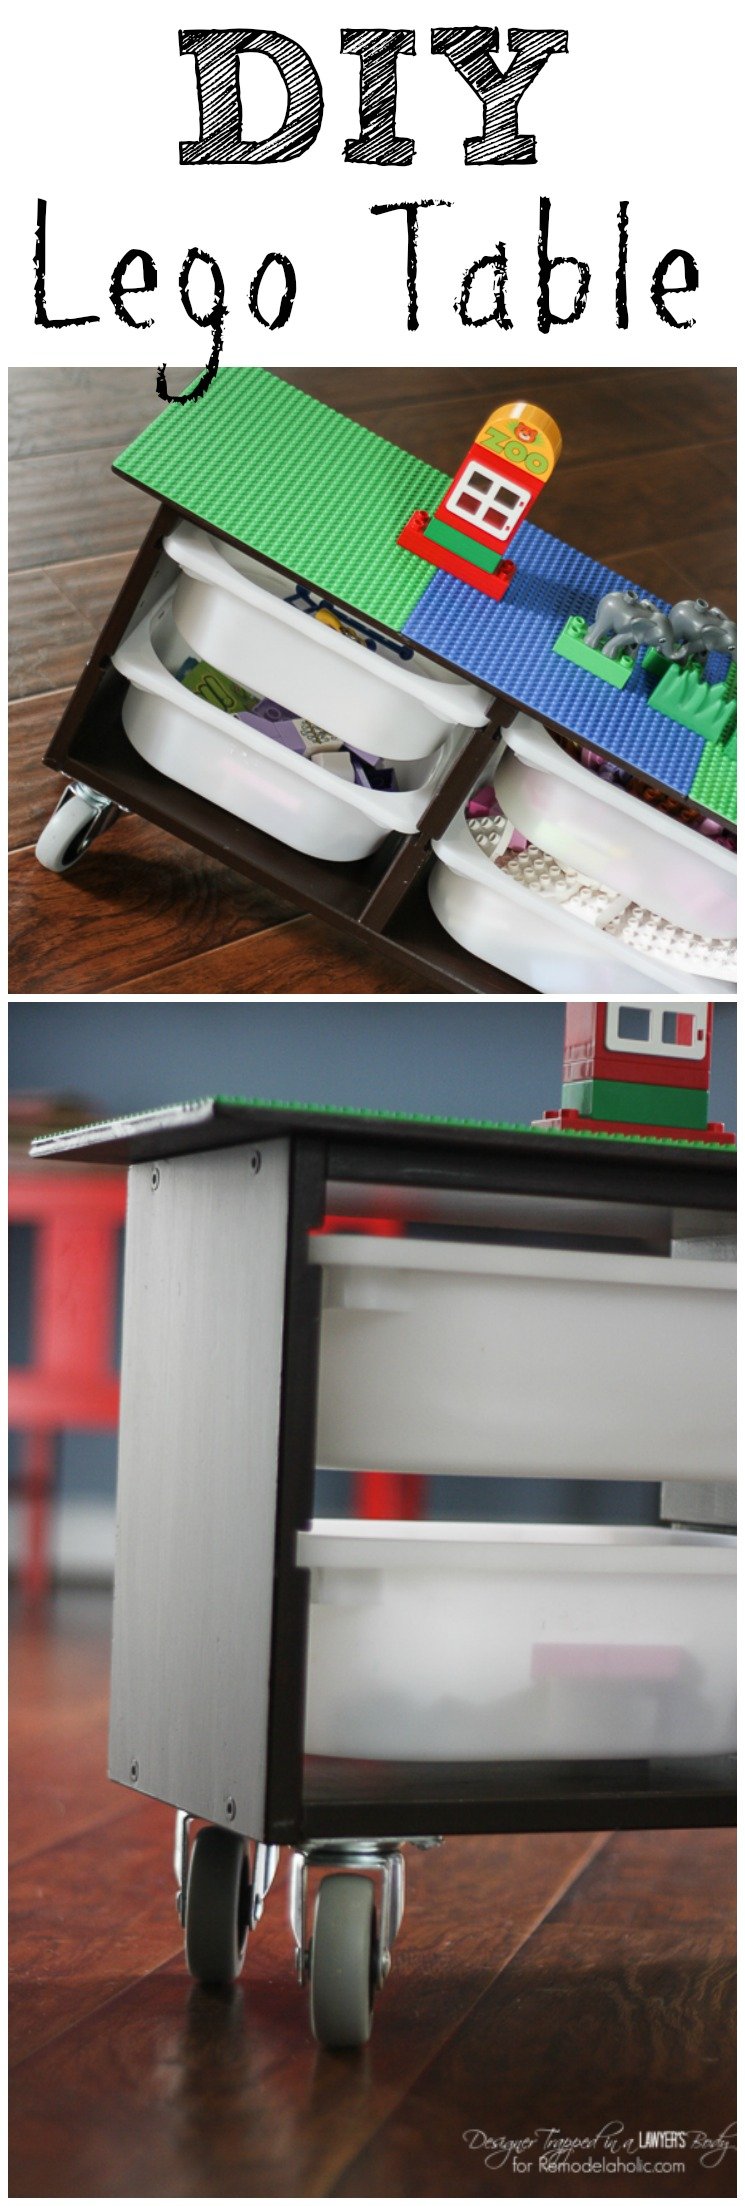
  • Ikea Trofast wall storage unit
  • Gel wood stain {if desired)
  • 1/8 inch plywood, cut to size
  • 4 Lego base plates (available on Amazon)
  • 4 casters {we used 3 inch casters}
  • Multi-surface glue

Steps:

1) If desired, stain your Trofast wall storage.  We wanted a darker stain, but if you don’t, you could certainly skip this step!

2) Lay your base plates on your piece of plywood and draw an outline with your pencil.

GENIUS! Easy, DIY lego table using a basic Ikea storage piece. Full tutorial by Designer Trapped in a Lawyer's Body for Remodelaholic.com!

2) Cut your plywood to size.  We were using scrap plywood, so we used two smaller pieces of plywood, instead of one continuous piece.  We did not measure.  We simply used the 4 Lego base plates as our guide, since we planned to glue the base plates directly on top of the plywood.  PS- I am proud to report that I am getting over my fear of the table saw 🙂


GENIUS! Easy, DIY lego table using a basic Ikea storage piece. Full tutorial by Designer Trapped in a Lawyer's Body for Remodelaholic.com!

3) If desired, stain the BOTTOM side of the plywood.  There is no need to stain the top that your base plates will be glued on.

4) Attach your casters to the bottom 4 corners of the unit.

GENIUS! Easy, DIY lego table using a basic Ikea storage piece. Full tutorial by Designer Trapped in a Lawyer's Body for Remodelaholic.com!

5) Attach your plywood to the top of the Trofast unit.  Be sure to center it, since it will overhang the top and sides.  You get extra credit if you do it in your pajamas, like I did.  {Quick explanation- most of our projects are completed at night after our girls go to bed, hence the PJs.  #yougottadowhatyougottado}.

GENIUS! Easy, DIY lego table using a basic Ikea storage piece. Full tutorial by Designer Trapped in a Lawyer's Body for Remodelaholic.com!

You can see in the photo below why we stained the bottom of the plywood–the overhang portion is visible from underneath.

GENIUS! Easy, DIY lego table using a basic Ikea storage piece. Full tutorial by Designer Trapped in a Lawyer's Body for Remodelaholic.com!

6) Glue on your base plates.  We used Elmer’s ProBond Advanced and it worked like a charm.  Place something heavy on top and allow it to dry overnight.

GENIUS! Easy, DIY lego table using a basic Ikea storage piece. Full tutorial by Designer Trapped in a Lawyer's Body for Remodelaholic.com!

That’s it!  How easy is that?  And I have to tell you, it keeps our girls’ Legos nicely organized.  Best of all, they are playing with their Legos much more now!  They love moving the table around to different areas of the room and are actually EXCITED to separate the Legos by color/kit.  Win!

What do you think of the finished product?

GENIUS! Easy, DIY lego table using a basic Ikea storage piece. Full tutorial by Designer Trapped in a Lawyer's Body for Remodelaholic.com!

GENIUS! Easy, DIY lego table using a basic Ikea storage piece. Full tutorial by Designer Trapped in a Lawyer's Body for Remodelaholic.com!

GENIUS! Easy, DIY lego table using a basic Ikea storage piece. Full tutorial by Designer Trapped in a Lawyer's Body for Remodelaholic.com!

GENIUS! Easy, DIY lego table using a basic Ikea storage piece. Full tutorial by Designer Trapped in a Lawyer's Body for Remodelaholic.com!

I would love for you to head over to my blog, Designer Trapped in a Lawyer’s Body, to explore some of our other thrifty renovation projects, like how we totally transformed our kitchen for less than $700 or how we created a STUNNING laundry room for only $71 out of pocket.  Our laundry room makeover includes painted vinyl floors {yep, you can PAINT vinyl floors!}.  You will also love how I covered a plain wood chair with fabric and Mod Podge for a high style look on a budget.  I hope to see you over in my corner of blog land soon!

vinyl floors 1 700 kitchen mod podge chair


Want to save this project for later?  Be sure to pin it!

GENIUS! Easy, DIY lego table using a basic Ikea storage piece. Full tutorial by Designer Trapped in a Lawyer's Body for Remodelaholic.com!

Ready to organize more kids’ toys?

Try adding casters to a basket for kid-friendly storage (tutorial from The Heathered Nest on Remodelaholic)

diy wire baskets with casters and chalkboard labels - The Heathered Nest on @Remodelaholic

or use clear lidded canisters to keep art supplies visible but not cluttered (like Pretend Fancy)

organizing kids art supplies

and your little artists will love this chalkboard table — and the alphabet block stools open for storage, too! Toolbox Divas shows you how to build it here.

Building Block Playtable Tutorial by ToolBox Divas for Remodelaholic

  • Facebook
  • Twitter
Remodelaholic is a participant in the Amazon Services LLC Associates Program, an affiliate advertising program designed to provide a means for sites to earn advertising fees by advertising and linking to amazon.com. Please see our full disclosure here.

Published: May 14, 2015Filed Under: Contributor, Furniture Building Projects and Plans, How To, Kids Bedrooms, Tables, Tutorials Tagged: ikea, ikea hack, Play Rooms, playroom, toy storage, toys

About Tasha

Hi! I'm Tasha author and creator of Designer Trapped in a Lawyer’s Body, where I blog about thrifty DIY home renovations, simple crafts and tips for a happy household. Join me as my firefighter husband, 3 1/2 year old twin girls and I renovate our outdated home one room at a time. We are living proof that you can create your dream home on a budget even when you lead very busy lives!


free email bonus

Kitchen Organization Boot Camp

Is your kitchen a zen paradise? It can be. I'll show you how.

Previous Post
Try These 25 Quesadilla Recipes for Lunch or Dinner
Next Post
10 Creative Ways to Organize Kids’ Art and Schoolwork

Comments

  1. Vineta says

    May 14, 2015 at 2:56 pm

    This would be perfect for our son! We’re running out of Lego storage space fast, and this would be a great way to corral all those loose pieces and random creations.

    Reply
    • Tasha says

      May 15, 2015 at 10:24 am

      It is working fabulous for our girls, Vineta! Best of all, they play with their Legos even more now than before!

      Reply
  2. Seng says

    May 14, 2015 at 9:53 pm

    Love this! Now the kids have no excuse not to put up their legos 🙂

    xo,
    Seng
    https://www.sengerson.com

    Reply
    • Tasha says

      May 15, 2015 at 10:23 am

      Thanks so much, Seng!

      Reply
  3. Tammy says

    March 23, 2016 at 10:26 pm

    This will be great for my grandkids. Where can you get the Lego plates?

    Reply
    • Cass says

      March 30, 2016 at 10:22 pm

      You can check a local toy store, but I love Amazon! They have “compatible” base plates, which aren’t made by Lego but have worked well for us and are so much less expensive.

      Reply
      • CARRIE says

        October 6, 2020 at 12:40 pm

        I am curious how this has held up. I have 2 boys and at some point someone *will* sit or stand on it. I like this model because its shorter than the floor frames.

        Reply
  4. Amelia says

    December 16, 2020 at 8:25 pm

    I know this is an older post, but I just found it and love the stain you used! Do you remember the brand/color?

    Reply

Leave a Reply Cancel reply

We love hearing from fellow Remodelaholics, so let us know what you like about this and leave any questions below in the comments. If you have followed a tutorial or been inspired by something you have seen here, we would love to see pictures! Submit pictures here or by messaging us over on Facebook.
Recipe Rating


Hey there, I am Cassity! Nice to virtually meet you!

This blog is about DIY at its finest. We are obsessed with it and so are you, so while we're working and have nothing to show you of our own projects we show off yours. So submit your projects! More About Us…

Categories

  • Facebook
  • Instagram
  • Pinterest
  • RSS
  • Twitter
  • YouTube

Meet The Team

Privacy Policy

Remodelaholic is a participant in the Amazon Services LLC Associates Program, an affiliate advertising program designed to provide a means for sites to earn advertising fees by advertising and linking to amazon.com. Please see our full disclosure here.

© 2005-2016 Remodelaholic LLC, All Rights Reserved

  • Facebook
  • Instagram
  • Pinterest
  • RSS
  • Twitter
  • YouTube

Copyright © 2021 · Remodelaholic

  • Pinterest
  • Facebook
  • Twitter