Etta’s Pink and Navy Bed Nook
We’ve been chipping ever so slowly away at Etta’s Room, in between other projects. Last thing you got to see was the confetti drapes tutorial I made after getting the new windows (I still LOVE those new windows!!). But, I am feeling the stress of making anything actually totally happen, or I should clarify, actually finish this project! UGH! So while approximately 3 sides of the room are completely undone, I decided to clean up and make Etta’s bed nook look pretty! It’s the little things that keep me going.
I showed you the fabric I bought for the room a while ago, but it is still all neatly and nicely folded, cuz making something, even a simple something is TOO overwhelming for my schedule right now! You’ve heard of the straw that broke the camel’s back? Well, sewing something right now, feels much like an additional bail of hay, let alone one single straw… And I actually like to sew.
So, I have been shopping around for bedding, keeping in mind that (maybe someday) I will be in the right mood to make the little duvet cover/comforter that I had planned. (and maybe a few additional pillows, not that I need them, but I just can’t seem to help myself when it comes to limiting the number of pillows I have in a room, its a sickness.)
I found a few that I liked that were a little more patterned, but ultimately bought this adorable soft little coverlet, which was a decent deal for $50. bucks. (Why is bedding stuff so expensive?)

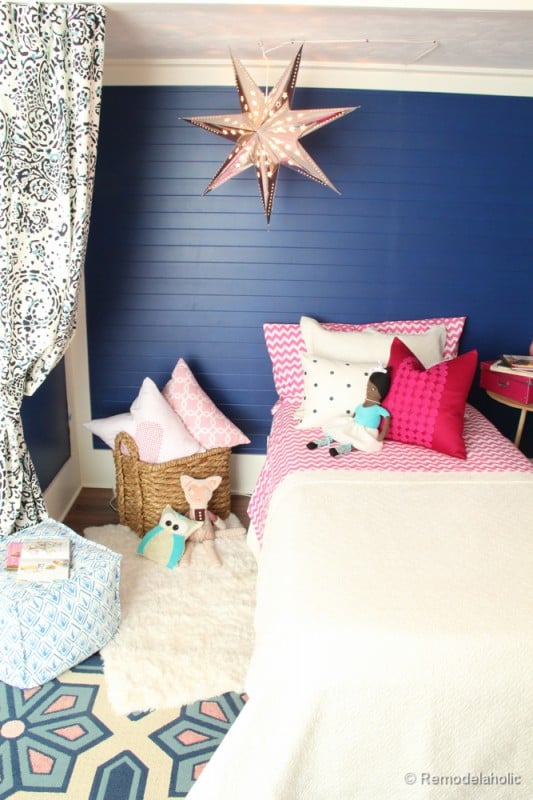
I was so relieved when it came because it is the exact color of the trim, so it matches perfectly!

The best part is that I set up the bed to photograph, and even see if the room would come together. I walked out to get something, and Etta went running into her room (she had been playing outside) she was yelling to the babysitter “I’M JUST GOING TO GET… (audible in take of breath, I could hear from the other room)” I walked in and she said really quietly, totally awestruck like she was in some sort of sanctuary. “This is cool… I really like it.” And that ladies and gentlemen, made this project TOTALLY worth it!!


Things I still need:
Headboard- I know that I just bought one for my bed, but I just am having a hard time considering spending the money on another one so soon. Especially since they basically cost the same as amount mine, which is kind sized. And I can’t seem to find one that I really like. So I think it will be a DIY project (which means, be looking for me to actually finish that right before we move, I kid, well, actually I wish I were kidding, how unfortunate)
Nightstand- I just used one of those $3.00 tables from Walmart.
Drapery Rod- Confession: I pinned the drapes up to the trim with pushpins. I need a real rod of some sort. We will have to see how I do this, cuz I really don’t want to be looking at a rod. But I want the option for the girls to close it if they want to create a little house, and Etta has already asked about 30 times to close here drapes in just the first hour.
Art- I need to add some art to the walls, I actually have most of what I plan to hang up, but I don’t want extra holes in the wall, and since the headboard is not accounted for, I might as well wait.
So what do you think of our little girl’s new bed nook??
Cassity Kmetzsch started Remodelaholic after graduating from Utah State University with a degree in Interior Design. Remodelaholic is the place to share her love for knocking out walls, and building everything back up again to not only add function but beauty to her home. Together with her husband Justin, they have remodeled 6 homes and are working on a seventh. She is a mother of four amazing girls. Making a house a home is her favorite hobby.


What a beautiful, sweet room. I bet she loves spending time in there. You did a fabulous job.
Thank you Brandi! We are both having fun with the room! Just a bit more to finish!
Love the nook–actually, I love the whole room thus far. I’m trying to figure out, however, what you did to the walls in the nook? Are they paneled? Planked? Paint treatment? Have you or will you do a post on this part of the room? I searched and couldn’t seem to find any. I think it would be perfect to do in my itty, bitty guest room.
Kelly, I haven’t done that part of the room… I got to excited about the fun stuff! I will probably show it in a round up reveal post at the end, but to hopefully answer your question, the back wall has a “v” groove 4′ x 8′ panel hung horizontally. the side walls, don’t have the panel and are just painted the same color as the blue.
Thanks for the quick reply! Very helpful
How sweet and perfect is that?! Love that blue wall and I am going to paint some of our tongue and groove. I bet your little is loving this, too.
Jake’s a Girl
She is, and it make me happy that she is liking it so much!
I really love the pink chevron sheets! So adorable. Oh, and I think that is the same rug we just bought for our family room minus the pink.
Yes, I painted the pink on the rug, so that it would match the room better, so I bet it is the exact same rug! It was a super great deal! I am really happy with it. (the sheets are from Pottery Barn)
it looks amazing!!! love the colors and style! i love me a good nook! 🙂
Thanks Cassie! I am really excited about it too! So fun!
Re: curtain rods. Have you thought about using a spring tension rod? I have used shower rods if I wanted something bigger around. 🙂
Cathy, the only concern that I have with a tension rod is that these little girls are SURE to pull on or worse climb up the drapes when I am not looking! (not that they are wild or naughty, but just that they are little kids, it is bound to happen) Also the space is just over 8 feet, and most shower tension rods are only about 6 feet, so I will have to see what other options might work! I will keep you guys posted.
I’ve seen lots of odd shaped /sized curtain rods made of conduit pipe and attached to the ceiling (or wall) using the conduit attachments. Makes for a much stronger rod and for a really great price.
Adorable room . Love the navy. Where did you get the chevron sheets?
Carol, Thank you! I got the sheets at Pottery Barn just a few weeks ago!
It looks great!! I love the blue and pink combo!! So pretty!!
Thanks Crystal, I am really loving it too, it is girly but different!
Cassity, this room looks phenomenal! Congratulations – I love every detail, from the light to the doll to the chevron sheets. I wish you’d come and do our new apartment in NYC – I have the decorating skills of a blind toad. Will certainly be looking through your work for inspiration!
I laughed out loud at the blind toad comment! I am sure you are not that bad!
We all need inspiration by the way. I have about a million pins on Pinterest and I use them to glean ideas all the time! I believe as long as you can find examples that you love and incorporate them into your own home, that the process of recreating a look and personalizing it is really creating! The thing that truly counts in the end is being happy with your space and being true to what you like whether it is in fashion or not! I think you can do it!!!!
So cute Cassity. I wish I had a space for something like this in my home. I especially love the coverlet – I’m considering something similar for Charlotte’s room.
Now, curtains…is the ceiling recessed (hard to tell from the pics). If you don’t want a visible rod, could you possibly hang the drapes from a ceiling mounted track inside the actual nook so they appear to be falling from behind the little bulkhead? Alternatively, could you attach a strip of trim to the front of the bulkhead and hide a ceiling mounted track behind it? Something like a ripple fold (s-fold) would have a lovely waterfall-like drape and lend a gentle softness.
I think that nightstand is kinda cute. It would look pretty cool with paint-dipped legs.
Sorry for all the suggestions…you know me, I love tackling a good decorating dilemma – just can’t help myself 🙂
Kristine
Kristine! I love the paint dipped idea for the nightstand, that really would be cute! The ceiling isn’t recessed unfortunately, but I will have to see what we can do!
By the way, I saw your office reveal today! AMAZING! I LOVE the desk you guys built and I absolutely LOVE the art! and just so you know, I will take all the help/advice i can get from you because I truly LOVE your style! Thanks for the ideas!
Thanks Cassity.
Hmm, maybe the trim idea could work. If you attached a piece of plain or decorative moulding spanning the cavity you could hide a track behind it. It would act as a streamline pelmet of sorts with the drapes recessed in behind it. You could keep it very plain and paint it to match the ceiling or use something decorative and even paint it a poppy colour!
Here is a pic of kinda what I mean:
https://www.houzz.com/discussions/338327/What-is-the-width–height-of-the-recessed
Very cute. Love the chevron.
Thanks!
It’s funny that I came across this today because I am trying to decide colors for our first born baby’s nursery (I am due in January!!) and I think either way, boy or girl, I want to incorporate navy blue. I am thinking navy blue and orange for a boy and nay blue and coral (or like pink or light purple) for a girl. I really really really want to paint the walls a nice gray color either way and do the navy blue and whatever color as accents but the Hubs isn’t liking the gray wall idea. I need to find a way to convince him…
Anyway, I love this room! My room now isn’t even that nice!! =] I was going to mention that Target has these “loft style” drapes that are really streamline with no finials so you wouldn’t notice a rod as much as you would with a normal curtain rod. You should check them out!
Thanks! I will go to target and see! I love the sound of your babies room ideas so far! I am sure it will be lovely!
could you use a curtain wire, like from IKEA?
https://www.ikea.com/us/en/search/?query=DIGNITET+Curtain+wire
it’s low profile, and holds a lot of weight, so the girls could pull pretty hard on the drapes and they wouldn’t fall.
This looks perfect to me! I think I will do something similar to this!
My daughter is turning 2yrs. old but still sleeping with us. But, we are planning on renovating our guest room into 2 little rooms and that hanging curtain gives me an idea haha Thanks Cas! Your little girl’s room is so nice and clean I love it, except that there’s no toys or books yet or maybe there’s a separate place for that? What do you think? and I would actually do the same thing with our sweet girl’s room just cute, comfy, clean and stylish!
As far as the curtain rod, you can use rope or cool cording. I was too cheap and lazy to buy a rod for my apartment but needed to hang some sheer drapes. There are blinds but there is a somewhat large gap on the sides of the window. Since I am on the 1st floor, I thought I would invest as little as possible in this simple DIY project. I used some old ribbon and just used some hooks to tie it. THe drapes are lightweight but do sag the ribbon a bit. but I kind of like the look. They also close very easily.
That is an interesting idea! I think I am leaning toward a cord of some type, I might just do a tight metal cord… we will see!
I love what you did with your daughter’s room! Where dd you get the star light?
Thanks Ellen! Cassity bought that at Ikea. It’s cool huh!
Does the bed fit in the closet like an enclosed bed? Or is it supposed to be perpendicular to the closet like in the pictures.
Gabrielle, the bed does not fit in the closet like an enclosed bed. Cassity wanted to set it up this was for now for the layout of the room. We are planning however to redesign how it lays out in the future more like an enclosed bed, because the space is big enough. Thanks for asking about it.
You could attach trim or moulding with L brackets to extend the existing trim and hide the rod behind it. You could also paint a headboard on the wall or even hang textured or patterned wallpaper to create a headboard! Then frame it out with trim. You could even apply wallpaper (or fabric) to a piece of mdf for the headboard in any shape you want.
Thanks for the tips!
I LOVE this! It is so perfectly adorable, and my dream when I was small! You’re so creative. 🙂
Can you tell me where the rug and sheets are from? Thank you!