Stylish and Simple DIY Sofa Table
It can be hard to find a console or sofa table that is just right for your home, am I right? The style, the size, the color — there are lots of variables, lots of great options, and lots of different ways to decorate it! When I saw this simple sofa table that our guest whipped up, I just had to feature it. It’s a great project for any DIYer, especially if you’re just beginning and need a simple building project to earn your wings.


I love X style furniture – it’s a classic and stable design, and you can make it fit any style that you have in your home just by changing materials or color. Or you can mix it up a little bit and use just half an X (otherwise known as just a diagonal…) like Justin and I did for our computer desk:

Check out these other DIY x-base furniture pieces that I love:
 DIY X-Leg Ottoman| Home Stories AtoZ
 Antigua Round Table Plans | The Design Confidential
 Rustic X Furniture Series | Ana White
And now, here’s Alicia to show you just how simple it is to build this sofa table:
Simple DIY X Sofa Table
by Alicia of Thrifty and Chic
Thank you, Cassity, for letting me steal the show for my 15 minutes of fame 🙂 Don’t you just love her projects! I’ve been a Remodelaholic lover for years and years now and they keep getting better and better.
I guess I should introduce myself, I’m Alicia, voice behind Thrifty and Chic.

Like most of you, I’m sure, I love to create and decorate! I usually focus on projects like building furniture and easy….and cheap :)…..DIY projects for your home. I’ve been on a kick lately of changing up the walls in my house, like this planked wall in my front room. I am in love with it…well, as in love with it as you can be with an inanimate object 😉 lol. I also just redid my guest bathroom for under $60…and the board and batten in there was only $11. I’m all about decorating on the cheap…or lets class it up and say ‘being thrifty’. That’s also why I choose to build my own furniture. It’s a great easy way to change up a space without spending a lot of money…just using a little bit of elbow grease. My favorite furniture updates to date are my tree stump coffee tables (no building required obviously on this one, even better 🙂 ) and my sofa tables. You can find all my furniture plans, from farmhouse tables to benches, here on my blog!
So you see, I have a problem. I love building furniture, but have no place to put it anymore. So, the pile in my basement of unused furniture keeps getting bigger and bigger 🙂 I couldn’t help myself though, I wanted to make this sofa table. But luckily, my mom was in need of a sofa table…so at least I didn’t have to put my old one in the basement for this build 🙂

- 2 1×10 or 1×12 pine boards (depending on how wide you want it)
- 2 1×6 cedar planks
- 2 brackets
- Drill/Screws
- Hammer/nails
- Wood glue
- Stain/Paint
- Polyurethane/Polycrylic
Step 1: Cut your pine boards to size. For mine, the top piece was 54″ and the two legs were 28″

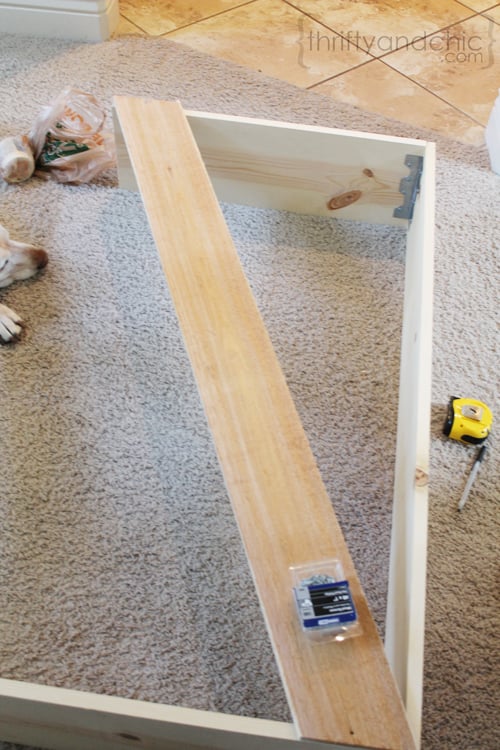
Step 2: Grab your bracket and screw into the shorter edge of one of the legs. Make sure that the end of the bracket is flush with the edge of the wood.

Step 3: Now put the top piece on the ground, and place the leg piece and bracket on top of it. Make sure the outside of the leg is flush with the edge of the top piece. Screw the bracket into the top piece.

Step 4: Do Step 2 and 3 above with the other leg.
Step 5: Lay the table on the ground, and grab your cedar boards and place them on top of the sides. Make sure the bottom corner of the board is lined up with the bottom corner of the leg, and the top corner is lined up with the top corner where the leg and top meet. Get underneath the plank and mark the angle. My angle was 22.5 degrees. Cut both sides of the board at this angle. I’m not a math genius, but I think this angle might change depending on the height and length you make the table.
Step 6: Secure the cedar plank to the table using wood glue and some nails.

Step 7: Repeat Step 5 and 6 on the other side with the second cedar plank.
Step 8: Stain or paint. I chose to stain mine a Dark Walnut.

I wanted to add some character to this. I love how white distressed furniture brings out the dark underneath, so I thought ‘why not do the opposite?’ I used a white stamp pad I got from the scrapbooking area and went over the edges and corners.

Step 9: Seal it up! Use Polyurethane if you stained it, or Polycrylic if you painted it.

I really like the contrast of the brown and white…it added just enough to make this piece pop.

To tie in the white distress marks, I put all white accessories on top.
Was this not the easiest project ever? If you don’t have a saw, even better!…just have the guys at Home Depot or Lowes cut the pine boards for you, and then go to their molding department and use the hand saw and miter box to cut the cedar. Less work for you 🙂
Total cost for this project if you need buy everything is about $20! (approx. $6 per 1×10 board, $2 per cedar plank, and $2 per bracket).
I love it, Alicia! Cheap and easy — so doable in a weekend! Check out what else Alicia has been DIYing over at Thrifty and Chic.


Love this idea, and I love the x design too. Hugs, Marty
I LOVE this tutorial! I’m actually even thinking of running down to the Home Depot and make this today– Seriously! I’ve been wanting a specific kind of soda table. … and this design is lovely with so much simplicity. Thank you for sharing this tutorial. (=
Love simple projects with big impact like this one! 🙂
HI, Love this idea and am hoping to complete it today. I bought the materials last night and it cost over 50 dollars to get all the material. Did I do something wrong. Just want to know for future projects, maybe I am buying more expensive material but lowes didn’t have many more options. thx
You’re absolutely correct Natalie, I purchased the supplies today from Lowe’s and my receipt topped $50 too. $2 cedar planks and $7 1″x10″? Maybe if they are 8″ long. Also, cedar plank does not come in 1″ thickness; only 3/4″ and 2″. Otherwise, Great project. I had fun making it
Why did you use two different types of wood? Why not all pine?
Thanks so much for this simple diy … My pooch loves to lie on the back cushions on the sofa so that she can see out of the window if we are expecting someone or while I am out … This plays havoc with pushing the cushions out of shape. This is the perfect solution. She can lie on this instead of the cushion & still see out of the window. She’s not so much of a ‘guard’ pooch, but ‘a meet & greet’ pooch … Cavaliers are wonderful, friendly pooches .. but the only way they could ever be considered for guard pooches, is if the sound of barking & jumping up & down for a pat & cuddle was considered a warning … 🙂 They would lick any burglar to death, than bite. I don’t think the word ‘bite’ is in their vocab … unless it’s in conjunction with food … 🙂
Pssst! If you have a kreg jig you dont need the brackets. . .probablymuchmore sturdyto boot. . Land a kreg jig is fabulous for any number of projects. . .
What abot an answer tothatquestion on prices?
Also had a thoughr: make two shorter ones at standard table height and put them underneath either end of a tabletop. . .or salvaged door. . .instant table for large gatherings (or large sewing projects), amd they can live side-by-side behind the couch the rest of the time.. .