How to Install a Pocket Door

What is a pocket door? And how do you install a pocket door? Learn the tips and tricks for installing a pocket door to save floor space from a traditional hinged door swing. An excellent solution for small spaces or awkward door areas.
For more small space solutions, try these: Tips to make a small space feel open, our Foldable Craft Table, and a Small space homework or office station.


Before we show you how to install a pocket door — let’s answer the most common question:
What is a pocket door?
A pocket door is a sliding door on a track inside the wall. Where a sliding barn door and the barn door hardware are on the outside of the wall, a pocket door and pocket door hardware are installed inside the wall and completely hidden.
Hidden doors are great solutions for small spaces and half bathrooms, since they save the floor space from a traditional hinged door swing, while still offering more privacy than a barn door. Pocket doors are also completely hidden when open, so they don’t require any adjustment to your wall decor either.
Related Reading: DIY Barn Doors and Barn Door Hardware

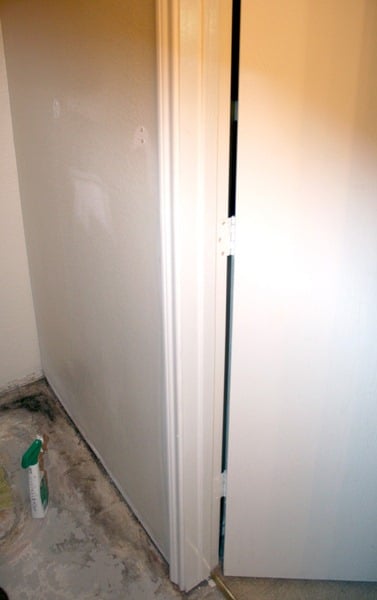
For our pocket door install, we had a half bath at the end of a hallway, with the door swinging out. You can see above how the door opened up into the hall and, with kids, it was just always open. Across the hall was our bedroom doorway, so it was blocked and the photos on the wall were only half visible.
Not the look and feel we were going for (especially with our new board and batten wainscoting around the house) and it was bad for the walking traffic flow, so a pocket door was the way to go for us. I HIGHLY recommend a prebuilt pocket door kit and here’s how the process goes:
How To Install A Pocket Door
*Remember, before starting any project that affects the structure of your home be sure to consult with a structural engineer or architect!*
Update March 2019: We installed another pocket door in our current home and made a video to show you the process! Check it out over on our YouTube channel:
Materials and tools for this pocket door frame installation
This post contains affiliate links. Learn more and read our full disclosure policy here.
- Pocket door frame
- Existing door or premade pocket door
- Pocket door handle, plug and/or lock
- Wood shims
- Utility knife
- Crowbar and/or reciprocating saw

Step 1: Choose the location
This nice blank wall with no electrical or plumbing inside made the ideal spot for a pocket door.
Step 2: Remove the existing door
Ahh… the difference it makes to take off the door! The great thing about installing a pocket door is that when you take off the existing door, you can see exactly how the space will feel when you are done: nice and open, no door blocking your path! 
Step 3: Hang drop cloths
Before starting any demo, put up some drop cloths to contain all. the. dust. (This drop cloth is hung in the room that shares the wall the pocket door is going into.)

Step 4: Remove drywall
The pocket door will go in the wall that is between the half bath and our master bathroom shower, so we cut out the drywall on the half bath side very carefully (We even kept it in one piece and reinstalled it! NO waste!). We scored the walls deeply at all the corners, then cut through the other sections and used a crowbar to gently pop the nails out of the back of the drywall (you can also use a reciprocating saw to cut the nails to get you started).

Here is the huge piece of drywall once removed…

Step 5: Remove studs
Next, we removed the studs and header where the door will go. (We did not build a temporary wall because this house has two parallel walls within 3 feet on either side. If you do not have those supporting walls, you may need to construct a temporary wall before removing the studs. Consult a contractor, if needed.)


We used a reciprocating saw to cut the nails so that the studs could be reused.
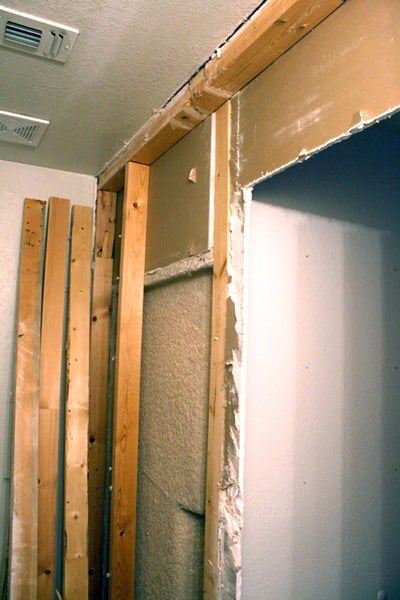
Step 6: Build a door frame
Justin started with a new header, and set the jack and king studs in place. (Jack means the one supporting the header and the king is the full height stud that sits outside the header.)

Step 7: Add the pocket door kit
Now that the door framing is in place, the easy part is adding the door kit. Basically, it is a slot with space for the door to slide into and a track on top.


Use shims to ensure it sits in the proper place.


Step 8: Prepare the existing door, if needed.
Add the track hardware to the existing door using the instructions that come with the pocket door kit. Also remove the old door knob and hinges and install a handle plug, if you need one.


Step 9: Hang the door
And the final results? Pocket door perfection… well, almost!

It reached perfection when we installed all the door trim and a nice coat of black paint to match the other doors!

Look how open and unobstructed the space is now! I hung new family pictures when all the wainscoting and trim was up… love it!)

If you want to see the first post about the 1/2 bath check it out here!
Please follow along with us on Pinterest, YouTube, Instagram and Facebook.
And find more great door tutorials, such as:
- How to remake a bi-fold closet door into a french door
- How to make a barn door from an interior door
- DIY Dutch Barn Door

Published Aug 22 2012 // Updated Apr 20 2020


Wow – that looks like a great change!
We have a hallway-style laundry room between the garage and the kitchen. I had to remove the door between the house and the laundry room because it was always in the way. I have wanted a pocket door there for so long! On one side of the door is the fridge, and on the other–cabinets with granite counter top on the kitchen and laundry side. It’s probably impossible, right? Maybe I’ll just have to have a contractor look at it. You did such a fantastic job that you have inspired me! Thanks for showing us all how to do it!
Heidi, It may not be impossible, but you would probably want to look on the fridge side first… but yes, talk to a contractor, to give you an eye to know how it can me done. It is SO worth it, we added another one a few years ago between our laundry room and kitchen. It never got in the way of the washer, and I could close it if I needed to hide the mess! Good luck with yours…
It looks so great! I personally love pocket doors, especially in small places. I wish I had some plumbing/wiring free walls near my master to install one.
I have been in the construction industry for most of my life and I am pleased to see that you noted asking an architect/engineer. You did, however, make one mistake. If you create a Drywall joint above the corner of a door or window, it will settle over time. This will cause cracks that will have to be taped, mudded, and repainted constantly. This can happen as often as every 3 months, though I have seen it take a little over a year. There is nothing that can be done to prevent the cracking except to remove the Drywall and move the joint past the door/window corner by about 3 inches. Other than that, everything looks great!
Jordyn,
THat is good to know. We actually covered that joint with molding all the way to the ceiling when we added the paneling treatment to the room… so it won’t show… But I haven’t posted about that yet! Maybe in a week or two! Thanks for your input though that is good to know, and wouldn’t be too hard to change.
Okay, so at first glance I thought this was about installing a ROCKET door. Now THAT would have been cool! (; Your pocket door is nice, too, of course. Hee hee!
I would like to see how to install an out side pocket door. One that will seal out the weather
I have no idea if they even make those…? Sorry i can’t help you out!
How much was the cost for the supplies for the pocket door?
it was around $100 for the kit. That does not include the door because we used the existing door.
Thanks for this — this is the exact door kit I’ve been looking at to fulfill my own pocket door desires! Great to know I don’t need to rip out both sides, just one. That alone resolved a huge question. Thanks so much!
You are so welcome! Please send us a pic when you’re done — we love seeing projects!
Great work! The header is extremely large. Must be load bearing? Did you support the wall somehow when you replaced the header?
I just continued the same header height that was their before. It was not a bearing wall, but I would rather over build than not. If it was a bearing wall you would have to build a temporary wall to support the load during construction.
Beautiful work. Thanks for walking through the process. Even have all the tools listed and pictures too. Awesome work. Thanks.