Build a Budget-Friendly Industrial Shelf Using PVC Pipe

How does the price compare? A 10-foot length of pipe costs between $4 and $20 (for electrical conduit up to copper, black, and steel pipe) and each flange/fitting will set you back around $2. Compare that to around $2 for 10 feet of PVC pipe and 50 cents for each joint (or less if you buy in bulk), and the savings add up substantially! (The prices may vary a bit geographically, but across the board, PVC is nicer to your budget than metal pipe, and the savings more than offset the cost of the spray paint!) Here’s Corey to show you how to create an awesome, custom industrial shelf without using up your kids college fund:
DIY Industrial Shelf Using PVC Pipe
by Corey of Sawdust 2 Stitches
Hey all, this is Corey visiting from “Sawdust 2 Stitches”. I am quite certain I have a problem… You see, I will look at a space and start to brainstorm ideas. Innocent enough, right? Well, the only problem with an innocent brainstorm is that it typically turns into a full scale, category 5, hurricane. Undoubtedly, I will be up to my elbows in paint at 3 a.m. (If you are nodding your head in agreement, take comfort in the fact that you are not alone.)
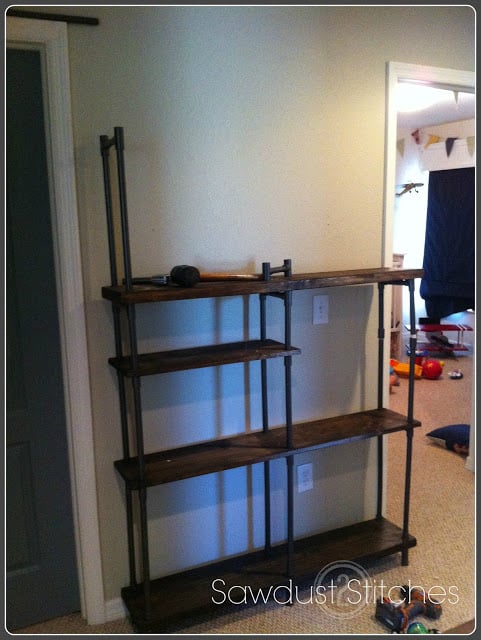
I was sitting on the floor, staring at this wall. Not exaggerating. (If something bugs me, I will sit and stare at it until I figure out what is “off” and then come up with a solution.)

Granted, this space wasn’t that bad, but it wasn’t great, it was just, blah. It lacked the “wow factor”.

Gorgeous right ? Well, for $5,998.04 at “Nuevo Living” it better be gorgeous! (Can you believe that is the “Special Price”?) Since I don’t just have that chunk of change collecting dust, I needed to find an alternative solution.
At that particular point in time I had been on a little bit of a P.V.C. pipe kick and had some leftover material from my “Light Fixture” and “Bed Canopy”. So, I marched downstairs to the garage and returned with my bucket of PVC. After playing with a few different possibilities, I was able to create some dimensions I liked. The rest is history. Right around 3 a.m. I was crawling into bed with this awesome shelf sitting in my upstairs hallway.

So if you have a “problem area” this may be just what you need, and here is what you will need to do it:
- Rubber Mallet
- Sand Paper
- Saw (I would suggest a Miter Saw)
- Drill
- 1″ Paddle Bit
- Sander (Suggested)
- Spray Primer
- Metallic Spray Paint
- Stain
- 2×10 wood planks (Amount varies by project size)
- 3/4″ PVC pipe (Amount varies by project size)
- “T” PVC Joints (Amount varies by project size)
P.V.C. pipe is AWESOME. Why?
- It’s cheap!
- Adaptable to nearly any space or design.
- Again, it’s cheap! (In my book that should count twice.)
Overall this is a fairly inexpensive, easy do-it-yourself project!
Bad news? You will need to create your own personal blueprint to accommodate your space.
This project is about 75% prep work…
Step 1: Think it through
Take the time to map out your dimensions! Unfortunately the whole “measure twice, cut once” logic applies. Once dimensions are established you can get started!
Step 2: Sand
Using a piece of “fine” grit sand paper scuff up the entire exterior of the PVC pipes, joints, and elbows.
Step 3: Cut
Using a miter saw cut the PVC down to predetermined measurements.

Step 4: Prime
I began by putting together my brackets. (It’s easier to spray them this way.) When priming I HIGHLY suggest using a gray spray primer. It quickly and evenly coats the pipe. Added bonus: Since it is already primed a darker color, it will make top coating much easier.

Step 5: Paint
I used Rustoleum’s Oil Rubbed Bronze. (Remember several light coats, as opposed to one heavy coat. This way you avoid drips!) Next, exercise patience and let it dry COMPLETELY.

Step 6: Prep Wood Planks
While the PVC pipes are drying, get started on the wood plank shelves.
For the shelves I used 2×10’s, in varying lengths. (You will need to adjust the length of the shelves to fit your own needs.)
I used a 1″ paddle bit to drill holes that would allow the PVC to fit through it.

Step 7: Sand and Stain Wood Planks
Sand the boards and then stain them. (I used Jacobean by Minwax.)

Step 8: Assemble!
This was my favorite part, assembling the puzzle! This is when your blueprint will come in handy.
Slowly but surely it started to come together. Might I suggest using a rubber mallet? Sometimes making the pieces fit together required a little “finesse.”
Final step:
Breathe easy, you’re done! I love that it is totally and completely customized! It creates that old-meets-modern feel of the industrial pipe shelving for a fraction of the cost!


So step back, open a can of cold Diet Coke and admire your new shelf!
Take luck, Corey
———————————————
Amazing, Corey! Such a great way to get the look while saving some cash.
Head over to Sawdust 2 Stitches to check out Corey’s other projects, such as her industrial-style suspended shelves, $4 faux metal industrial signs, crib mattress porch swing, or the awesome indoor fort she built for her boys! And you Remodelaholics will love the space she calls her “craft room” — go pay her a visit!
READER FEATURE: Uncookie Cutter was inspired by Corey and built an industrial PVC shelf to work as a mantel on her brick fireplace wall — and it hides her TV cords, too!

Looking for more ways to create the industrial look on a budget?
Pallets and reclaimed wood are a good place to start:


And Just A Girl teaches you how to get that Restoration Hardware wood finish!

Browse around the hardware store (or craft store) for supplies like L angles

chain


diamond plate panels

electrical conduit (the cheapest metal pipe material)

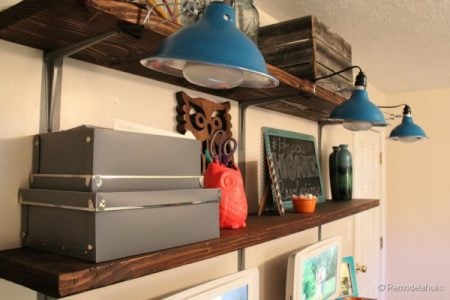
or industrial style lights like we attached to our rustic wall shelves in our office organization makeover.
And don’t forget to watch for a good upcycle candidate, like this music stand tripod lamp!


Hi Corey, thanks so much for this awesome idea! I’m new to blogging and have a new home that new a lot of “love”, haha. I really love your site and you are a real inspiration. Please check out my version of your shelves and let know if I gave you the correct credit that is due. I’m still learning and would love to know if I have done it correctly. Thanks so much! https://uncookiecutter.com/2015/04/diy-faux-industrial-shelves/
Hi Corey! Love industrial shelves, and I love using PVC pipes to make it more cost efficient! I have a design question (more like of what your opinion would be). What would you think of doing industrial shelves with PVC pipe and plywood? I can’d decide if it would look good or not. Thanks!
What did you use as caps for the tops and bottoms? Could wheels be used for the bottom instead? I noticed all of your segments are short, as if there is a different segment between each shelf. I was thinking about using this idea to make some shelving for my kitchen. Do you think this would hold up a microwave? What would I need to do to make the shelves deeper?
Thanks for inspiration and the feature Remodelaholic and Corey!! They are holding up well and we love them!
You’re welcome and thanks for sharing your version, April!
Can you combine PVC and galvanized steep pipe? I know it sounds weird, but I have a wall template in my head for customizing our family room wall, but the problem is the 200+ lb. aquarium. I know it will need more than 2″ PVC. Thanks!
Love these shelves!! Do you need to use some kind of adhesive to adhere the pipe to each individual joint?
How sturdy is the PVC, not sure how much weight they will hold?
I didn’t see any mention of pvc glue being used, so I’m guessing you relied on friction to hold the pipes together? In several places, the shelves were held up by nothing but an end cap. In your setup, there are long pieces of pipe used with no cross-bracing. It wouldn’t take much to rack the shelving and have the entire construction come down or for a shelf to let loose on one end. This is why the original you referred to used metal pipes. At the very least, all joints should be glued, and the units attached to the wall halfway down, along with each upright attached to the wall. Even with the current attachments you mentioned, it wouldn’t take much for a toddler or even an adult bumping into it to cause a disaster. It’s a good idea, just needs some structural reinforcing to keep it standing.
I love this! It’s beautiful and such a cost saving idea!! I know this doesn’t have anything to do with the shelves but could you please tell me what color and type of paint you used on the doors that flank the shelves? Thank you!! 🙂
Hi, wow…I wish I would have found this when I built my TV console. One question, is it sturdy, like toddler learning to walk sturdy? 🙂 I have this idea in my head that PVC pipe and wood would produce a flimsy product, so before I get started this information would be good to know. I realize that sturdiness also comes from my own design and how well I build something, but in general it would be nice to know.
Mount it to the wall, and you shouldn’t have an issue.
My son is starting to crawl and that issue was of concert to me. The shelf is only 10″ deep. If it’s on carpet, I’d definitely mount it up to something, or put your heavy stuff down low.
Thanks for the build information. I just finished mine. Took quite a while to plan it out properly. Mine is a standing desk with each shelf sized for it’s purpose. 6ft wide, 10″ (9.25″ actually), over 6ft high.
The wood is the highest expense, without a doubt.
Hand sanding everything took a very long time as well.
It sounds wonderful, Chris! We’d love to see pictures! https://www.remodelaholic.com/share-brag-post/
I’ve been looking for industrial-style audio shelving and balking at the prices. $500+ for a few shelves and some hardware? Go sell crazy somewhere else, people!
I am totally using this approach. Can even use some pipe to organize wires! This is so perfect.
I have been eyeballing this page for awhile and finally decided to get all the supplies and take the plunge – only to be stymied from the get go. I realized it isn’t the easiest thing to figure out what length of pipe to cut for the cross joints since you need to take into account how much of the t joint is involved and how much of the regular pvc pipe “disappears” into the t joint. I realized I couldn’t do it without a test run so I did my measurements and made my best guess and then drilled holes in my first plank of wood.
Only to find that my 3/4″ PVC pipe does not fit into my 1″ paddle bit holes. I didn’t think about the fact that 3/4″ refers to the opening and the material around that might make it more than 3/4″. I don’t know if your PVC was just thinner than mine or what since clearly not an issue for you. Now I am going to get a 1 1/4 paddle bit tomorrow and hope that works.
What a great idea! We made a desk out of real pipe but i love savig even more money with pvc! Attempting to make it this weekend!! Side question… and idea what the wall and door colors are in the first picture? Love the combo!
Good Morning,
Cool page!
Have a question on the PVC shelving unit. Under step 8 where you are beginning to add the shelves to the lowest level as you are building upwards, how are you attaching or stabilizing the shelf to the pipe?
I may have missed that step (having a bald moment – LOL). But, I am trying to figure out how the shelf doesn’t slide down the pole.
Craig
Hi,
I was thinking of making an industrial monitor stand using this principle. So far, this seems to be the best guide to answer most of my questions. Anyways, I still have a couple of questions,
1. Do I really have to use a separate primer with the spray paint (the one that you used says paint+primer)?
2. Does the PVC look really close to metal pipes?
Thanks for your time,
Tyler
I SO love this idea! I’m going to an over the washer shelf, so I will really need the stabilization as you used for the ceiling. On the top and the bottom of the vertical legs, what sort of bumper/fitting did you use? Thanks much!
Re: DIY Industrial Shelf Using PVC Pipe
by Corey of Sawdust 2 Stitches
Like Jerica, i would like to know what you used for the ends of the pipes that touched the floor and the ceiling.