All Gardening Plans on Sale! Click To Shop

Remodelaholic

DIY tutorials, Woodworking plans and more.

FREE BONUS: Kitchen Organization Boot Camp
  • Home
  • About Us
    • About US
    • Contributors
    • Facebook
    • Pinterest
    • YouTube
    • Instagram
    • Disclosure and Advertising
    • Contact Us
  • Shop
  • Project Ideas
    • Our Houses
      • Birch House (current projects)
      • Canyon House
      • Park House
      • Downing House
      • Logan House
    • DIY Project Plans
    • All projects
    • Barn Door Baby Gate
    • Dutch Door
    • Framing A Wall Mounted TV
    • Indoor Playhouse
    • Beach Themed Living Room Design
    • Chicken Coop Building!
    • Computer Desk
    • Computer Desk Plans
    • Custom Newel Posts and Stair Remodel
    • Family Room Sneak Peek
    • Headboard Tutorial
    • Living Room Progress
    • Mood Boards
    • Scrabbled Family Names
    • Pets
  • Design By Room
    • Bathrooms
    • Landscape
    • Kids Bedrooms
    • Kitchen
    • Living Rooms
    • Laundry Rooms
    • Master Bedrooms
    • Mood Boards
    • Office
  • Holiday
    • Christmas
    • Halloween
    • Patriotic
    • Easter
    • Fall
    • Saint Patrick’s Day
    • Thanksgiving
    • Spring
    • Valentines Day
    • Winter
  • Crafts
    • Printable
    • Art
    • Paper Crafts
    • Kids
    • Fabric Crafts
    • Decorate
  • Recipes
    • Appetizers
    • Beef
    • Beverages
    • Breakfast
    • Chicken
    • Desserts
    • Dinner
    • Fruit
    • Healthy
    • Holiday
    • Lunch
    • Main Dishes
    • Salads
    • Sandwiches
    • Sauces
    • Seafood
    • Side Dishes
    • Soup
    • Vegetables
  • Videos

DIY Leather Director’s Bench Building Plans

Written by Elisha Albretsen

  • Facebook
  • Twitter
 
How to make a leather director's bench
 
Hi everyone, I’m Elisha from Pneumatic Addict and I’m back to share another set of building plans with you! 
 
I’ve always believed an entry way need a bench. Somewhere to sit and take your shoes off when you get home, or for guests to set their purses. I several weeks ago I built an Easy DIY Industrial Bench and proudly placed it in my entryway. It didn’t take long for my boys to discover the rolling casters and turn the bench into a battering ram. The industrial bench was quickly moved to my bedroom and I started working on a second idea. 
 
I fell in love with the Director’s Bench from CB2, but there was absolutely no way I wad going to pay $450 plus shipping for a piece of occasional furniture. I dug out some leftover maple from my Floating Console Table, and sketched up some plans. 
 How to make a leather director's bench
 
 
My boards were slightly thinner than typical 2 x 2’s, but you will get an almost identical look with off the shelf lumber. 
 

How to Build a Leather Director’s Bench
by Elisha from Pneumatic Addict  

Click Here to Get a Free Printable Version of This Building Plan

Materials List:

  • (4) 2 x 2 boards (hardwood or “select pine”)
  • (1) 54″ x 27″ – piece of leather or upholstery weight “faux leather”
  • (9) yards of 1-1/2″ wide – woven cotton webbing (found in the trim section of the fabric store)
  • (4) 3″ wood screws
  • (8) 2″ wood screws
  • wood glue
  • 1/2″ heavy duty staples
  • 3/32″ drill bit
  • 3/8″ forstner bit
  • 3/8″ flat top wood plugs
  • miter saw or circular saw
  • cordless drill
  • face clamps
  • heavy duty staple gun


Cut list:

  • (2) 2 x 2 @ 42″
  • (1) 2 x 2 @ 35-3/4″
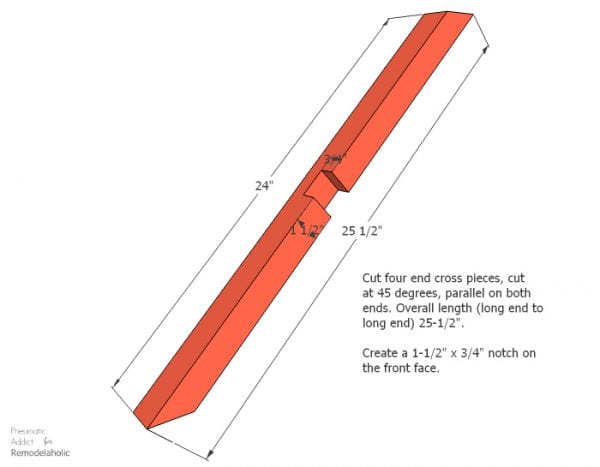
  • (4) 2 x 2 cut at 45 degrees (parallel) on both ends @ 25-1/2″ (long end to long end)
  • (1) piece of leather or “faux leather” @ approx. 42″ x 26″
  • (12) pieces of woven cotton webbing @ approx. 26″


Step 1

The wood frame is very simple to build with the exception of one pair of half lap joints. Start by cutting four cross pieces at 25-1/2″ in length, square on both ends. Measure 12″ from each end, giving you a 1-1/2″ section in the middle. Measure half the depth of your board and mark the sides. You can remove the middle section a number of ways. I used a table saw, making several passes, but you could use a router or even a sharp chisel. 


 Pneumatic-Addict-director-bench-end-pieces-WM
 
Once the half lap notches are cut, miter the ends of the cross pieces parallel directions, like the diagram above. 
 

Step 2

Apply glue to all three sides of the notches, and join two end pieces together. Repeat with the remaining two cross pieces, creating two X’s. 

Pneumatic-Addict-director-bench-end-cross-WM

 
Clamp the boards tightly together and allow the glue to dry fully. 
 
Pneumatic-Addict-clamping-half-lap-joint-bench


Step 3

Once the end pieces are dry, you can connect them together with the 35-3/4″ long center rail. Pre-drill two 3/32″ holes through the center of each X, and into the end of the center rail. Use a 3/8″ forstner bit to counter-sink the holes 3/8″ deep. Apply glue to the joints and connect the end pieces to the center rail using 3″, #8 wood screws. 

 
Pneumatic-Addict-director-bench-center-rail-WM 
 
Apply a small amount of glue in the screw holes and tap a wood plug in each hole. Once the glue is dry, use a flush cut hand saw to cut off any of the plug sticking up past the surface, or use an electric sander to smooth it down. 
 
tapping-hammer-wood-plugs-bench


Step 4

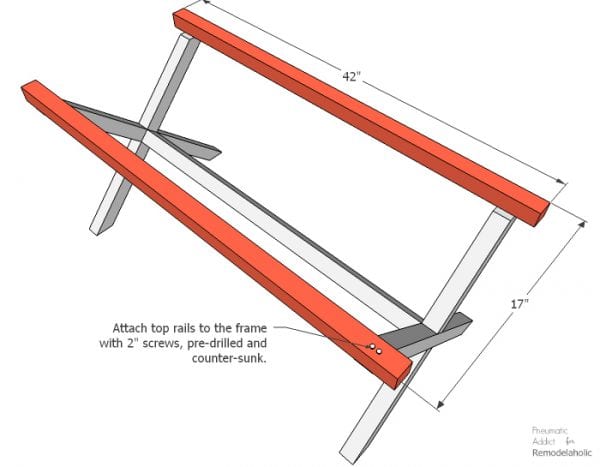
Center a 42″ top rail on each side of the frame, creating a 2″ overhang on each end. Pre-drill two holes through the rails and into each arm. Apply glue and secure with 2″ #8 wood screws. 

 
Pneumatic-Addict-director-bench-top-rails-WM
 
If you want to stain or paint the frame, you would do so at this point. 
 

Step 5

Once the glue is fully dry, the frame is complete and its time to wrap the seat. The leather itself isn’t strong enough to hold much weight. Creating a sub-layer of cotton webbing will give the seat support. Wrap a length of webbing around the frame and staple to inside face of one top rail. Flip the webbing around the opposite rail and pull tightly as possible (an extra pair of hands comes in really handy at this point) and secure to the inside face. Space each strip of webbing 2-3/16″ apart, across the length of the top rails. 


woven-cotton-webbing-diy-modern-bench 
 
With the webbing in place, drape the leather over the top of the bench.
 
 Pneumatic-Addict-director-bench-leather-WM
 
Pull it tightly around the top rails, and staple to the inside face. Use a sharp pair of scissors to cut notches in the leather around the legs. 
 
 
staples-wood-leather-modern-bench
 
That’s it! Move the bench in place and you’re ready to sit. 
 
Pneumatic-Addict-how-to-build-modern-leather-bench-WM 
 

I love the look of the raw maple and the wood plugs.

Pneumatic-Addict-how-to-building-plans-wood-frame-leather-bench-WM


Before wrapping the”faux leather” around the frame, I added some decorative stitching. It makes the top look more finished, and actually gives the material added strength against stretching.

Pneumatic-Addict-diy-wood-and-leather-directors-chair-WM


I’m digging the minimal look of my director’s bench in the entryway, but its so light and easy to pick up, I could easily move it anywhere in the house.

How to make a leather director's bench


Pin the image below and save the idea for later!

Follow this step-by-step building tutorial to make a chic leather director's bench, perfect for an entryway or extra seating. Building plan by Pneumatic Addict on Remodelaholic.com

More DIY benches to build:

wood chevron bench

How To Build A Chevron Bench With Box Frame @Remodelaholic Cro

outdoor wood and concrete bench

diy-modern-concrete-and-redwood-bench-building-plans-remodelaholic

corner bench

building tutorial for a corner bench with built-in table, perfect for a porch, Pinspiration Mommy on @Remodelaholic

rustic X bench and dining table

Free building plans! Build this rustic X dining table and farmhouse style bench this weekend. @Remodelaholic


tufted bench

How to make this DIY tufted bench from scratch - HomeMadebyCarmona for Remodelaholic


  • Facebook
  • Twitter
Remodelaholic is a participant in the Amazon Services LLC Associates Program, an affiliate advertising program designed to provide a means for sites to earn advertising fees by advertising and linking to amazon.com. Please see our full disclosure here.

Published: October 21, 2016Filed Under: Contributor, DIY, DIY Project Plans, Furniture Building Projects and Plans, How To, Seating, Sketches/Renderings Tagged: Bench, building plans, seating

About Elisha Albretsen


free email bonus

Kitchen Organization Boot Camp

Is your kitchen a zen paradise? It can be. I'll show you how.

Previous Post
Friday Favorites: Beautiful Backsplashes and Smart Boot Storage
Next Post
Get This Look: Contemporary Farmhouse Living Room | The Fixer Upper “Chicken House”

Leave a Reply Cancel reply

We love hearing from fellow Remodelaholics, so let us know what you like about this and leave any questions below in the comments. If you have followed a tutorial or been inspired by something you have seen here, we would love to see pictures! Submit pictures here or by messaging us over on Facebook.
Recipe Rating


Hey there, I am Cassity! Nice to virtually meet you!

This blog is about DIY at its finest. We are obsessed with it and so are you, so while we're working and have nothing to show you of our own projects we show off yours. So submit your projects! More About Us…

Categories

  • Facebook
  • Instagram
  • Pinterest
  • RSS
  • Twitter
  • YouTube

Meet The Team

Privacy Policy

Remodelaholic is a participant in the Amazon Services LLC Associates Program, an affiliate advertising program designed to provide a means for sites to earn advertising fees by advertising and linking to amazon.com. Please see our full disclosure here.

© 2005-2016 Remodelaholic LLC, All Rights Reserved

  • Facebook
  • Instagram
  • Pinterest
  • RSS
  • Twitter
  • YouTube

Copyright © 2021 · Remodelaholic

  • Pinterest
  • Facebook
  • Twitter