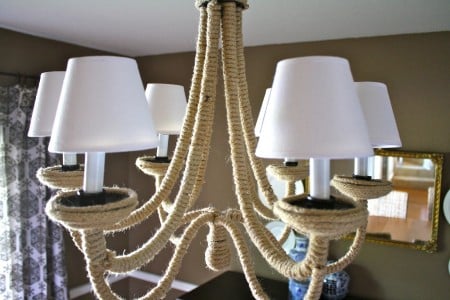
Designer lighting is so lovely to drool over, but the prices are enough to make your heart stop! So it’s a match made in heaven when you find a piece that you love that is totally DIY-able! Just see how our guest today saved a whole lotta cash by creating a knockoff of the gorgeous crystal orb chandelier from Restoration Hardware:
Starting with a thrift store chandelier saved Teryn some money, but you can even start with a purchased one (like these under $100) and end up with a look you love at a price you can afford! If Restoration Hardware isn’t your style, try one of these other lovely DIY chandeliers (and read below for instructions on making your own RH chandelier).
How to Make a Crystal Orb Chandelier Like Restoration Hardware’s
by Teryn from Vintage Romance Style
H,i I’m Teryn from
Vintage Romance Style. DIY + women’s lifestyle to help you live your happiest life. My saying is always “Your home doesn’t have to be expensive to make you happy.” Also your home doesn’t have to be a carbon copy of anything you see. Whether it be magazines, stores or even other blogs. Be unique and decorate like YOU love it! Grab a cup of coffee or a cherry coke and hop on over to my
blog to find even more home decor inspiration on a budget, recipes, crafts and beauty!
Today I am beyond excited to share my first ever Restoration Hardware knockoff!
I love everything Restoration Hardware but not their prices.
I was looking at their amazing website when I came across this.
I knew their had to be a way to DIY on a budget!
So I started researching and slept on it for a few nights to figure out the easy as pie way to do it.
Let me tell you, it was pretty simple and once you figure it out, it only took me about an hour!
I’ve seen other complex tutorials but this one is not!
Here is what you need:
This post contains some affiliate links for your convenience. Click here to read our full disclosure policy.
1. A flea market or thrift store chandelier. Mine is vintage from a flea market a few years ago.
3. Big pliers to cut the very thick wire.
I used Kobalt 9 inch Linesman Pliers from Lowes (you can also find them on
Amazon). They are HIGH leverage pliers. $13
4. Spray paint that matches your chandelier.
I used Valspar metallic gold from Lowes. $5
Here’s how I did it…
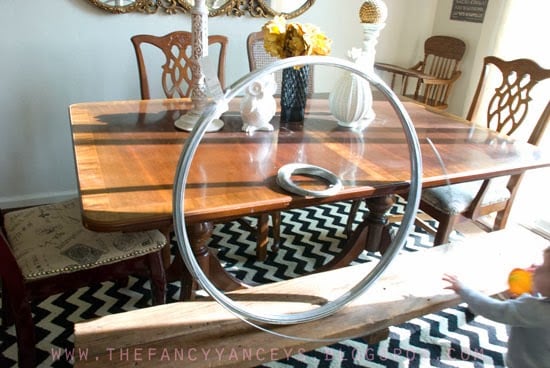
1. I stood on a chair and took the wire and put a circle of it around top to bottom to see how big you want your circle. Clip the wire 2 inches longer than what you need and safely get off the chair.
you will have what look like this wire circle.
This first circle will be your template for all the others.
I HAVE 8 ARMS ON MY CHANDELIER SO I CUT 4 CIRCLE FOR THE BASE OF THE BALL. Then I cut 3 more to make it more orb like.
So for an 8 armed chandelier use 7 wire circles.
Hold the end of the wire and bend it down. Do this to both sides of the circle.
Once the first circle is made, make 6 more circles using the 1st one as a template.
Once your circles are done take them outside to spray paint.
Spray paint one side and let it dry then flip them over and spray paint the other side. Let the 2nd side dry and then you are ready to put them on your chandelier!
You will put the first 4 on to make the foundation. Pick one arm of the chandelier and make the circle line up with the direct opposite arm until all 8 arms are taken up by 4 wire circles. Hook each of the 4 circles to the top.
*1-4 wire will be vertical circles. I was so excited I forgot to snap a picture of the first 4.
5-7 will be hooked on eachother.
#5 is horizontal and 6&7 cris cross eachother.
The reason why these hold on is because it is a tight squeeze and they hook onto each other holding everything tight.
Once you have all 7 on your can tweak the spacing and make sure everything is holding nice and tight and you are done!
COST BREAK DOWN:
Valspar spray paint- $5
High tensile wire- $20
High leverage wire cutters- $13
Chandelier- It depends if you already have one, buy it brand new or from a thrift store/flea market
ADDITIONAL INFORMATION:
Wall color- Valspar CREAM IN MY COFFEE
Typography wall art- you can check out my tutorial HERE
Mirror- from a local thrift store
Cream curtains- luxury table cloths from Homegoods
See what else I created with those curtains/table cloths HERE !
————————————–
LOVE the look, Teryn! Thanks for sharing!!
Remodelaholics, be sure to check out Vintage Romance Style for more lovely budget-friendly DIYs, like dyed dropcloth curtains or a pink cuckoo clock!
Lorene has been behind the scenes here at Remodelaholic for more than a decade! She believes that planning projects and actually completing them are two different hobbies, but that doesn't stop her from planning at least a dozen projects at any given time. She spends her free time creating memories with her husband and 5 kids, traveling as far as she can afford, and partaking of books in any form available.
Related


Genius! Looks so pretty!
Like your copy much better than the original!
What kind of wire that you use To make the outside part of the chandelier? thanks